Resistance Welder MULTISPOT MI-100
Operation
41
6.5.7 Welding-on T-pins
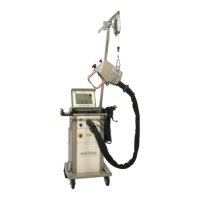
For example T-pins used for fixing trim strips, can be welded on using contact pieces TST 3 (1) and
TST 5 (7). Incorporated in the tip of the contact piece is a magnet which holds the T-pin during the
welding process.
Welding procedure:
1. Grind welding area to a bright metal
finish.
2. Select appropriate contact piece and
insert until limit stop into welding gun.
3. Select "T-pin" mode and sheet thickness
on display.
4. Insert head of T-pin into tip of contact
piece.
5. Select welding position and press-on
welding gun.
6. Press and keep hold of release button of
gun until end of welding program.
Fig. 49: Contact piece
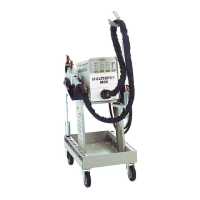
3 5 6 4
Fig. 50: Fitting piece
1 Contact piece TST 3 Art.-Nr. 407 227
2 T-pin 3 x 4,5 Art.-Nr. 408 597
3 Fitting piece Golf 2 Art.-Nr. 313 451 Special accessory!
4 Fitting piece Passat B 3 Art.-Nr. 315 671 Special accessory!
5 Fitting piece Porsche Art.-Nr. 314 465 Special accessory!
6 Fitting piece Golf 3 / Vento Art.-Nr. 317 962 Special accessory!
7 Contact piece TST 5 Art.-Nr. 408 540 Special accessory!
8 T-pin 5 x 10 Art.-Nr. 408 571 Special accessory!
NOTE!
T-pins of Ø 5 x 10 (8) can be welded on using contact piece TST5 (7).
Select "stud welding" and sheet thickness on display.
Fine-adjust, if necessary.
Otherwise, proceed as described above.
NOTE!
Special fittings are available for welding works on roof areas of the vehicle types Golf 2, Golf 3,
Vento, Porsche 944 and Passat B3. These fittings permit accurate welding on of the T-pins exactly
at the points specified by the vehicle manufacturers.
For item numbers please see accessories list!