5
Reference Manual
00809-0200-4410, Rev BC
Initial Connection
July 2017
Initial Connection
2.3.2 Connections and power
Physically connect the PC/laptop to the Gateway with an Ethernet cable by connecting one end to the
Ethernet port on the back of the PC/laptop. Connect the other end to the Ethernet 1 port on the
Gateway. “Configure the Gateway” on page 6 shows the standard terminal block diagram. Once the
Gateway and PC/laptop are connected, wire a 24 VDC (nominal) power supply with a capacity of at least
250 mA to the Gateway power input terminals.
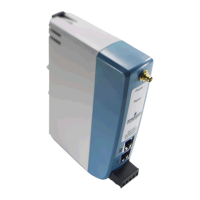
Figure 2-1. Wireless Gateway Housing Diagram
Table 2-1. Default IP Addresses
Gateway PC/laptop Subnet
Ethernet 1 192.168.1.10 192.168.1.12 255.255.255.0
Ethernet 2 192.168.2.10 192.168.2.12 255.255.255.0
A. DIN rail clip
B. SMA connector
C. Power and Reset indicator lights. During normal operation
the power indicator will be green. During a reset the reset
light will turn red. The reset switch should not be enabled
during normal operation.
D. Ethernet port 2. This secondary port must be enabled
when ordering to access the device. When this port is
activated, the factory IP address is 192.168.2.10.
See Table 2-1.
E. Ethernet port 1. Use for standard
communication to the webserver or other
protocols enabled on the gateway. The factory
IP address is 192.168.1.10. See Table 2-1.
F. Five screw terminal block.
G. 24 VDC (nominal) power input
H. Serial Modbus
®
+
-AB
GH
S
Power
Reset
A
B
C
D
E
F

 Loading...