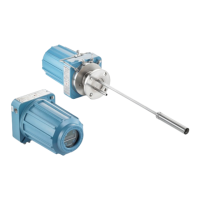
hardware to be properly installed external to the transmitter. A Rosemount
OCX8800 shipped from the factory must be configured before blowback can be
implemented. This same process must be performed any time a replacement card
stack is installed.
3.6.1 Configure blowback with the Field Communicator -
HART
®
Procedure
1. Use the Field Communicator or AMS software to access the HART menu.
2. From the DETAILED SETUP menu, select INPUT/OUTPUT.
3. From the INPUT/OUTPUT menu, select BLOWBACK.
4. From the BLOWBACK menu, select BlBk Enabled. Select Yes to enable
blowback. Also set the following parameters:
• BlBk Intrvl: Length of time between blowback events (60 minutes
recommended).
• BlBk Period: Length of time blowback is activated (five seconds
recommended).
• BlBk Purge Time: Length of time after blowback is complete before
oxygen / combustibles readings are considered valid (set as required by
the application).
5. Manually initiate blowback from DIAG/SERVICE.
3.6.2
Configure blowback with the Field Communicator -
FOUNDATION
™
Fieldbus
Procedure
1. Use the Field Communicator or AMS software to access the Fieldbus menu.
2. From the TRANSDUCER block menu, select Alarm Relay/Blowback.
3. From the Alarm Relay/Blowback menu, select Blowback.
4. From the Blowback menu, select Blowback Enabled. Also set the following
parameters:
• Blowback Interval: Length of time between blowback events (60 minutes
recommended).
• Blowback Period: Length of time blowback is activated (FIVE seconds
recommended).
• Blowback Purge Time: Length of time after blowback is complete before
oxygen/combustibles readings are considered valid (set as required by
the application).
• Initiate Blowback: Intiates a blowback event manually.
Configuration and start-up Manual
December 2022 00809-0500-4880
60 Emerson.com/Rosemount