24
4 Press or to choose one of the options:
● P.I.M./Exif: This information helps ensure an
accurate image reproduction for files that
include P.I.M. or Exif Print data.
● Enhance: This setting improves your photos’
colors and increases contrast and sharpness.
It may correct images that are too dark, too
bright, or backlit.
● None: Prints photos as is or bypasses P.I.M. or
Exif Print data. Select this setting for the
fastest printing.
Note: The setting you select will remain in effect and
apply to all photos when you use the current photo
selection option (Print Some, Print All, and so on).
5 Press the OK button, then press OK again to exit
Fix Photo.
6 If you don’t need to change any other settings,
press OK to exit the menu.
7 Press the Print button. You see the Print
Confirmation.
8 Make sure you have enough paper loaded, then
press Print again to start printing.
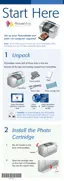
Manually Fixing Your Photos
Manual corrections apply only to individual photos.
You can select different settings for each photo in a
print job.
1 After selecting the photo and number of copies
you want, press the Menu button.
2 Press or to highlight Fix Photo, then press .
3 Select Brightness, Saturation, or Sharpness, then
press . You see your photo next to the menu:
4 Press or to increase or decrease the setting.
You can see the changes on your photo.
5 When the photo looks good, press OK.
 Loading...