QX5
QXFXO4/QXISDN4/QXE1T1/QXFXS24; (SW Version 6.0.x) 25
QXFXO4/QXISDN4/QXE1T1/QXFXS24 Manual II: Administrator’s Guide
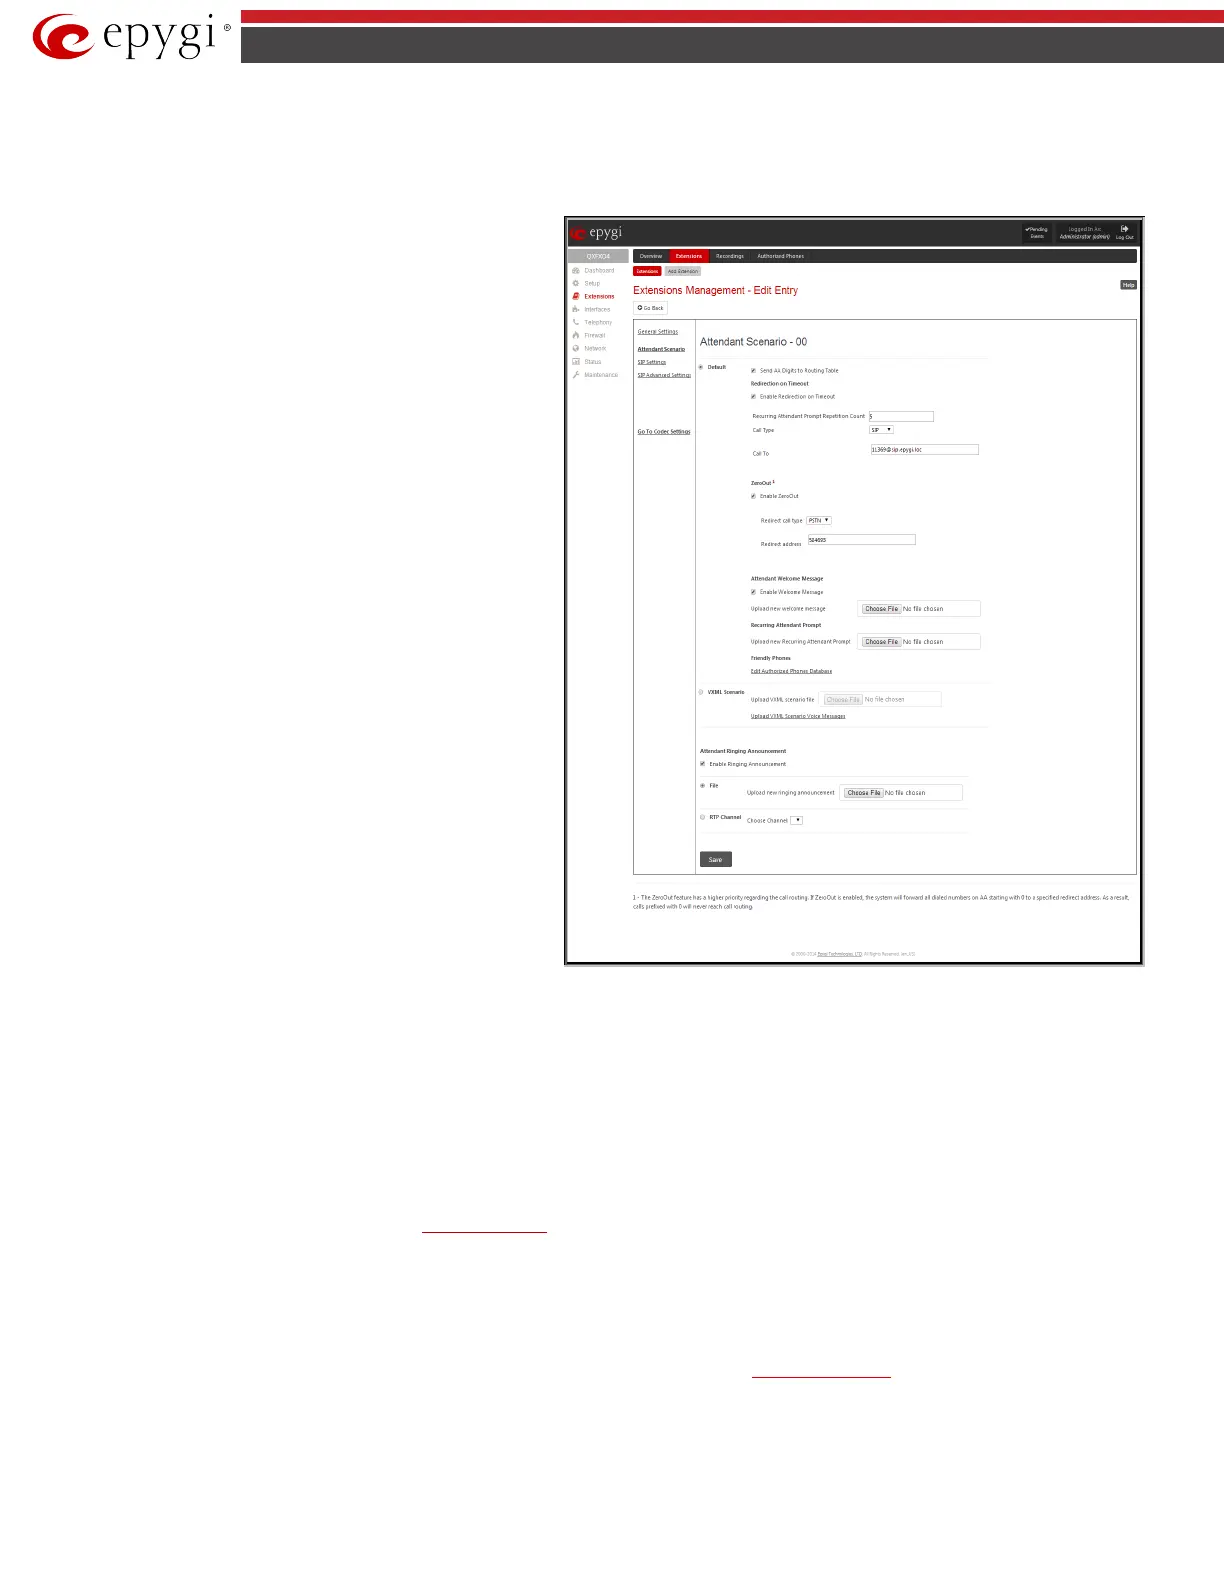
2. Attendant Scenario
This group is used to select between default and custom attendant functionality scenarios.
The Default manipulation radio button selection enables the following components:
•
Send AA Digits to Routing Table
selection switches the Auto Attendant to the routing
mode. Any inserted digits on the Auto Attendant prompt
will be parsed through the Routing Table on the QX.
• Redirection on Timeout - this group allows automatic
call redirection in case no action has been performed by
the caller. The group offers the following options:
Enable Redirection on Timeout checkbox is used to
enable/disable the automatic call redirection.
Recurring Attendant Prompt Repetition Count text
field indicates the number of Recurring Attendant
Prompts to be consecutively played to the caller with no
action from his/her side. When the Recurring Attendant
Prompt is played the number of times indicated in this
text field, the call will be automatically redirected to the
defined destination.
Call Type drop down list includes possible incoming call
types (PBX, PSTN, SIP or Auto). PBX selection means
that the call will be redirected to the local extension. SIP
selection means that the call will be redirected to the SIP
destination correspondingly. PSTN selection means that
the call will be redirected to the PSTN destination. Auto
selection is used for undefined call types: destination
(independent on whether it is a PBX number, SIP
address or PSTN number) will be reached through
Routing.
Call To text field requires the destination number dialed
in the format depending on the selected Call Type. The
wildcard is supported in this field.
• ZeroOut – this group is used to configure call
redirection service on the Auto Attendant. When a caller
reaches the Auto Attendant, he may want to accelerate
the automatic redirection feature instead of using Auto
Attendant features. To activate ZeroOut, caller should
dial
digit during the Auto Attendant welcome
message. The caller will then be automatically
transferred to the destination specified in this page.
Fig.II- 26: Extensions Management - Edit Entry – Attendant Scenario page
Enable ZeroOut checkbox selection enables the ZeroOut feature and activates the following fields to be inserted:
Redirect Call Type drop down list includes the available call types:
o PBX - local calls between QX extensions and the Auto Attendant
o SIP – calls through a SIP server
o PSTN – calls to PSTN
o Auto – used for undefined call types. Destination (independent on whether it is a PBX number, SIP address or PSTN number) will be
reached through Routing.
The Redirect Address text field requires the destination address where the caller should be automatically forwarded to if activating the
ZeroOut feature.
Attention: The routing patterns in the
Call Routing Table starting with digit “0” will not work for incoming calls to attendant if both the ZeroOut
and Send AA Digits to Routing Table options are enabled. The ZeroOut feature has a higher priority. If it is enabled and used, the system will
forward all incoming calls to attendant to the specified redirect address. As a result, calls prefixed with 0 will never reach call routing.
• Attendant Welcome Message - this group allows updating the active Auto Attendant welcome message (played only once when entering Auto
Attendant), downloading it to the PC, or restoring the default one. The group offers the following components:
Enable Welcome Message checkbox is used to enable/disable the Auto Attendant welcome message (the default one or the custom one
uploaded from this page or recorded from the handset being played when callers enter
QX’s Auto Attendant.
Upload new welcome message indicates the file name used to upload a new welcome message. The uploaded file needs to be in PCMU (CCITT
u-law, 8 kHz, 8 bit Mono) wave format, otherwise the system will prevent uploading it and the “Invalid audio file, or format is not supported”
warning message will appear. The system also prevents uploading if there is not enough memory available for the corresponding extension and
the “You do not have enough space” warning message will appear.

 Loading...

