37
USER PARAMETERS
Chapter 12
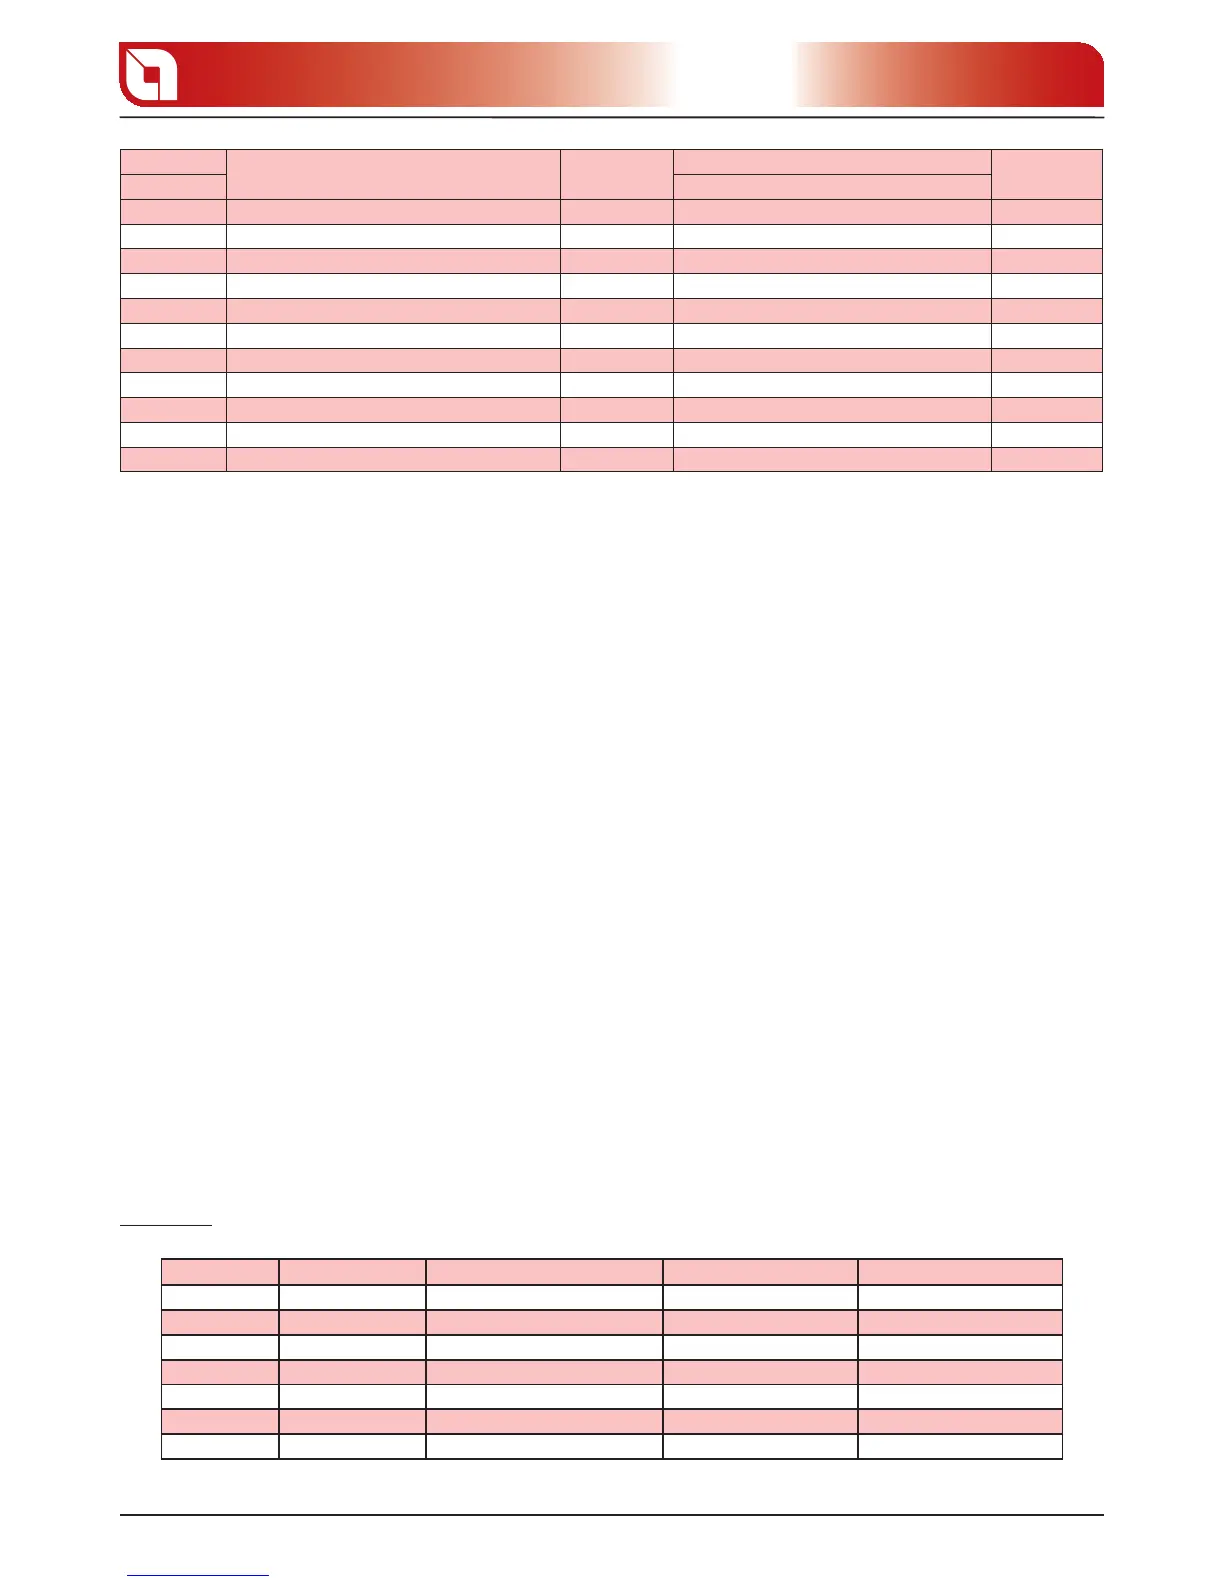
Parameter
Function
Adjustment
buttons
Display D1
Button to
con rm
Display D2 Indication
0 Enable/disenable weekly programmer 2 o 3 ON/OFF 5
1 Time of 1st switch-on 2 o 3 OFF or from 00:00 to 23:50 5
2 Time of 1st switch-o 2 o 3 OFF or from 00:00 to 23:50 5
3 Consents 1st switch-on/off for the various days 2 o 3 ON/OFF 1, ON/OFF 2, … ON/OFF 7 5
4 Installer parameter 2 o 3 00 5
5 Time of 2nd switch-on 2 o 3 OFF or from 00:00 to 23:50 5
6 Time of 2nd switch-o 2 o 3 OFF or from 00:00 to 23:50 5
7 Consents 2nd switch-on/off for the various days 2 o 3 ON/OFF 1, ON/OFF 2, … ON/OFF 7 5
8 Time of 3rd switch-on 2 o 3 OFF or from 00:00 to 23:50 5
9 Time of 3rd switch-o 2 o 3 OFF or from 00:00 to 23:50 5
A Consents 3rd switch-on/off for the various days 2 o 3 ON/OFF 1, ON/OFF 2, … ON/OFF 7 1
For example, let’s suppose we want to use the weekly programmer function with the three heating periods
as follows:
1st period: from 8.00 to 12.00 every day of the week except Saturday and Sunday
2nd period: from 15.00 to 22.00 only Saturday and Sunday
3rd period: not used
We can now proceed to setting the weekly programmer.
Parameter 0 (D2 = 0 (blinking) , D1 = ON )
Use button 2 or 3 to activate the weekly programmer, setting the value to ON.
Parameter 1 (D2 = 1 (blinking), D1 =Ex. “08.00”)
Press button 2 or 3 to set “8.00”, which corresponds to the switch-on time of the 1st period. Press button 5
to con rm and go to the next parameter.
Press button 4 to go back to the previous one.
Parameter 2 (D2 = 2 (blinking), D1 =Ex. “12.00” )
Press button 2 or 3 to set “12.00”, which corresponds to the switch-o time of the 1st period. Press button
5 to con rm and go to the next parameter.
Press button 4 to go back to the previous one.
Parameter 3 (D2 = 3 (blinking), D1 = “OFF 1” )
Enable the rst period for every day of the week except Saturday and Sunday, using buttons 2 and 3 as
follows:
a. button 3 – to scroll the days
b. button 2 – to enable/disenable (ON/OFF) the rst period for that day
Example:
Day Initial data Function of button 2 Final data Function of button 3
MONDAY OFF 1 OFF 1 ON 1 and vice versa ON 1(enable period) Go to following day
TUESDAY OFF 2 OFF 2 ON 2 and vice versa ON 2(enable period) Go to following day
WEDNESDAY OFF 3 OFF 3 ON 3 and vice versa ON 3(enable period) Go to following day
THURSDAY OFF 4 OFF 4 ON 4 and vice versa ON 4(enable period) Go to following day
FRIDAY OFF 5 OFF 5 ON 5 and vice versa ON 5(enable period) Go to following day
SATURDAY OFF 6 OFF 6 ON 6 and vice versa OFF 6(disable period) Go to following day
SUNDAY OFF 7 OFF 7 ON 7 and vice versa OFF 7(disable period) Go to following day