DXP HD 4K PLUS Series • Installation 8
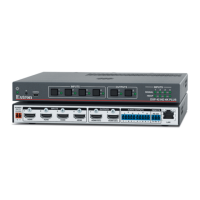
DXP 42 Rear Panel
LAN
POWER
12V
1.5A MAX
INPUTS
1
HDMI
2
HDMI
3
HDMI
4
HDMI
OUTPUTS
1
HDMI/CEC
2
HDMI/CEC
AUDIO OUTPUTS
L
3
R L
4
R
Tx
RS-232
Rx G
REMOTE
D
D
G
G
B
B
A
A
E
E
D
DF
F
A
Input connectors
E
Remote RS-232 port
G
Analog audio outputs
B
Output connectors
F
LAN port
I
Power connector
Figure 4. DXP 42 HD 4K Rear Panel
Rear Panel Features
A
Input connectors — Connect HDMI source devices (or DVI sources with the
appropriate adapters) to these female 19-pin type A HDMI input connectors (see
figure3,
A
, on the previous page, or figure 4,
A
).
LockIt cable lacing brackets, one for each HDMI input and output connector, are
provided with the DXP. These brackets can be used to secure the HDMI cables to the
DXP connectors to reduce stress on the HDMI connectors and prevent signal loss due
to loose cable connections.
For information on attaching the LockIt brackets, see Securing the HDMI Connectors
Using the LockIt HDMI Cable Lacing Bracket on page13.
B
Output connectors — Connect HDMI output devices (or DVI devices with the
appropriate adapters) to these female 19-pin type A HDMI output connectors for
buffered video output (see Securing the HDMI Connectors Using the LockIt HDMI
Cable Lacing Bracket).
C
Reset LED — (DXP 44, 84, and 88 only) This green LED remains lit while the DXP has
power. While the Reset button (
D
) is being pressed and held, this LED blinks every 3
seconds to indicate the level of reset that is initiated if the button is released at that point
(see Resetting on page32 for more information).
NOTE: The factory configured passwords for all accounts on this device have been
set to the device serial number.
Performing a unit factory reset (entering an E ZQQQ } SIS command or
a reset mode 5 via the rear panel Reset button) removes the serial number
passwords, leaving the unit with no password.
D
Reset button — (DXP 44, 84, and 88 only) This recessed button initiates four levels
(modes) of reset on the DXP switcher. To initiate the different reset levels, use a pointed
object such as a small Philips screwdriver or a stylus to press and hold the button while
the switcher is running or while it is being powered up (see Resetting).
E
Remote RS-232 port — Connect a host device, such as a computer or touchpanel
control, to the switcher via this 3-pole 3.5 mm captive screw connector for serial
RS-232 control (see Connecting to the Remote RS-232 Port on page12 for more
information).
Connect the 9-pin connector end of the RS-232 cable to the serial port of your
computer or control system.
4