Fält Communications 2016 ©
162187 Manual Fältcom ECII® Flex V024D 2016-02-23 Page 16 of 41
From keypad:
< Telephone number (max 20 digits) >
From phone:
001 < Telephone number (max 20 digits) > #
3. Enter Alarm Code for Receiver 1:
From keypad:
< Alarm Code 1 (max 10 digits) >
From phone: 091 < Alarm Code 1 (max 10 digits) > #
4. Enter phone number for Alarm Receiver 2:
From keypad:
< Telephone number (max 20 digits) >
From phone: 002 < Telephone number (max 20 digits) > #
5. Enter Alarm Code for Receiver 2:
From keypad:
< Alarm code 2 (max 10 digits) >
From phone:
092 < Alarm Code 2 (max 10 digits) > #
For alarm receivers 3 to 6, use the keys:
From keypad:
instead of
under item 4
above.
From phone:
< 003- 006 > < telephone number > #
Note: Do not forget to test the setting by sending a test receiver alarm.
If a telephone number is missing, an error tone will be heard in the loudspeaker when
an alarm is activated and the LED’s on the front will flash alternately three times.
6.7 Prefix in a PABX switch board
If the lift phone is connected to a PABX that requires a prefix to get an external extension;
program a star,
, after the prefix. E.g. if the prefix is 0 then program:
From keypad:
< Telephone number >
From phone:
001 0 < Telephone number > #
Each will give a 2 second pause; for longer pause use several .
6.8 Alarm input setting
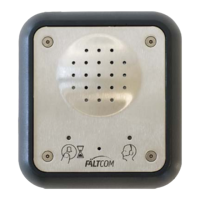
All three alarm inputs of the Fältcom ECII® Flex can be configured. Alarm input 1 is designed
for the alarm button in the car and can be configured to normally open or normally closed.
Alarm input 2 and 3 (serial interface labeled “AUX”) can be configured for normally
open/closed push button and also if the alarm shall be defined as an emergency alarm, tech-
nical alarm or if the input signal shall be defined as a filtering signal for alarm input 1.
Examples of technical alarms are sum alarms from the lift controller or sensors from the lift
car doors and more.