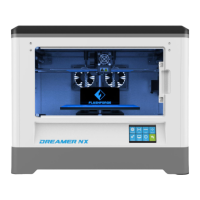
Dreamer NX User Guide | www.flashforge.com
purposes. Changing the value in the boxes will not affect anything.
f. Center X/Y/Z button: Extruder and build platform will back to the zero (0, 0,
g. X/Y Speed and Z Speed: Set the move speed of extruder/ build platform.
● Limit Switch: In order to protect your Dreamer NX, three limit switches are
equipped to control the maximum position, and the three limit switches
corresponding to X/Y/Z axis limit switch. It has two statuses:
a. Not Triggered: If the extruder/build plate don’t move to its maximum, X/Y/Z
axis limit switch is not triggered, and shows “Not Triggered”.
b. Triggered: If the extruder/build plate moves to its maximum, X/Y/Z axis limit
switch is triggered, and shows “Triggered”.
● Stepper Motor Controls: Allows users to control to stepper motor. Click
[Enable], and lock the motor so it does not allow any movement; click
[Disable], and unlock the motor to be controlled manually.
● LED Color: Allows users to change the LED color of Dreamer NX.
● Extruder Controls: You can set the value of “Motor Speed (RPM)”, which
can control the rotation speed of filament feeding wheel. The motor rotation
time can be controlled via setting the value of “Extruder Duration”. Generally
we suggest the users choose option of continuous time 60 seconds. The
filament must be loaded in the extruder before motor starts. Therefore, do not
start rotation operation until the extruder temperature reach the printing
temperature of filament. For PLA filament, the extruder temperature should
reach 220℃, after reaching the extruder temperature, click the
[Forward]/[Reverse] rotation button to control filament load and filament
unload. Furthermore, if you want to stop filament load and unload, you can