22
TS52PRO Test Set
Users Guide
3
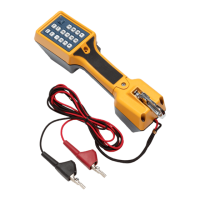
Loosen the two screws that hold the line cord to
the PC board (Figure 6).
4
Using needle nose pliers or one of the line cord
clips, remove the two screws and washers from the
line cord connectors.
5
Using needle nose pliers, remove the plastic clip
(Figure 7) that holds the line cord strain relief in
place.
6
Slip the line cord screw lugs (Figure 8) out through
the hole in the end of the housing.
bfp06.eps
Figure 6. Removal/Installation of Line
Cord Screws
bfp07.eps
Figure 7. Removal/Installation of Plastic Clip
Installing a New Line Cord
To install a new line cord:
1
From the outside of the housing, slide the screw
lugs of a new line cord through the hole in the
end of the test set housing. Make sure the crimp
barrel offset side of the screw lugs is up (Figure 9)
and that the line cord screw lugs are flush against
the circuit board.
Note
Do not over tighten screws. Over tightening will
strip the plastic.
2
Fasten the red wire lug to the PC board (Ring) with
screw and washer (Figure 8).
3
Fasten the black wire lug to the PC board (Tip)
with screw and washer (Figure 8).
9 VOLT