After a short while, pairing sequence should be finished with success. User will be informed about
successful pairing by on screen communicate Pairing done.
In case of failure, MotoMonitor will display warning:
Pairing failed– try again
In such case, user should start the pairing sequence once again.
16.1.6 Radio channel
MotoMonitor software allows multiple sets (transmitter + receiver) connecting to each other, at the same
time and in the same area. However, in case of reaching the area with high level of signal disturbances
(transmitter - receiver connection breaks very often), user can change working radio frequency.
Use following buttons to amend the frequency:
+1 (top left) – increase channel by 1,
-1 (bottom left) – decrease channel by 1,
Save (top right) – save settings,
Back (bottom right) – exit without saving,
IMPORTANT NOTE !
After changing the receiver's channel - it is required to reconnect (pair) receiver with transmitter once
again.
It is recommended to use different channels, when there are many devices working in the same area.
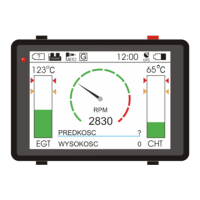
16.1.7 Color scheme
To personalize MotoMonitor, manufacturer allows pilot to change the interface layout.
To change the color scheme, use buttons:
Previous (top left) – go to next color scheme,
Next (bottom left) – go to previous color scheme,
Save (top right) – save selected scheme,
Back (bottom right) – exit without saving,
16.1.8 Erase memory
To revert the device to default settings, it is possible to format MotoMonitor memory.
User should enter Erase memory setting and press button:
Yes (top left) – and then accept the choice by pressing
Save (top right).
FLYelectronics All Rights Reserved Page 21