15
EN
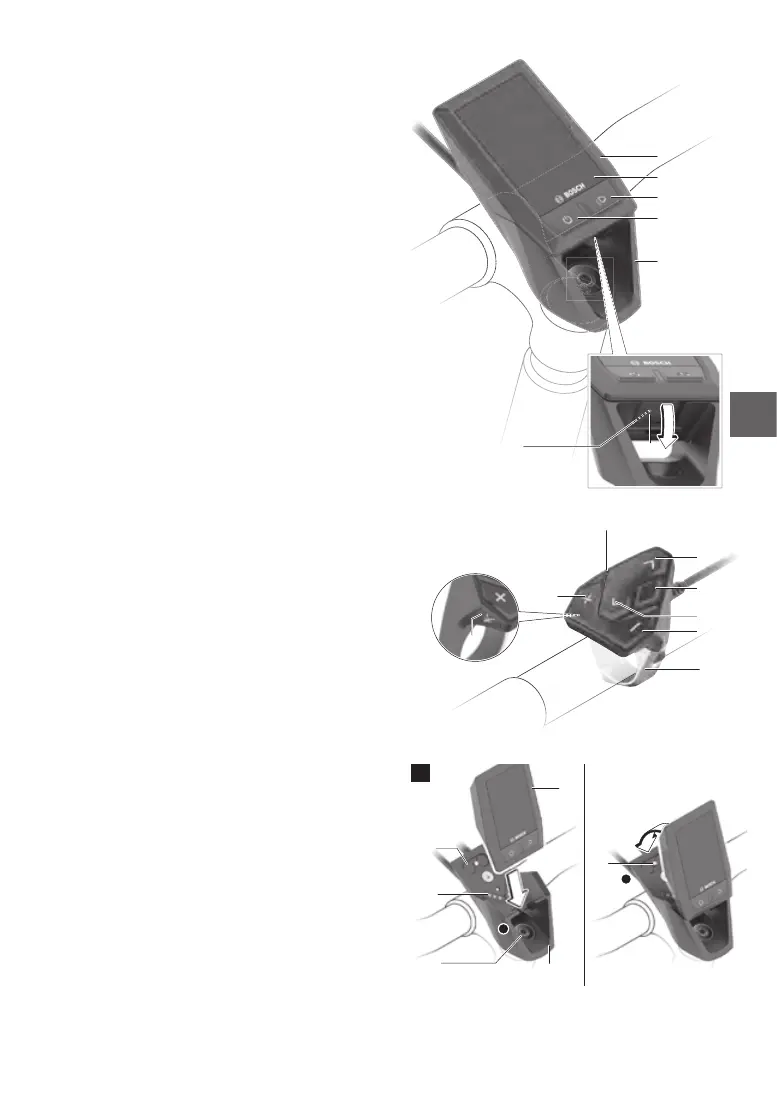
Bedienung mit KIOX Bedieneinheit
(1)
Bordcomputer
(2)
Display
(3)
Taste Fahrradbeleuchtung
(4)
Ein-Aus-Taste Bordcomputer
(5)
Halterung Bordcomputer
(6)
USB-Anschluss
(7)
Bedieneinheit
(8)
Taste nach vorn blättern >
(9)
Auswahltaste
(10)
Taste nach hinten blättern <
(11)
Taste Unterstützung senken –/
Taste nach unten blättern
(12)
Taste Unterstützung erhöhen +/
Taste nach oben blättern
(13)
Taste Schiebehilfe
(14)
Kontakte zu Antriebseinheit
(15)
Blockierschraube Bordcomputer
(16)
Steuersatzschraube
(17)
Schutzkappe USB-Anschluss
(1)
(2)
(3)
(4)
(5)
(17)
(6)
| 3
Bosch eBike Systems 1 270 020 XBK | (12.03.2019)
(8)
(9)
(10)
(11)
(12)
(13)
(7)
(19)
1
2
A
(1)
(5)
(14)
(16)
(15)
(18)
| 3
Bosch eBike Systems 1 270 020 XBK | (12.03.2019)
(8)
(9)
(10)
(11)
(12)
(13)
(7)
(19)
1
2
A
(1)
(5)
(14)
(16)
(15)
(18)
5.3 Operating the e-bike with
KIOXon-boardcomputer
Thisbriefguideonlyexplainsthemainpointson
how to operate the system. Please also refer to
the information in the enclosed manufacturer ins-
tructions.
(1) On-board computer
(2) Display
(3) Bike lighting button
(4) On-boardcomputeron/obutton
(5) On-board computer holder
(6) USB socket
(7) Operating console
(8) Forwards/right button >
(9) Select key
(10) Back/left button <
(11) Decrease assistance button –/
Scroll down button
(12) Increase assistance button +/
Scroll up button
(13) Pushing aid button
(14) Contacts to drive unit
(15) On-board computer lock-screw
(16) Headset screw
(17) USB socket protective cap*
(18) Magnetic holder
(19) Operating console holder
*available as a spare part
Installingandremovingtheon-board
computer
Start by positioning the lower end of the KIOX onto
the holder (5) and rotate it forwards slightly until
you feel it engage with the magnetic holder.
To remove the on-board computer, grasp the top
andpullittowardsyouuntilitcomesothemag-
netic holder.
Remove the on-board computer if you park
youre-bike.
You can secure your on-board computer against
removal. To do so, loosen the headset screw (16)
until the KIOX holder can swing from side to side.
Place the on-board computer in the holder. Screw
the lock-screw (M3, 6 mm long) from below into
the designated thread in the on-board computer
(using a longer screw may cause damage to the
on-board computer).
Swing the holder back and tighten the headset
screw as per the manufacturer’s instructions.