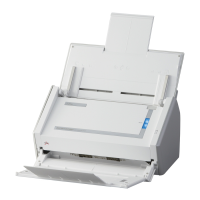
No. Name Description
6 [Scan] button (*1) Starts scanning. Can be pressed even when the stacker is closed.
Indicates the status of the ScanSnap as follows:
Blue (lit): Ready
Blue (flashing): Scanning
Orange (flashing): Error
7 Wi-Fi indicator Indicates the connection status between the ScanSnap and your
wireless access point as follows:
Blue (lit): Ready
Blue (flashing): Standby
Orange (lit): Not Connectable
Orange (flashing): Not Connectable (WPS error)
8 Stacker Open to use the stacker.
Stacks up the ejected documents.
*1: When the ScanSnap has turned off automatically because of the automatic power off function,
either press the [Scan] button (this will not start scanning), or close the ADF paper chute (cover),
then open it again to turn the ScanSnap back on.
For details, refer to "Automatic Power OFF (iX1600 / iX1500 / iX1400 / iX500 / iX100 / SV600 /
S1300i)" (page 100).
Back
No. Name Description
9 Tape seal Remove this tape seal after installing the software.
10 Security cable slot Used to connect an anti-theft security cable (commercially available).
11 Power connector Used to connect a power cable.
12 USB connector Used to connect a USB cable.
13 Ventilation port Holes for ventilating hot air from inside the ScanSnap.
14 WPS button Press this button to connect to a WPS compatible wireless access
point by using the push button method.
15 Wi-Fi switch Turn this switch on to connect the ScanSnap to a wireless LAN.
Parts and Functions
72

 Loading...