Careand cleaning of the range. CEappliancescom
Be sure aft controls are off and all surfaces are cool before cleaning any part of the range.
If your range is removed for cleaning, servicing or any reason, be sure the anti-tip
device is reengaged propefly when the range is replaced. Failure to take this
precaution could result in tipping of the range and cause injury.
How toRemovePackaging Tape
To assure no dmnage is done to the finish
of the product, the satest way to remove
the adhesive left fl'om packaging tape
and cooktop labels on new appliances
is an application of a household liquid
dishwashing detergent, mineral oil or
cooking oil.
Apply _dth a soft clofl_ and allow to soak.
X._ipe (liT and then apply an appliance
polish to thoroughly clean and protect
the surti_ce.
NOTE: Theadhesivemust be removedfrom a//
parts, it cannotbe removedif it is bakedon.
Control Knobs
Thecontrolknobsmayberemovedfor easier
cleaning.
getore removing the knobs fin.
cleaning, please note that the knobs are
in the OFFposition. When replacing the
knobs, check the OFFposition to insure
proper placement.
Wash the knobs in soap and water or a
vinegar and hot water solution but do
not soak.
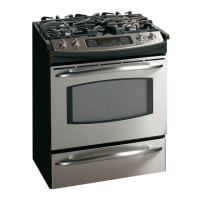
Grate
t Burnercad
Burnerneed
Electro0e
Burnerbase
CAUTION:DO NOT OPERATETHE
BURNER WlTHOUTALL BURNER
PARTSIN PLACE
Burner Assembly
The burner assemblies should be washed
regularly and, of coui_e, alter spillovei_.
Turnall controlsoff before remowngburnerparts.
The burner grates, burner heads and
btII'neI" C}ll)S C}lIl be i'ei//oved li)i" easv
cleaning.
The electrode (ff the spark ignitor is
eN)osed beyond the StlYlilce of the
burner base. \._]/en cleaning the cooktop,
be carefld not to snag the electrode _ff
the spark igniter with your cleaning
cloth. Damage to the igniter could occm:
Toavoid snagging a cloth on thespark
igniter, leave the burner heads inplace
when cleaning the cooktop.
Be careful not to push in any cooktop
controls while cleaning the cooktop.
A slight electrical shock might result
which could cause you to knock over
hot cookware.
Wash burner parts with an allI)uq)ose
non-abi_lsive cleaner _lIl(1 W_IIII/ wateI:
Soak stubborn soil. Dry them with a
cloth--do not reassemble while wet.
To reassemble, replace the burner head
fiist, then the burner cap and finally the
burner grate. Be sure the pins in the
burner head are properly located in the
btlrner base holes.
29