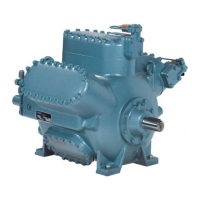
B8 CLEANING OF SUCTION GAS FILTER(S)
a) Evacuate the compressor (refer to §B5).
b) Remove the four bolts holding the suction stop valve
and remove the valve.
c) Pull the strainer element out of the suction strainer
housing without damaging the gauze. (see also fig.
RC6-11 on parts list page 12).
d) Clean element by rinsing it in a solvent. Then
thoroughly dry the element preferably with
compressed air.
e) Check the gauze for damage.
f) Slide the strainer element again into the housing and fit
the suction stop valve. Check the oilit gasket for proper
condition.
c) Purge the compressor (refer to §B10).
B9 DISMANTLING, INSPECTION AND RE-ASSEM-
BLY OF SUCTION AND DISCHARGE VALVES
The suction and discharge valves of a refrigeration
compressor are parts that are heavily loaded both
mechanically and thermally. Wear and life time of the
valves strongly depend on the operating conditions
of the compressor. A high working temperature and
rapid temperature variations shorten the life time of
the valves, which, for this reason, require regular
inspection.
For dismounting, inspection and re-assembly of
the valves, proceed as follows:
a) Evacuate the compressor (refer to par. B5).
b) Remove the cylinder head covers.
c) Remove the pressure ring and buffer spring.
d) Lift the complete discharge valve out of the cylinder
liner.
e) Remove the suction valve ring and sinusoidal springs,
which are loose on the collar of the cylinder liner.
f) Unscrew and disassemble the discharge valve.
g) Clean all valve parts and check them for break of
damage.
MIND! If it appears that valve parts are broken, also
the cylinder liner and piston of the relevant cylinder
must be checked for damage.
The valve rings and valve seats must be undamaged;
even the slightest damage may easily cause breakage.
Valve ring and/or seat should be replaced when, due
to wear, the total score of valve ring and seat is over
0.2 mm.
The sinusoidal springs must also be undamaged and
must have sufficient slack height.
REMARK! All valve parts can be obtained
separately, except the discharge valve
seat, stroke limitor and central bolt. If,
for example, the discharge valve seat is
to be renewed, a complete discharge
valve (including stroke limitor, valve
ring and sinusoidal springs) should be or-
dered (also refer to the parts list).
h) Carefully clean all valve parts and slightly oil them with
compressor oil; then re-assemble the discharge valve.
j) After reassembling the discharge valve, check
whether the valve ring and springs can be pressed
against the stroke limitor, and when released, the
valve ring is properly pressed back on its seat.
k) Place the suction valve ring and the corresponding
sinusoidal springs on the collar of the cylinder liner
and install the discharge valve, buffer spring and
pressure ring.
l) Check the gasket of the cylinder head cover and lay
the cover onto the cylinder head.
m) Screw all hexagonal bolts and firmly tighten them.
n) Purge the compressor (refer to par. B10).
REMARK! In order to reduce the down-
time involved in this valve inspection, it
is recommended to have as many com-
plete valve assemblies in stock as there
are cylinders on the compressor.
The valves can then be exchanged with
the valves to be checked. The original
valves can then be inspected at leisure
and, if necessary, repaired or replaced.
Refrigeration Division
Grasso
B: INSPECTION, MAINTENANCE
AND TROUBLE SHOOTING
B1.6 Installation and Maintenance Manual RC(U)6 v001.99.01.en