Do you have a question about the GW Instek PSM-2010 and is the answer not in the manual?
Procedure for safely unpacking and inspecting the instrument for damage.
Ensures correct voltage selection before connecting the power plug to prevent instrument damage.
Guidelines for operating the instrument within specified ambient temperature and avoiding electromagnetic interference.
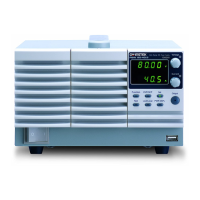
Details the components and controls located on the front of the device.
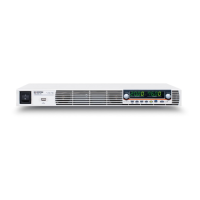
Provides a concise overview of the rear panel connections and features.
Explains the indicators and information shown on the front panel display.
Covers fundamental steps for operating the programmable power supply, including warm-up and initial setup.
Details the purpose and usage of various function keys for controlling the instrument.
Outlines the procedures for performing specific operations like voltage and current setting.
Lists the maximum configurable output voltage, current, and protection limits for different models.
Details the specifications and usage notes for the provided test leads.
Instructions for replacing blown fuses, emphasizing safety precautions and correct fuse types.
Procedure for changing the AC input voltage setting, which may require fuse adjustment.
Recommendations for setting up the instrument and using calibrated devices for accurate measurements.
Step-by-step guide for adjusting and calibrating the instrument's output parameters.
Guidelines for safely cleaning the instrument using mild cleaning agents.
Illustrates the internal system components and their interconnections.
Describes the organization of the digital control and power output circuits.
Provides a detailed overview of the PSM-series programmable power supply's features and capabilities.
Lists the key features and capabilities of the PSM-series programmable power supply.
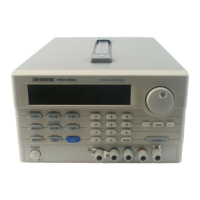
Details the components and controls located on the front of the device.
Provides a concise overview of the rear panel connections and features.
Explains the indicators and information shown on the front panel display.
Describes the function of the wheel knob for number input or function selection.
Explains how to clear remote control mode and use panel control.
Identifies the key used for input confirmation.
Identifies the push-button for selecting the second level function.
Details how to lock and unlock the panel control knobs.
Provides information on setting up GPIB or RS-232 interfaces.
Covers fundamental steps for operating the programmable power supply, including warm-up and initial setup.
Details the purpose and usage of various function keys for controlling the instrument.
Outlines the procedures for performing specific operations like voltage and current setting.
Lists the maximum configurable output voltage, current, and protection limits for different models.
Details the specifications and usage notes for the provided test leads.
Describes setting the Over Voltage protection level, state, and clearing it.
Describes setting the Over Current protection level, state, and delay time.
Explains how to dynamically switch output ranges and the behavior on power reset.
Explains setting the delay time for auto mode operations.
Describes how to recall setting data from the memory bank.
Explains the setting method for automatic range selection.
Describes how to save setting data to memory groups.
Details how to turn the output on/off and the corresponding indicator status.
Explains how to lock and unlock the panel setting.
Describes the voltage step setting procedure.
Describes the current step setting procedure.
Explains switching panel display to voltage/current setting mode.
Outlines the steps for performing constant voltage operation.
Outlines the steps for performing constant current operation.
Details the procedure for setting and confirming Over Voltage Protection.
Details the procedure for setting and confirming Over Current Protection.
Explains storing and recalling various setting data from the memory bank.
Describes the auto running operation and its related settings.
Explains the function and procedure of remote voltage sensing.
Explains voltage load regulation effects and adjustments.
Discusses output noise and methods to reduce it.
Procedure for safely unpacking and inspecting the instrument for damage.
Ensures correct voltage selection before connecting the power plug to prevent instrument damage.
Guidelines for operating the instrument within specified ambient temperature and avoiding electromagnetic interference.
Details the components and controls located on the front of the device.
Provides a concise overview of the rear panel connections and features.
Explains the indicators and information shown on the front panel display.
Covers fundamental steps for operating the programmable power supply, including warm-up and initial setup.
Details the purpose and usage of various function keys for controlling the instrument.
Details the purpose and usage of various function keys for controlling the instrument.
Describes setting the Over Voltage protection level, state, and clearing it.
Describes setting the Over Current protection level, state, and delay time.
Explains how to dynamically switch output ranges and the behavior on power reset.
Explains setting the delay time for auto mode operations.
Describes how to recall setting data from the memory bank.
Explains the setting method for automatic range selection.
Describes how to save setting data to memory groups.
Describes the function of the wheel knob for number input or function selection.
Explains how to clear remote control mode and use panel control.
Identifies the key used for input confirmation.
Identifies the push-button for selecting the second level function.
Details how to turn the output on/off and the corresponding indicator status.
Explains how to lock and unlock the panel setting.
Describes the voltage step setting procedure.
Describes the current step setting procedure.
Explains switching panel display to voltage/current setting mode.
Outlines the steps for performing constant voltage operation.
Outlines the steps for performing constant current operation.
Details the procedure for setting and confirming Over Voltage Protection.
Details the procedure for setting and confirming Over Current Protection.
Explains storing and recalling various setting data from the memory bank.
Describes the auto running operation and its related settings.
Explains the function and procedure of remote voltage sensing.
Explains voltage load regulation effects and adjustments.
Discusses output noise and methods to reduce it.
Instructions for replacing blown fuses, emphasizing safety precautions and correct fuse types.
Procedure for changing the AC input voltage setting, which may require fuse adjustment.
Recommendations for setting up the instrument and using calibrated devices for accurate measurements.
Recommends using an Electronic Load with GPIB for auto calibration.
Specifies requirements for a current monitoring resistor for calibration.
Specifies requirements for meters used in output voltage and current measurement.
Suggests using an oscilloscope to test voltage noise and output oscillator.
Identifies PC as a supplementary tool for auto calibration.
Step-by-step guide for adjusting and calibrating the instrument's output parameters.
Details the steps for current calibration procedures.
Guidelines for safely cleaning the instrument using mild cleaning agents.
| Brand | GW Instek |
|---|---|
| Model | PSM-2010 |
| Category | Power Supply |
| Language | English |