Page 68
Section 7 Analyzer Commissioning and Startup
The check list below must be used to ensure that the installation has been properly carried out. Please
proceed through the check list in the given order, completing the 5 sections below. Detailed commissioning
and startup procedures are available in presentation format in the MMC/SD card shipped with the BioTector.
It is recommended to review this document before starting the commissioning and startup procedures. If the
BioTector analyzer is certified for hazardous areas, carefully read the hazardous area documentation supplied
with the analyzer. This documentation contains important information for compliance with explosion protection
regulations. Understanding this information is essential for the safe operation of the equipment.
For system and personal safety, refer to Section 1 Safety Precautions. Necessary
safety precautions, such as wearing eye protection and gloves, should be taken throughout the
commissioning and startup procedures.
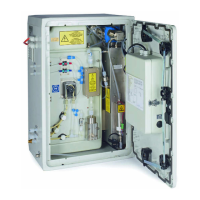
1. INSPECTION and SYSTEM CONNECTIONS:
Several tubing are disconnected and labeled in BioTector for shipping. Before connecting any
tubing, inspect the analyzer. Check all the electrical and tubing connections and confirm that there
are no loose connections within the BioTector. Close the analysis door.
Reconnect the tube linking the Ozone Generator to the acid TEE, at the TEE.
Reconnect the tube linking the Cooler and CO
2
analyzer, at the top of the Cooler.
Reconnect the tube linking the Ozone Destructor to the Exhaust Valve (MV1), at the top of
the Ozone Destructor.
The Acid and Base pump tube rails and the tubing of pumps are disconnected and labeled in
BioTector for shipping. Reconnect the tube rails and install the pump tubing of the Sample, Acid
and Base pumps.
Check the Swagelok / PFA tube connections and confirm there are no loose connections within
the BioTector.
Check the electrical connections and confirm there are no loose connections within the BioTector.
Confirm the mains supply voltage and the frequency on site match the analyzer requirements.
Connect the power cable.
Connect the 4-20mA cables.
Connect low voltage wiring (e.g. Fault Relay).
Connect the air supply to the BioTector’s AIR port. See figure 13 in Section 5.3.1 Air Supply
Connection for details. The minimum air supply flow rate is 8.4 m
3
/hour at 1.5 bar. The average air
consumption is less than 5.4 m
3
/hour, and typically 3.6 m
3
/hour during online operation. When the
oxygen concentrator is running, the pressure typically cycles from 1.5 bar to 0.9 bar.
Option A: Instrument air. The set point pressure of the air, supplied from an existing
instrument air supply line, should be 1.5 bar. The recommended air quality
is -20°C dew point, free of water, oil and dust.
Option B: BioTector Compressor. The set point air pressure supplied from BioTector
compressor should be 1.5 bar.
In BioTectors built with a vortex cooler, air should be supplied to the vortex cooler using a
regulator, which is dedicated for the vortex cooler only.
Connect the EXHAUST port with ¼” PFA tube to a safe and well ventilated area or to open
atmosphere. The tube must have no restrictions and it must be placed so that any condensation
and liquid buildup in the tubing is prevented. The maximum length of ¼” PFA tubing installed in
Exhaust line is 10 meters. If tubing longer than 10 meters is required, the use of a larger ID tubing
or pipe is recommended.
The end of the exhaust tubing should have a slight downward slope so that any condensation or
liquid at the outlet of the tubing cannot freeze at night or during cold weather. See figure 15 in
Section 5.4.2 Drain, Bypass and Exhaust Connections for details.
Remove the tapes, which are used to seal the ends of the supplied CO
2
filter. Fit the CO
2
filter to
the Base container and seal the Base container tightly. See figure 14 and figure 15 in Section
5.3.2 Reagent Connections for details.
 Loading...