9
6. Adjustment
6.1 Blade
6.1.1 Blade Tension
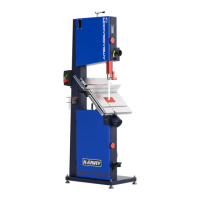
Refer to Figure 8.
1. Disconnect the machine from the power source.
2. Back off the upper and lower blade guides to eliminate any contact with the blade.
3. Tighten the blade by the blade tension lever (C).
4. Rotate the blade tension hand wheel (H) until the blade is properly tensioned.
5. Re-adjust the upper and lower blade guides.
Too little or too much blade tension can cause blade breakage and/or poor cutting
performance. When the band saw is not being used, release the blade tension. This
will prolong the life of the blade and the tires and reduce the load on the wheels,
bearings and other components.
6.1.2 Changing the Blade
Always wear gloves when handling blades. New blades are usually packaged in a
coiled position. To prevent injury, uncoil them slowly and carefully while wearing
work gloves and safety glasses.
Refer to Figure 8.
1. Remove the table insert (A), loosen the locking handle (B) and remove it from the work
table.
2. Release the blade tension lever (C) and then open the upper and lower doors.
3. Flip to open the upper blade guard cover and uninstall the lower blade guard by
loosening the locking knob.
4. Back off the upper and lower blade guides to eliminate any contact with the blade.
5. Slide the blade (D) through the split on the table (E) and the frame (F) to take off the
blade.
6. Mount the new blade through the table and the frame, then place the blade over the
upper and lower flywheel (G) and place the blade in the upper and lower blade guides.
7. Tighten the blade by the tension lever (C) on the back of the saw.
8. Re-install the table insert (A), locking handle (B) and the blade guards and close the
doors.