5-12 Chadwick-Helmuth A Business Unit of Honeywell International, Inc.
Chapter 5 - Maintenance And Repair
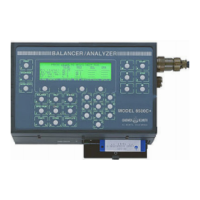
5.4.2 Disk Drive Test Procedure
a. Hold down START key on 8500C/C+ and turn on power supply.
NOTE: This erases all memory in 8500C/C+.
b. Wait until Power-Up Self-Test display appears and release START key.
c. Hold disk with arrow facing up and pointing in and insert disk in 8500C/C+ disk drive-
push in until drive button pops out (Figure 2-1).
NOTE: Do not use a chart disk or any other disk with important data on it because all data
on the disk will be erased.
d. Press STATUS on 8500C/C+.
e. Verify that display indicates Disk Unit Ready and Writable.
f. Press MORE KEYS key.
g. Press SELF-TEST soft key.
h. Press HW soft key.
i. Select Disk Drive on display with arrow keys.
j. Press EXECUTE soft key.
k. Press START key.
l. Wait until 8500C/C+ stops reading diskette (about 1 minute).
m. Verify that display indicates Disk Drive Test Successful.
n. Press OK soft key.
o. Press QUIT soft key.
5.5 Calibration Tests
NOTE: These tests require firmware version 3.21 (or higher) in the 8500C/C+ balancer/
analyzer. For instructions on changing the firmware to a newer version, see Section 5.7.3,
“EPROM Change Procedure.”
This section contains instructions to test the 8500C/C+ system design parameters. If a test step fails,
refer to the “Troubleshooting Guide” in Section 5.6 to locate the faulty component.
Calibration tests provide the highest level of confidence that the instrument is operating properly. Use
calibrated laboratory equipment to verify that the instrument conforms to its published specifications.
5.5.1 8500C/C+ Balancer/Analyzer Test Procedure
NOTE: These tests build successively on the first test in this section. Any settings not
mentioned must be left as they were in the previous test.
5.5.1.1 Test Setup
Connect equipment as shown in Figure 5-8.
 Loading...