Calibration Handbook
95IR-F9 / AirScan IR
IR-F9-RXX/AirScan iR Calibration Procedure
General Information
There are only two pots on the pre-amp that are used for calibrations. All other pots are factory set and
must never be adjusted. They can only be properly adjusted at the factory. Refer to the Manning AirScan
TM
iR
instruction manual for more in-depth calibration procedure details.
Zero Calibration
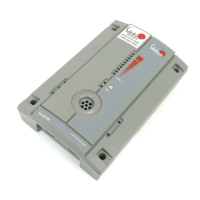
1. Press and hold both “zero” (S1) and “span (S2) buttons simultaneously for one second or until the “system”
LED begins to blink slowly. Refer to figure 11 for switch location.
TEST +
S2
S1
JP3
JP1
JP2
ZERO
SPAN
TEST -
SIG
+24
GND
SHLD
Draw
Chamber
SYSTEM
CALIBRATE
FAULT
mA FAULT
IR SOURCE
ATMOS
ACTIVE
POWER
24
Black
-
Red
+
VDC
40-200
Black
-
Red
+
mVDC
Note 1: Checking voltage to
sensor at +24 and GND
Note 2: Reading signal at
TEST+ and TEST-
Rx LED
Pushbutton S1
Pushbutton S2
Zero Adjust
Span Adjust
Tx LED
Serial Port
ICSP Programming Port
Tubing to calibration point
Figure 11. IR-F9 Switch Locations
2. If calibrating a CO2 unit or in a high-background environment, apply pure nitrogen (N2) into the calibration
port at a rate of 1.0 L/min. for at least 45 seconds (OR until output signal is within ± .02 mA of signal
deviation/change).
3. Press and hold “zero” button (S1) for approximately 1 second or until the yellow “calibrate” LED is
continuous ON.
4. When yellow calibration LED is continuous ON, release “zero” button. The “calibrate” LED will turn off
and the unit will be zeroed.
5. Parameters are now programmed into memory.
6. Place multi-meter leads on Test(+) and Test(—) and ensure the output is steadily resting between 3.9 to
4.1mA (39.0 to 41.0mV).
If this isn’t the case, initiate the auto “zero” procedure once again.
7. Press and hold both “zero” (S1) and “span” (S2) buttons simultaneously for one second or until the yellow
“system” LED will be ON solid.
8. End of zero procedure.
 Loading...