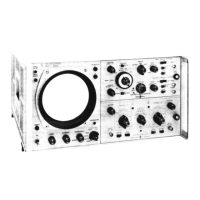
Model 141A
Section
V
PBragraphs 5-1 to 5-5
SECTION
V
MAINTENANCE
5-1.
INTRODUCTION.
5-2.
This section covers maintenance, trouble-
shooting, and adjustment of the Model
141A
Oscillo-
scope. Aperformance check
is
includedwhichmay be
used at incoming inspection, or after adjustments have
been made, to verify that the instrument meets
specifications.
5-3.
PERFORMANCE CHECK.
5-4.
CRT
CONTROLS.
a.
Install
a
single largeplug-inor two small plug-
in units in the Model
141A
(verticalplug-in in the lower
compartment, horizontal in the upper compartment).
b. Set INTENSITY fully counterclockwise.
c. Set PERSISTENCE counterclockwise just out of
NORMAL detent and Presentation Selector to WRITE.
d. Set POWER switch to ON.
e. Check that CRT screen
is
lightly and evenly
illuminated.
If
the CRT screen is not lightly
illuminated, turn POWER off and
check that all CRT neck and bulb
leads are connected. DO NOT
rotate INTENSITY clockwise or
the CRT may be damaged.
f.
Rotate PERSISTENCE into NORMAL detent and
depress BEAM FINDER switch. A defocused spot
should appear on the screen.
g. Set INTENSITY control to 10 o'clock and return
beam to screen with POSITION controls. Check that
counterclockwise rotation of INTENSITY control ex-
tinguishes beam and clockwise rotation gives brighter
than normal intensity. Immediately return INTENSITY
to 10 o'clock.
should have sufficient range to defocus the beam in
both extreme positions and should give
a
sharp, round
spot when close to mid-range. Adjust bothcontrols
for the sharpest display.
i. The magnetic field in which the Model
141A
is
operated
will
affect the alignment of the trace on the
CRT. Set afree-running trace and adjust the TRACE
ALIGN to make the trace parallel with the horizontal
graticule line.
both POSITION controls.
h. The FOCUS and ASTIGMATISM adjustments
j.
Set
a
free-running,
1
MSEC/CM trace and center
k. Rotate INTENSITY control slowly clockwise until
a trace appears.
02567-1
m. Change sweep time to 0.2 SEC/CM and observe
that the trace disappears and that the moving beam
spot
has
no tail.
n. Rotate PERSISTENCE slowly clockwise and note
that beam spot develops
a
tail; fully clockwise makes
the complete trace remain on the screen.
p. Rotate INTENSITY fully coukerclockwise; trace
should remain visible for one minute.
q.
Rotate INTENSITY slowly clockwise until trace
blooms, then fully counterclockwise.
r.
Rotate Presentation Selector to ERASE for two
seconds and release; screen should be dark.
s.
Rotate INTENSITY slowly clockwise until trace
has normal intensity, then fully counterclockwise.
t. Rotate PERSISTENCE counterclockwise, screen
should be lightly illuminated
and
trace should disap-
pear; rotate PERSISTENCE fully clockwise andscreen
should be dark.
u. Repeat step
s.
v. Rotate Presentation Selector to STORE; trace
should remain visible at low intensity for one hour.
Trace may be viewed,
at
normal intensity, any time
during the hour of storage by rotating the Presentation
Selector to VIEW. Viewing time decreases
as
time
in storage increases.
Selector to WRITE, and WRITING RATE to
MAX.
seconds and release; screen should appear evenly
illuminated.
w.
Set sweep time to
1
~SEC/CM,
Presentation
x. Rotate Presentation Selector to ERASE for
2
y. Rotate INTENSITY slowly clockwise until trace
z.
Set horizontal plug-in for single sweep.
appears
.
aa.
Rotate Presentation Selector to ERASE for
2
seconds and release.
bb. Arm sweep
(if
necessary) and trigger
a
single
sweep.
cc. Trace should appear and remain on the screen
for
a
short time, then the entire screen should slowly
fade positive (total illumination).
5 -5.
CALI
BRATION.
a.
Set: Vertical SENSITIVITY
.
.
.
.
0.05
V/CM
PERSISTENCE
-
-
- -
.NORMAL detent
b. Connect
1
VOLT pk-pk from the Voltmeter Cali-
c. Adjust vertical VERNIER for exactly 10 cm
d. Disconnect the Voltmeter Calibrator and connect
INPUT coupling
*
-
* *
- -
*Dc
brator to vertical INPUT.
deflection.
the
1V
CALIBRATOR output to the vertical INPUT.
5-
1