Model
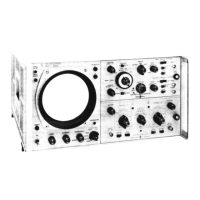
141A
Section
II
Paragraphs 2-1 to 2-16
SECTION
II
I
N
STA
11
AT1
ON
1
I
1
I
2-1.
INITIAL INSPECTION.
2-2. MECHANICAL CHECK.
If
external damage to
the shipping carton
is
evident, ask the carrier's agent
to
be
present when the instrument
is
unpacked. Check
the instrument for external damage such
as
broken
controls or connectors, and dents or scratches on the
panel sutfaces.
E
damage
is
evident,
see
Paragraph
2-15 for recommended claim procedure.
If
the ship-
ping carton
is
not damaged, check the cushioning
material and note any signs of severe stress
as
an in-
dication of rough handling in transit. If theinstrument
appears undamaged, perform the electrical check
(Paraqaph 2-3). Retain the packaging material for
possl!.ile future use.
2-3. ELECTRICAL CHECK. Check the electrical
performance of the Model 141A
as
soon
as
possible
after receipt. Paragraphs 5-3 through 5-5 contain
performance check procedures which
will
verify in-
strument operation within the specifications listed in
Tabie
1-1.
Initial performance and accuracy of the
instrument
are
certified as stated on the inside front
cover
of
this manual.
If
the Oscilloscope does not
operate
as
specified,
refer
to Paragraph 2-15for
recommended claim procedure.
2-4.
PREPARATION
FOR
USE.
2-5.
POWER REQUIREMENTS.
2-6.
The Model 141A Oscilloscope requires
a
power
source of either
115
or 230 volts ac,
*
lo%,
single
phase,
50
to
60
Hz,
which can deliver approximately
300 watts. A
rear
panel switch provides selection of
the line voltage to
be
used.
2-7.
to be
Be sure to set the
rear
panel switch
for the line. voltage to be used. The
power supplies may
be
damagedifthe
switch
is
set to the wrong position.
230-VOLT OPERATION. If the instrument
is
operated from a 230-volt source, set the
rear
panel switch to 230. The line fuse, F401, must be
changed to
n
2-amp slow-blow fuse for 230-volt opera-
tion. The fuse
is
accessible
by
removing the bottom
cover of the Model 141A; it
is
identifiedin Figure 5-1.
2-8. THREE-CONDUCTOR POWER CABLE. For
the protection of operating personnel, the National
Electrical Manufacturers' Association (NEMA) recom-
mends that the instrument panel and cabinet be grounded.
The Model 141A
is
equipped with
a
detachable, three-
conductor power cable which, when plugged into an
appropriate receptacle, grounds the instrument. The
offset (round) pin on the power cable connector
is
the
ground pin. To preserve the protection feature when
02567-1
operating the Model 141A from
a
two-contact outlet,
use
a
three-conductor to two-conductor adapter and
connect the green lead on the adapter to
ground
at the
power outlet.
2-9.
INSTRUMENT MOUNTING.
2-10. MODULAR CABINET. TheModel 141A
is
shipped from the factory
as
a
bench instrument with
the tilt stand,
feet,
and plastic trim inplace. The top
and bottom panel covers
can
be removed, givingcom-
plete accessibility to all components and adjustments.
Sufficient space should
be
left around the sides of the
cabinet to allow unrestricted
air
circulation.
2-11. RACK MOUNTING. A kit for converting the
modular cabinet to
a
rack mount
is
suppliedwitheach
Model 141A. Instructions for making the conversion
are
given below. Refer to Figure 2-1
as
an aid to
identifying parts.
a.
Detach tilt stand by pressing away from front
feet; remove
all
plastic feet
by
depressing metal but-
ton and sliding feet
free.
b. Aluminum trim strips (behindeachfront handle)
on sides of instrument have an adhesive back; use
a
thin-blade tool to remove them.
c.
Attach
a
rack-mounting flange, using screws
provided in kit, in each space where trim stripwas
adhered; larger notch of flange should be positioned
at instrument bottom.
d. If Model 141A
is
to be placedin
a
rack above or
below another hp instrument, attach
filler
strip pro-
vided with kit between front panels of instrument.
2-12.
INSTRUMENT COOLING.
2-13. The Model 141A uses
a
forced-air cooling system
to maintain reasonable operating temperatures within
the instrument.
side panel perforations. When operating the instru-
ment, choose
a
location which provides
at
least
three
inches of clearance around the rear and both sides.
2-14. The cooling fan and
air
filter require periodic
lubrication and cleaning. Refer to Paragraph 5-44
for maintenance instructions.
2-15.
CLAIMS.
2-16. The warranty statement applicable to
all
Hewlett-
Packard Company instruments andproducts
is
provided
inside the front cover of this manual.
If
physical
damage
is
found or
if
operationis not
as
specified when
the instrument
is
first received, notify the carrier
and the nearest Hewlett-Packard Sales/Service
Office
immediately. The Sales/Service Office will arrange
for repair or replacement of the instrument without
waiting for settlement of
a
claim with the
carrier.
For other than initial inspection warranty claims,
contact the Sales /Service
Office.
Warm
air
is
exhaustedthrough the
2-1