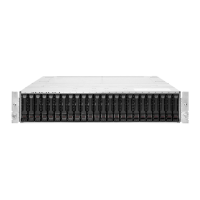
Serial number and product number label
Serial and product numbers are required to obtain support. The serial number and product number label is located on top
of the J2000. Additional labels are located on top of each I/O module. The I/O modules must be removed to access the
labels.
Removing the optional front bezel from the rack
The front bezel must be removed to access the drives and to extend the J2000 from the rack.
Pull the left and right sides of the bezel away from the ball studs on the left and right J2000 ears.
Extending the J2000 from the rack
WARNING: TIPPING HAZARD: Extend only one J2000 from the rack at a time. Make sure that all systems in the
rack are secured. Systems should be installed in the rack according to their weight, with the heaviest system on the
bottom and lightest system on top.
The J2000 must be extended from the rack to access and service the system fan modules. You do not need to extend the
J2000 from the rack to access and service the hot-swappable power modules and I/O modules.
Prerequisites
The optional front bezel has been removed from the rack.
Procedure
1.
If a front bezel is installed, remove it as described in
Removing the optional front bezel from the rack.
2.
Loosen the left and right thumbscrews that secure the front of the J2000 to the rack posts.
3.
Slowly pull the J2000 forward until it locks into the serviceable position, which is accompanied by an audible click.
Releasing the cable management arm
The cable management arm (CMA) must be released to access and service the power modules and I/O modules. You do
not need to release the CMA to access and service the drives and fan modules.
Procedure
1. Press the release button on the CMA body connector.
2. Pull the CMA body connector
o the CMA body rail connector.
3. Gently swing the CMA to the side.
The CMA is cleared. You can now replace the I/O module or power module as described in Replacing an I/O module
and Replacing a power module, respectively.
Maintenance
17