Home
HP
Laptop
Pavilion ze4200 - Notebook PC
Page 98 (Figure 2-18. Removing the Top Case)
HP Pavilion ze4200 - Notebook PC - Figure 2-18. Removing the Top Case
188 pages
Manual
To Next Page
To Next Page
To Previous Page
To Previous Page
Loading...
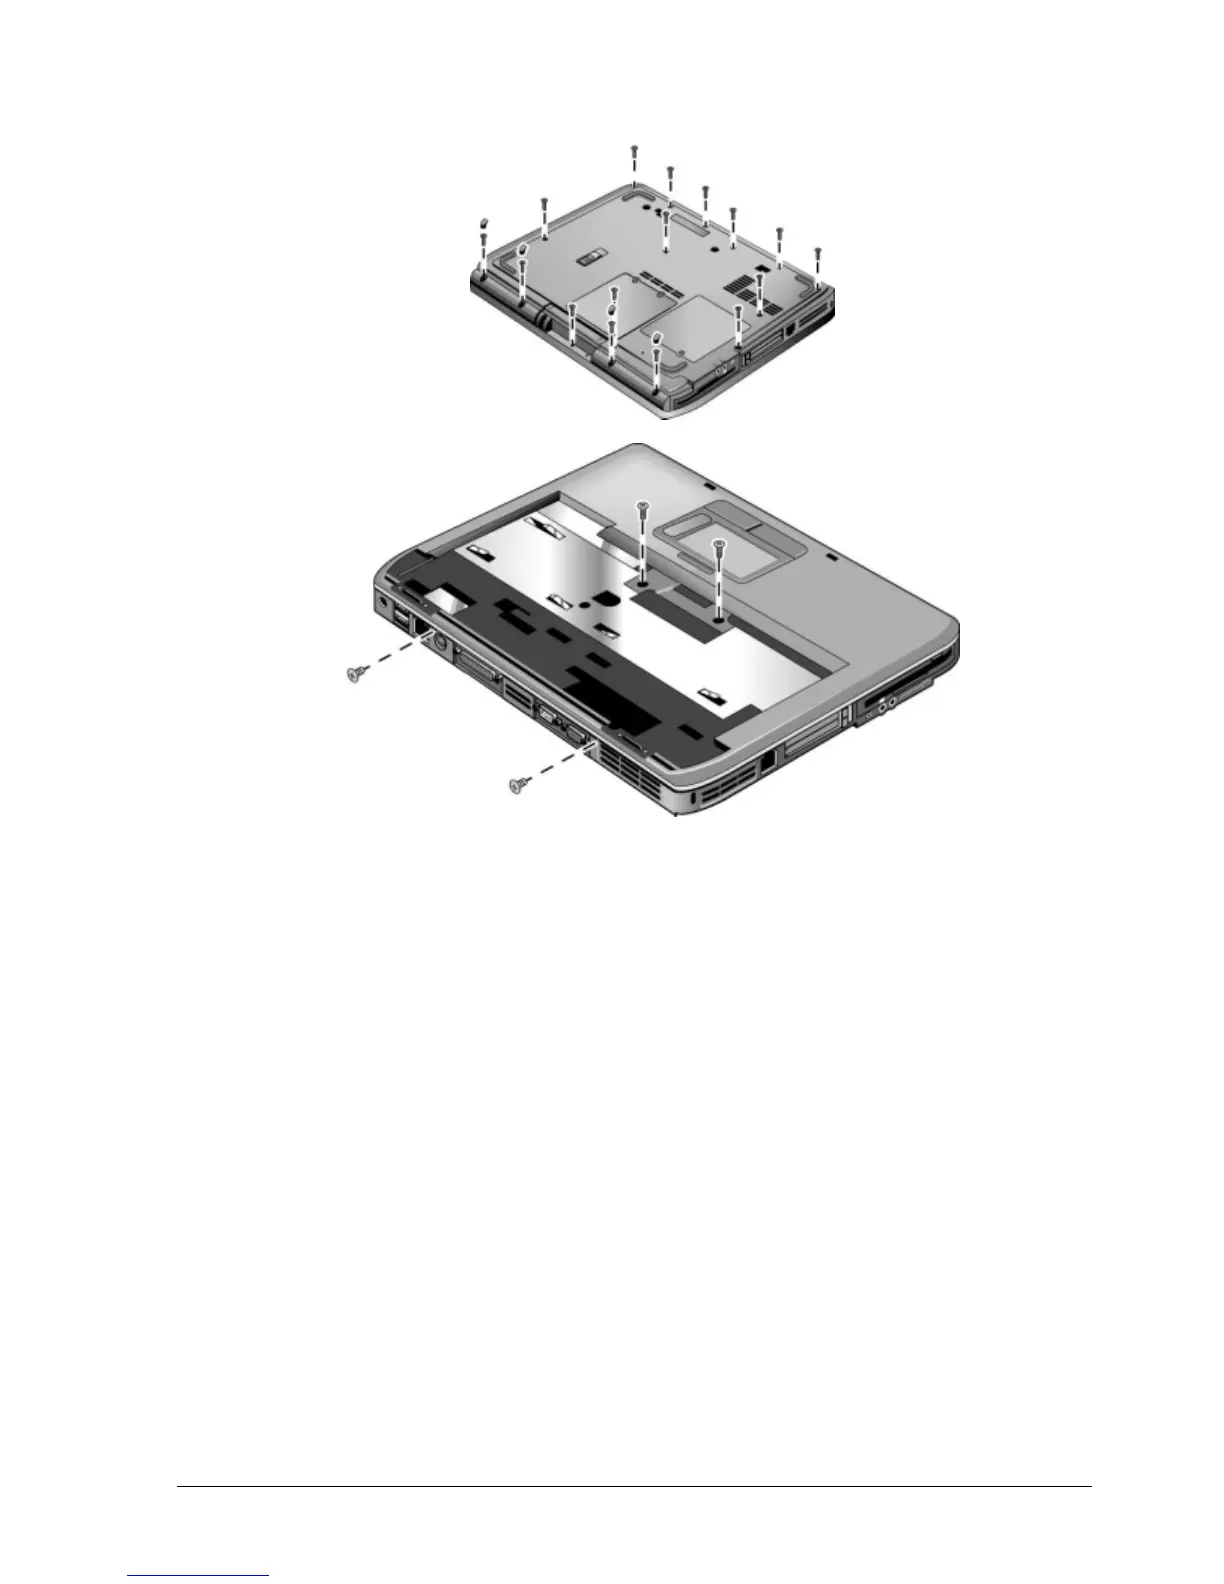
Figure 2-18. Removing the Top Case
HP Pavilion 4300, 4200, and 4100, HP nx9005 and nx9000,
Compaq Evo Notebook N1050 and 1010, and Compaq Presario 2100 and 1100 Models
Service Manual
Removal and Replacement
2-27
97
99
Table of Contents
Main Page
Table of Contents
3
Table 1-1. Notebook Products
7
Table 1-2. Product Comparisons
49
Features
54
Figure 1-1. Front View
54
Figure 1-2. Back View
55
Figure 1-3. Bottom View
56
Figure 1-4. Front View
57
Figure 1-5. Back View
58
Figure 1-6. Bottom View
59
Operation
60
Table 1-3. Activating Power Modes
60
Table 1-4. Main Status Lights (Front of Notebook)
61
Table 1-5. Keyboard Status Lights
61
Table 1-6. Fn Hot Keys
62
Figure 1-7. Resetting the Notebook
63
Specifications
64
Table 1-7. Specifications
64
Table 1-8. Accessories
68
Figure 1-8. Replaceable Module Diagram
70
Internal Design
70
Table 1-9. Functional Structure Description
71
Removal and Replacement
72
Table 2-1. Removal Cross-Reference
72
Table 2-2. Required Equipment
73
Table 2-3. Recommended Screw Torque Values
73
Disassembly Flowchart
74
Figure 2-1. Disassembly Flow
74
Figure 2-2. Removing the Battery
75
Removing the Battery
75
Figure 2-3. Removing an SDRAM Module
76
Removing a SDRAM Module
76
Figure 2-4. Removing an SDRAM Module
77
Figure 2-5. Removing the Mini-PCI Card
78
Removing the Wireless LAN Mini-PCI Card
78
Figure 2-6. Removing the Mini-PCI Card
79
Figure 2-7. Removing the Hard Disk Drive
80
Removing the Hard Disk Drive
80
Figure 2-8. Removing the Hard Disk Drive Tray
81
Replacing Small Parts
82
Table 2-4. Replacing Small Parts
82
Removing the Keyboard Cover
83
Figure 2-9. Removing the Keyboard Cover
84
Figure 2-10. Disconnecting the Speaker Cable
85
Figure 2-11. Removing the Speaker Assembly
86
Removing the Speaker Assembly
86
Removing the Keyboard
87
Figure 2-12. Removing the Keyboard
88
Figure 2-13. Removing the Switchboard PCA
89
Figure 2-14. Removing the Switchboard PCA
90
Removing the Switchboard PCA
90
Removing the CD/DVD Drive
91
Figure 2-15. Removing the CD/DVD Drive
92
Figure 2-16. Removing the CD/DVD Drive
93
Removing the Display Assembly
94
Figure 2-17. Removing the Display Assembly
95
Removing the Top Case
97
Figure 2-18. Removing the Top Case
98
Figure 2-19. Removing the Top Case Screws
100
Figure 2-20. Removing the Top Case Screws
101
Figure 2-21. Removing the Top Case
102
Removing the Floppy Drive
103
Figure 2-22. Removing the Floppy Drive
104
Figure 2-23. Removing the Floppy Drive
106
Removing the Infrared (I/R) PCA
107
Figure 2-24. Removing the I/R PCA
108
Removing the Audio PCA
109
Figure 2-25. Removing the Audio PCA
110
Figure 2-26. Removing the Heat Sink (with Fan)
111
Removing the Heat Sink (with Fan)
111
Figure 2-27. Removing the Heat Sink (with Fan)
113
Removing the CPU Module
115
Figure 2-28. Removing the CPU Module
116
Figure 2-29. Removing the CPU Module
118
Removing the RJ11/1394 Connector Module
119
Figure 2-30. Removing the RJ11/1394 Connector Module
120
Removing the Motherboard
121
Figure 2-31. Removing the Motherboard
122
Removal Procedure
123
Figure 2-32. Removing the Hard Disk Drive Guide
124
Figure 2-33. Disconnecting the Motherboard Cables
125
Figure 2-34. Removing the Motherboard
127
Figure 2-35. Example of Serial Number Label
130
Replacing Components on a Bottom Case
130
Figure 2-36. Replacing the Antennas
131
Figure 2-37. Removing a PCMCIA Door
131
Repairing the BIOS IC
132
Figure 2-38. Boot-Block Jumper
133
Removing Other Components
134
Table 2-5. Removing Components
134
Troubleshooting and Diagnostics
136
Support by Authorized Service Providers
136
Table 3-1. ASP Support Options
136
Troubleshooting
137
Figure 3-1. Basic Troubleshooting Steps
137
Checking for Customer Abuse
138
Troubleshooting the Problem
138
Verifying the Repair
139
Table 3-2. Scope of Diagnostic Tools
140
Table 3-3. Troubleshooting Suggestions
141
Diagnostic Tools
153
Table 3-4. POST Terminal-Error Beep Codes
155
Table 3-5. POST Messages
158
Table 3-6. Sycard Pcctest Commands
160
Bios Setup Utility
161
Table 3-7. BIOS Setup Menus and Parameters
162
Replaceable Parts
164
Figure 4-1. Exploded View
165
Figure 4-2. Exploded View
166
Table 4-1. Replaceable Parts
167
Table 4-1. Replaceable Parts
168
Table 4-2. Accessory Replaceable Parts
175
Table 4-3. Part Number Reference
176
Reference Information
185
Password Removal Policy
185
Hewlett-Packard Display Quality Statement
186
Table 5-1. LCD Guidelines
187
Service Notes and Obsolete Parts
188
Related product manuals
HP Pavilion ze4300 - Notebook PC
8 pages
HP Pavilion zd7000 - Notebook PC
67 pages
HP Pavilion zv5000 - Notebook PC
56 pages
HP Pavilion Notebook PC
74 pages
HP Pavilion Notebook PC 17
5 pages
HP Pavilion 14 Notebook PC
95 pages
HP Pavilion n5000 - Notebook PC
153 pages
Pavilion dv9000 - Entertainment Notebook PC
38 pages
Pavilion dv9500 - Entertainment Notebook PC
30 pages
Pavilion dv3000 - Entertainment Notebook PC
48 pages
Pavilion HDX9000 - Entertainment Notebook PC
18 pages
Pavilion dv2-1000 - Entertainment Notebook PC
37 pages