lp-505 Rev. 000 Rel. 015 Date 1.7.20
62
Have leaks xed at once by a qualied installer / service technician.
Failure to comply could result in substantial property damage, severe
personal injury, or death.
Operate Pressure Relief Valve
• Before proceeding, verify that the relief valve outlet has been
piped to a safe place of discharge, avoiding any possibility of
scalding from hot water.
• Shut power o to the water heater. To avoid scalding, wait for
water heater to cool before operating the relief valve.
To avoid water damage or scalding due to relief valve operation, a
discharge line must be connected to the valve outlet and directed
to a safe place of disposal. This discharge line must be installed by a
qualied installer / service technician in accordance with the water
heater installation manual. The discharge line must be terminated
so as to eliminate possibility of severe burns or property damage
should the valve discharge.
• Lift the relief valve lever. If water ows freely, release the lever
and allow the valve to seat. Watch the end of the relief valve
discharge pipe to ensure that the valve does not weep after
the line has had time to drain. If the valve weeps, lift the lever
again to attempt to clean the valve seat. If the valve does
not properly seat and continues to weep, contact a qualied
installer / service technician to inspect the valve and system.
• If water does not ow from the valve when you completely
lift the lever, the valve or discharge line may be blocked.
Immediately shut the water heater down per instructions
on page 2 and call a qualied installer / service technician to
inspect the valve and system.
• If relief valve seats properly, restore power to the water heater.
Observe operation for ve minutes and ensure it operates
properly.
Check the Burner
Clean the exterior of the burner.
Cleaning the Cold Water Inlet Filter (Draining the Water Heater)
1. Place a bucket under the appliance to collect the residual water
inside the water heater.
2. Press the Power button on the control panel to turn o the electrical
power to the water heater. Then turn o the gas valve.
3. Valve o the water heater from the system. If the water heater
cannot be isolated from the system, turn o the main water valve.
Open the hot water faucets in the system to aid in draining the
system.
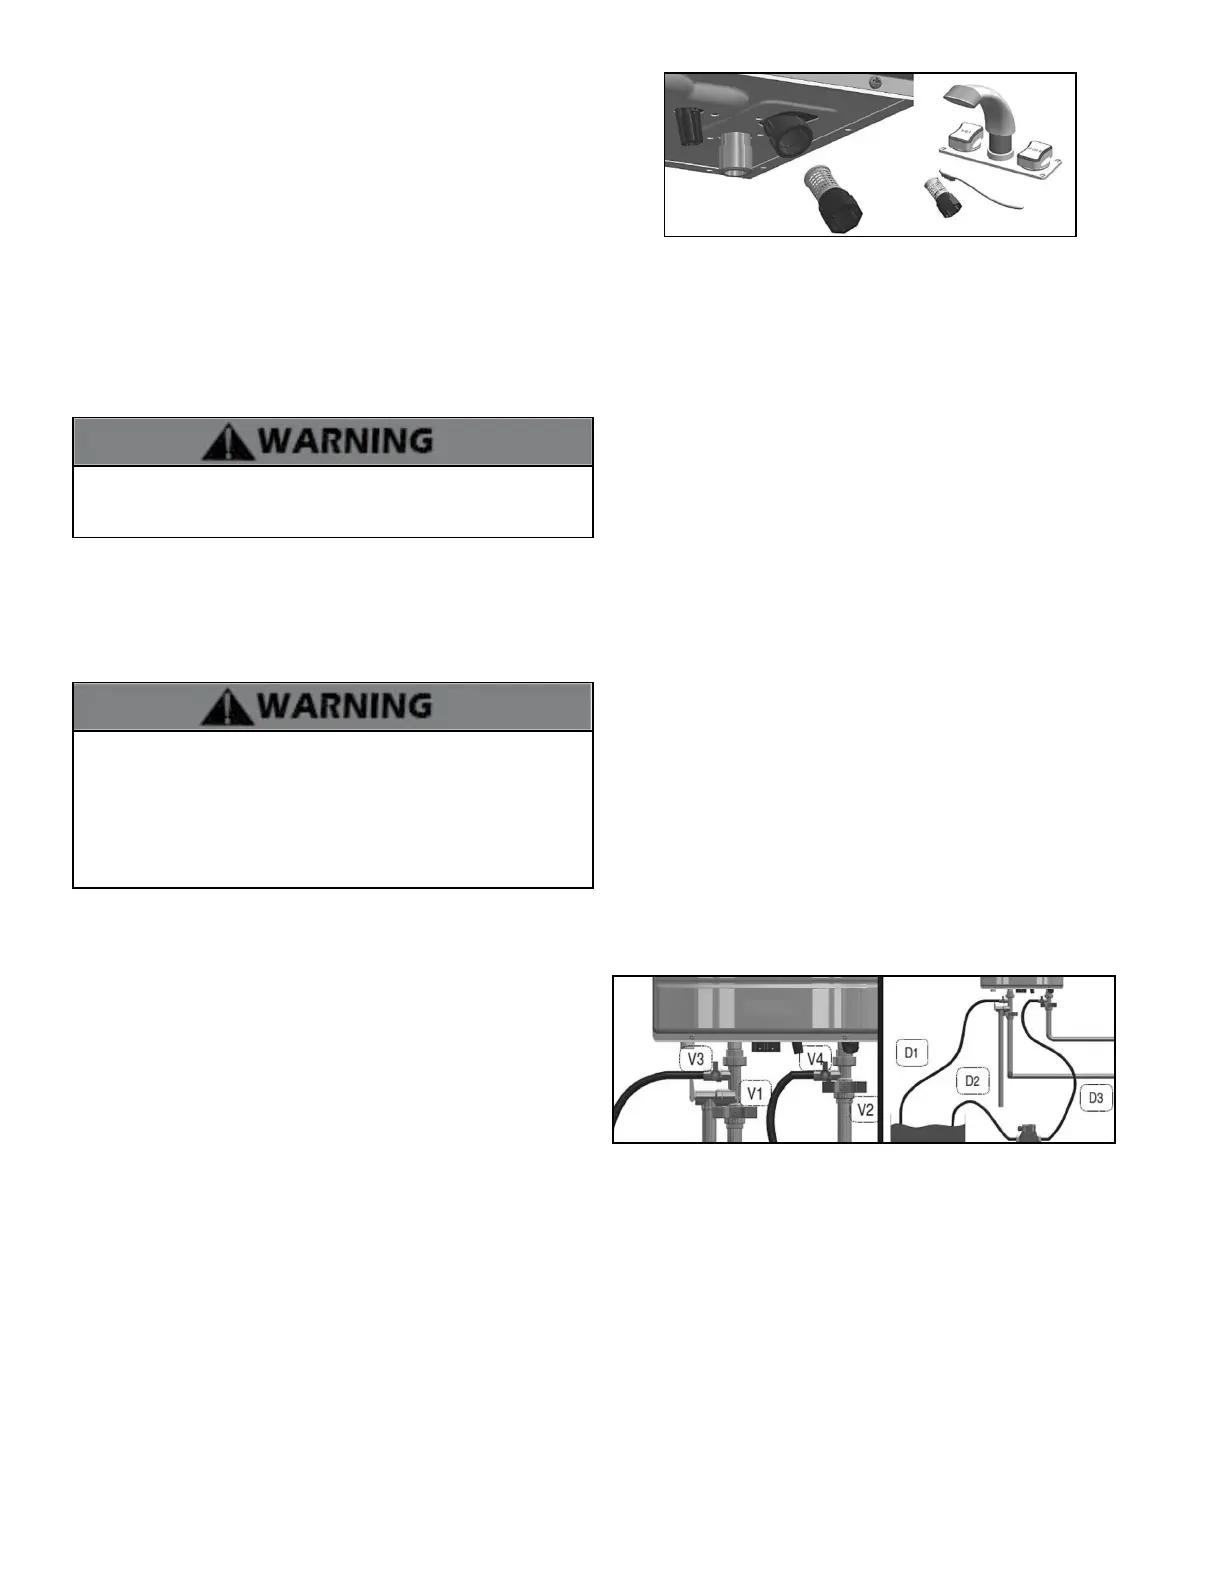
5. Remove the cold water inlet lter. Then clean it with a toothbrush
and clean running water. See Figure 58.
7. Dry the lter completely. Then reinsert the lter into the plastic
assembly.
8. Replace the front cover of the water heater cabinet. Reconnect
power supply to the water heater.
9. Press the Power button on the control panel to turn on the water
heater.
Check Primary and Gas Piping
• Remove the water heater cover and perform a gas leak
inspection following Operating Instructions, page 2, this
manual. If gas odor or leak is detected, follow procedures on
page 2. Call a qualied installer / service technician.
• Visually inspect for leaks around the internal water heater
water connections and around the heat exchanger. Visually
inspect the external system piping, circulators, and system
components and ttings. Immediately call a qualied installer /
service technician to repair any leaks
Figure 58 - Draining the Water Heater; Cleaning the Filter
6. Reinstall the cold water inlet lter.
7. Restore water service to the water heater by opening the
isolation valves, or turning on the main water valve.
8. Turn on the gas valve. Turn on electrical power to the water
heater and press the Power button to turn the water heater on.
Flushing the Water Heater
Flushing the heat exchanger is a complicated procedure that should
only be performed by a qualied installer / service technician.
NOTE: Improper maintenance WILL VOID water heater warranty.
1. Disconnect electrical power to the water heater.
2. Close the shuto valves on both hot water outlet and cold
water inlet lines (V1 and V2). See Figure 59.
3. Connect one hose (D1, Figure 59) to the valve (V3) and place
the free end in a bucket. Connect one of the hoses (D3) to the
circulation pump outlet and the cold water inlet line to valve V4.
Connect the other hose (D2) to the circulation pump inlet and
place the free end in the bucket.
4. Pour tankless water heater cleaning solution into the bucket.
Ensure the cleaning solution is approved for potable water
systems. Place the drain hose (D1) and hose D2 to the pump inlet
in the cleaning solution.
5. Open service valves (V3 and V4) on the hot water outlet and
cold water inlet lines.
6. Turn on the pump. Operate the pump and allow the cleaning
solution to circulate through the water heater for at least 1 hour
at a rate of 4 gallons per minute. This will remove any possible
harmful scale deposits.
7. Rinse the cleaning solution from the water heater as follows:
a. Remove the free end of drain hose D1 from the bucket.
b. Close service valve V4 and open shuto valve V2.
c. Do not open shuto valve V1.
d. Allow water to ow through the water heater for 5 minutes.
e. Close shuto valve V2.
Figure 59 - Flushing the Water Heater
8. Disconnect all hoses.
9. Remove the cold water inlet lter from the water heater and
clean out any residues.
10. Reinsert the lter and ensure the lter cap is securely
tightened.
11. Connect electrical power to the water heater.
12. Open a hot water faucet. Run the water heater continuously
for ve minutes to ensure all cleaning solution is purged from the
system. Check for leaks and ensure the water heater is operating
properly.
 Loading...