Extension Cylinders Repair 5000 SRM 969
Extension Cylinders Repair
REMOVE
1. Retract attachment to 20-ft position. Shut down
engine. See Figure 1 and Figure 8.
2. Disconnect hydraulic lines at chain end (42) and
put caps on open lines. Disconnect electrical
plugs at chain end.
3. Remove bracket (25) holding chain and hose
clamp closest to chain.
4. Start engine. Extend extension beam approxi-
mately 1200 mm (4 ft) allowing removal of pin
at rod end of extension cylinder.
5. Remove snap ring and pin from rod end of exten-
sion cylinder.
6. Retract attachment to 20-ft position. Shut down
engine.
7. Using a crane or lift truck, pull extension beam
out approximately 1200 mm (4 ft). Carefully
guide hose/cable chain into center frame.
8. Remove two bolts holding interface box and repo-
sition box to prevent damage.
9. Support extension cylinder using a crane or lift-
ing device capable of supporting 250 kg (551 lb).
10. Remove six bolts at gland (10) holding extension
cylinder.
11. Remove extension cylinder from attachment
horizontally until cylinder is completely clear
of main frame of attachment. Carefully guide
chain to prevent damage.
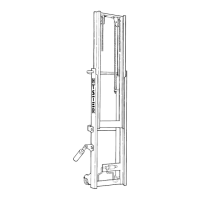
DISASSEMBLE
1. Remove four bolts (16) that hold ring (6).
2. Slide ring away from cylinder head.
3. Pull piston rod (3) out of cylinder.
4. Piston (13) will touch spacer (11), which will push
out gland (10), O-ring (23), bushing (9), and seal
ring (22). It will also push out wiper ring (4),
guide ring (8), and washer (5).
5. Remove setscrew (15). Remove nut and piston
from rod.
6. Inspect components and replace if necessary.
CLEAN AND INSPECT
WARNING
Cleaning solvents can be flammable and toxic
and can cause skin irritation. When using
cleaning solvents, always follow the solvent
manufacturer’s recommended safety precau-
tions.
Clean parts of the cylinder with solvent. Inspect
shell, rod, and piston for wear or damage. Inspect
bearing blocks for wear or damage. Install new parts
as necessary.
NOTE: The pressure reducer (32) has been sealed
andissuppliedwithapressuresettingof80bar
(1160 psi). See Figure 8. Do not adjust this pressure
setting.
ASSEMBLE
Follow steps under Disassemble in reverse order.
INSTALL
1. Clean tracks and lubricate in those positions
where nylon pads (18) for extension cylinder will
come in contact with center beam. See Figure 8.
2. Use a crane or other lifting device capable of
supporting 250 kg (551 lb) and install extension
cylinder until bracket holding extension cylinder
is aligned. Carefully guide hose/cable chain into
center frame.
3. Install six bolts holding bracket.
4. Mount interface box using two bolts.
5. Connect electrical connectors at rear of extension
cylinder. Connect hydraulic lines to extension
cylinder.
6. Start engine. Extend attachment and align pis-
ton rod (3) end with extension beam, allowing in-
stallation of pin and snap ring. Install pin and
snap ring.
7. Retract attachment to 20-ft position. Carefully
guide hose/cable chain.
12