30
1
2
3
3
3
4
5
6
7
6
8
9
A
10
11
12
12
A
B
A
C
INSTALLERUSER
MAINTENANCE TECHNICIAN
24
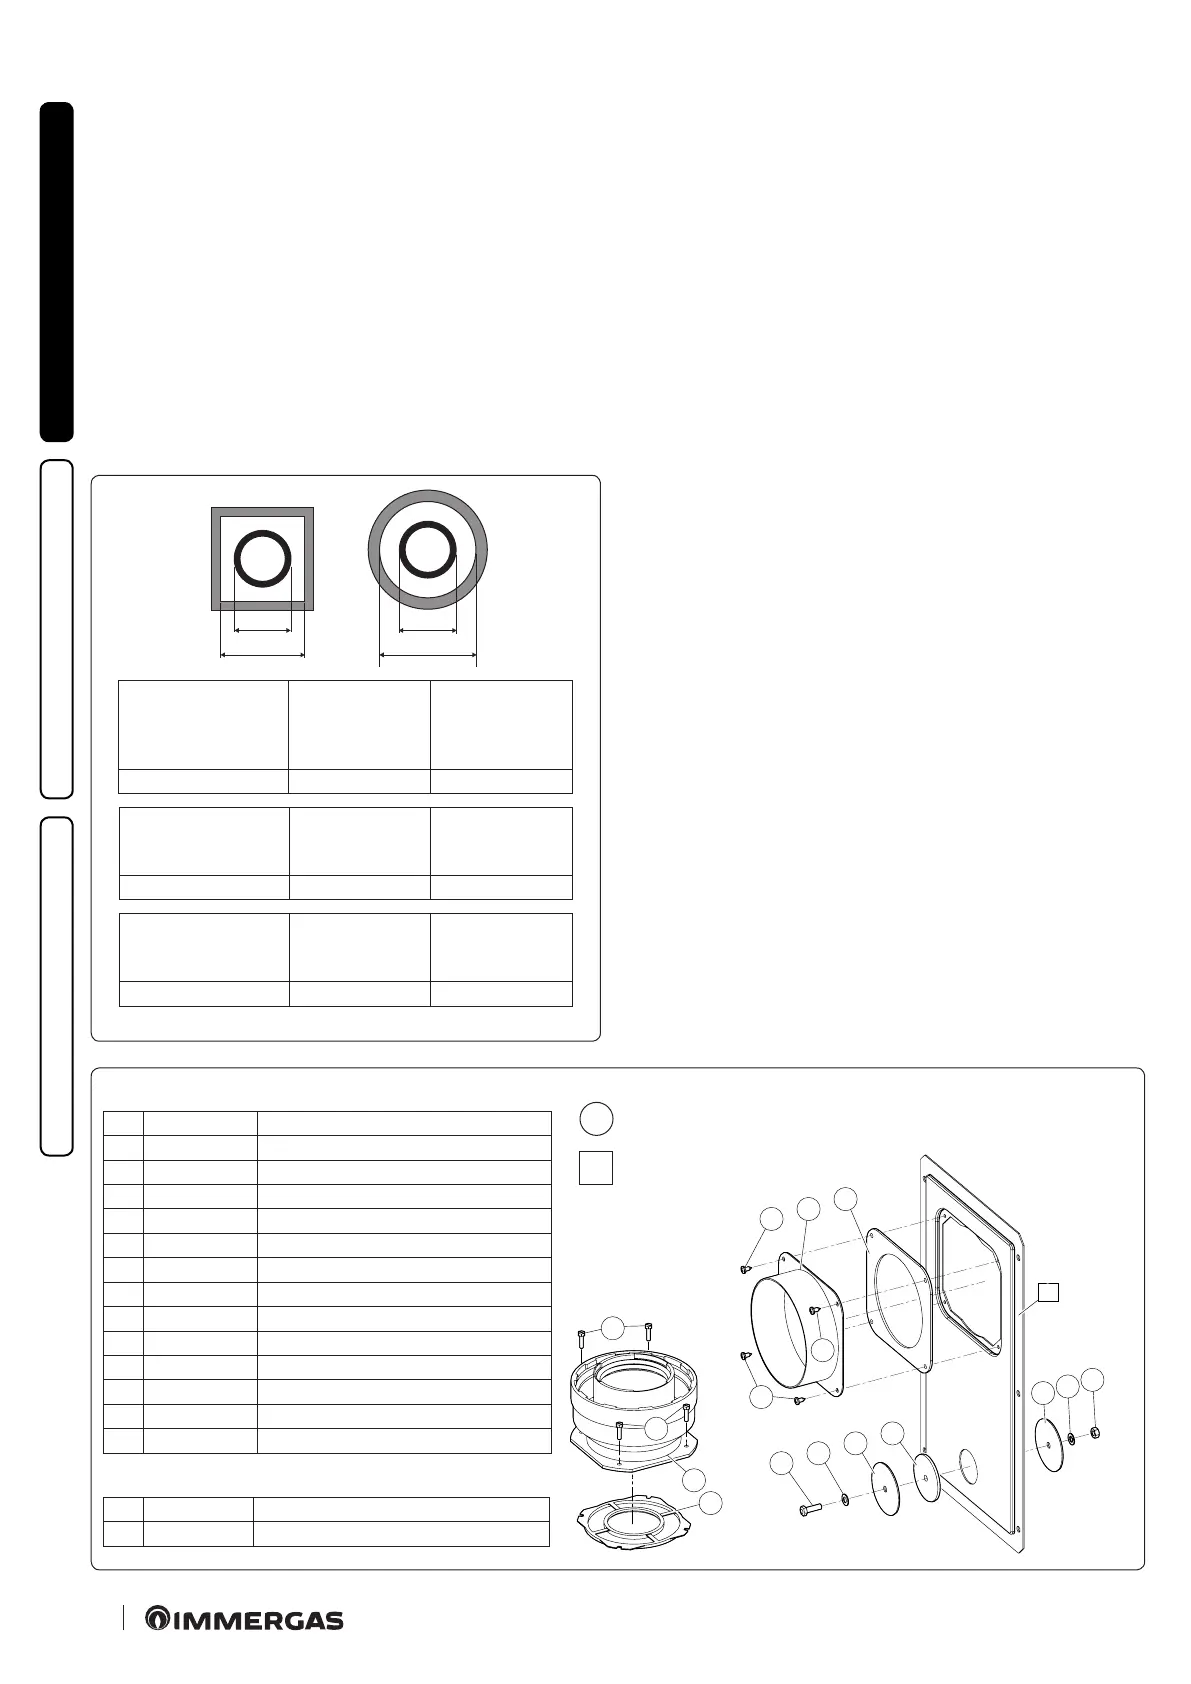
Installation drawings key:
Unique identication of the component
in the kit
Identification of the component not
supplied in this kit
1
A
Kit composition:
Ref. Qty Description
1 1 Door adaptor Ø 100 or Ø 125
2 1 Door gasket made of neoprene
3 4 Screws 4.2 x 9 AF
4 1 Hex headed screw M6 x 20
5 1 Flat nylon washer M6
6 2 Door hole closure metal-sheet plate plug
7 1 Plug gasket made of neoprene
8 1 Toothed washer M6
9 1 Nut M6
10 1 (kit 80/125) Concentric gasket Ø 60-100
11 1 (kit 80/125) Flanged adapter Ø 80-125
12 4 (kit 80/125) Hex headed screws M4 x 16 slotted
- 1 (kit 80/125) Bag of lubricating talc
Supplied separately:
Ref. Qty Description
A 1 Ducting kit door
1.19 ADAPTOR C9 KIT INSTALLATION.
is kit allows an Immergas boiler to be installed in "C
93
" cong-
uration, with combustion air intake directly from the sha where
the ue gas exhaust is, obtained by means of a ducting system.
System composition.
e system must be combined with the following components
(sold separately) to be functional and complete:
- kit C
93
Ø 100 or Ø125 version;
- ducting kit Ø60 and Ø80 rigid and Ø50 and Ø80 exible;
- ue exhaust kit Ø 60/100 or Ø 80/125 congured according to
the installation and type of boiler.
Kit Assembly.
- Mount the components of kit "C9" on the door (A) of the ducting
system (Fig. 30).
- (Version Ø 125 only) mount the anged adaptor (11) interposing
the concentric gasket (10) on the boiler, tting it with the screws
(12).
- Mount the ducting system as described in the relative instruc-
tions sheet.
- Calculate the distances between the boiler drain and the bend
of the ducting system.
- Prepare the boiler ue system, making sure that the internal pipe
of the concentric kit is tted up to the end stop in the ducting
system curve (Quota "X" Fig. 31), whereas the external pipe must
reach the end stop of the adapter (1).
N.B.: to encourage the removal of possible condensate forming
in the exhaust pipe, tilt the pipes towards the boiler with a min-
imum slope of 1.5%.
- Mount the cover (A) complete with adaptor (1) and caps (6) on
the wall and assemble the ue system to the ducting system.
N.B.: (version Ø 125 only) before assembly check the gaskets are
in the right position. In the event component lubrication (already
carried out by the manufacturer) is not sucient, remove the
residual lubricant using a dry cloth, then to ease tting coat the
parts with common or industrial talc.
Once all components have been assembled properly, the exhaust
fumes will be expelled via the ducting system; the combustion
air for normal boiler operation will be aspirated directly by the
sha (Fig. 31).
29
Ducting
Ø 80 Rigid
(A) mm
SHAFT
(B) mm
SHAFT
(C) mm
86 126 146
Ducting
Ø 80 Flexible
(A) mm
SHAFT
(B) mm
SHAFT
(C) mm
90 130 150
Ducting
Ø 60 Rigid and
Ø 50 Flexible
(A) mm
SHAFT
(B) mm
SHAFT
(C) mm
66 106 126



 To Next Page