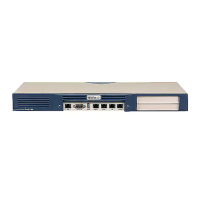
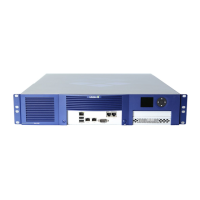
Infoblox SoT 1405 Series Field Replaceable Units
34 Infoblox Installation Guide
Note that all disk drives in the array must have the same disk type (IB-Type 5) for the array to function properly.
When you have a mismatched disk in the array, promptly replace the disk with a replacement disk from Infoblox to
avoid operational issues.
Note: For replacement disk assembly part numbers, see Table 7 on page 39.
Disk LED Operation
The disk drives are located on the left side of the appliance rear panel. A single LED, the top LED on the right of the
drive carrier, indicates the activity and status of each drive.
Table 6 Disk Drive LED
Replacing Hard Disk Drives
Caution: Never remove a correctly functioning drive in a live Infoblox SoT 1405 Series appliance. If a disk drive fails,
remove the failed disk only. (Verify the failed disk in the Grid Manager or through the CLI.) Removing the hard disk
from a correctly operating Infoblox SoT 1405 Series appliance can cause a complete failure of the appliance and
require an RMA (Return Material Authorization).
Use the following procedure to replace a hard disk in the Infoblox SoT 1405 Series appliance (Reporting 1405
excluded):
1. Power down the appliance before replacing the hard disk drive.
2. Press the release button to unlatch the disk.
3. Use the catch-release lever to pull the disk about two cm (one inch) to disengage contact, as indicated in
Figure 14.
Upper LED Color Condition Action
Green (flickers on
and off)
Disk is connected and
operating normally
None
Dark Disk has failed or not
inserted
Verify the disk failure in the Grid Manager or CLI. Remove the disk and replace
with a functional disk drive. Note that the drive rebuilds with its twin.
 Loading...