PROCEDURE FOR CHANGING THE INTELLISYS CONTROLLER
SSR 50-450 Horsepower
1. Remove the power from the machine.
2. Remove the back cover from the defective controller. (Be careful not to
break the ground strip that is connected to the back cover.)
3. Disconnect the two ribbon cables inside the controller.
4. Remove the controller mounting screws and remove the controller out
the front of the starter door.
5. Remove the gasket from the defective controller and use it on the new
one. If the old gasket is damaged, replace it.
6. Install the new controller in the starter door using the mounting screws.
7. Reconnect the ribbon cables to the new controller by removing the back
cover. Note: The new controller comes with two new ribbon cables, but
the installed ribbon cables can be used if they are in good condition.
8. Replace the back cover on the controller.
PROCEDURE FOR CHANGING THE STARTER INTERFACE BOARD
SSR 50-450 Horsepower Intellisys
1. Remove power from the machine.
2. Disconnect the ribbon connector in the upper right hand corner of the
interface board.
3. Remove the connector from the transformer in the top center of the board.
4. Disconnect the wires from the stepper motor and stepper limit board from
terminal strip BTS-3 (left side of the interface board).
5. Remove the six (6) mounting screws and allow the board to lay down.
6. Completely back out all of the terminal screw before mounting the board
in the starter box.
7. Mount the replacement starter interface board using the six mounting
screws.
8. Remove and reconnect one wire at a time from the old board to the new
one. Be careful to remember which terminal number each wire is moved
from.
9. Reconnect the stepper motor and stepper limit board using the color
codes on the wires and terminals.
10. Reconnect the controller ribbon connector and the transformer connec-
tor.
-55- -56-
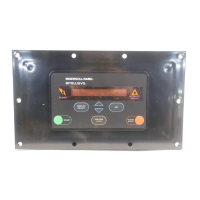
3) Press “Set” once...then you should see the words "Ready-To-Start”
change to “Press Set Chg Values” and/or “Press Test - Light Ck”. These
two sets of words will flash back and forth about every 3 seconds.
Also, a small white light over the “Set” button and a red “Test” light will
appear.
4) Press the “Down” arrow of the “Display Select” and the Mod/ACS button
at the same time once.
5) You should see the words “Scroll for Sensor” and 2 red arrows appear.
6) Press the “Down” red arrow and you will see two sets of words...”Sensor
1AVPT" and “Inlet Vacuum” flash back and forth on the display about
every three seconds.
7) Press “Set”...and “Sensor 1AVPT” will blink twice and lock in the trans-
ducer calibration and then automatically scroll to a different set of
words...they will be “Sensor 3APT" and “Sump Pressure”. They also flash
back and forth about every three seconds.
8) Press “Set”...and “Sensor 3APT” will blink twice and lock in the transducer
calibration and then automatically scroll to a different set of words...they
will be “Sensor 4APT” and “Package Discharge Pressure.” They also
flash back and forth about every three seconds.
9) Press “Set” and 4APT will blink twice and lock in the transducer calibration
and then automatically scroll back to the beginning set of words.
10) All three transducers are now calibrated...To exit this function...press the
“Down” arrow of the “Display Select”...or...simply wait for thirty seconds
and the panel will automatically default back to “Checking Machine” and
then to “Ready-To-Start”.
11) The unit can now be started normally.
PROGRAM CONTROLLER TO READ INLET FILTER CONDITION
1. Ready to Start (in display window)
2. Press set
3. Press UNLOAD and MOD/ACS at the same time “checking machine” will
display for 2 seconds.
4. Scroll down to inlet filter condition and see -0- zero.
5. Run the machine and read inlet filter condition under various load
conditions. Maximum 13.8 shutdown on high inlet vacuum.
NOTE: All Display readings are frozen into memory after any shutdown until
reset is pressed.
 Loading...