IF CONTROLLER HAS THEN
A. Software Revisions 1.11, Install new E-PROM 39179593
1.20, 1.3 or 1.4 Revision 1.5 onward
In Existing Controller
B. Software Rev. 1.5 No Changes Required
Onward
IF COMPRESSOR THEN
A. Has Auto Start/Stop No Changes Required
Prom
B. Does Not Have Auto Install Auto Start/Stop
Start/Stop Prom Field Kit 39671193
TOOLS REQUIRED:
ONLY WHAT WOULD BE FOUND IN ANY REASONABLY EQUIPPED
SERVICEMAN’S TOOL BOX.
PARTS LIST FOR SEQUENCER INTERFACE I (KIT P/N 39674395)
ITEM PART NUMBER QTY DESCRIPTION
1 39813274 1 Interface I, Sequencer
2 39547880 1 Cable, Modular, 44" Lg.
3 39177357 4 Screw, #10-32 Self Tapping
4 APDD 404B-91 1 Instructions, Interface I
Installation
5 APDD 405A-91 1 Instruction, Sequence
Controller, SSR10-450 HP
6 39181284 1 Fuse, 1A (Spare)
7 39179593 1 EPROM, Programmed
(Software Revision 1.5 Onward)
INSTALLATION INSTRUCTIONS:
1. Locate the area inside the starter box where the Sequencer Interface I
(P/N39813274) is to be mounted (see figure 1). Align the left hand side
of the Sequencer Interface I approximately 3 inches from the left side of
the starter box and center front to back on the starter box shelf. Mark the
mounting holes. Drill #25 diameter pilot holes for the #10-32 self-tapping
screws. Attach the Sequencer Interface I with the screws provided in
the kit.
2. Connect the Modular Cable (P/N39547880) between Communication
Port Jack on the Sequencer Interface I and the Communication Port
Jack on the Compressor Starter interface Board (see figure 3). Route
cable along with existing ribbon cables and secure away from primary
voltage wiring/components.
3. Connect 115 V. A. C. wiring between the Sequencer Interface I and the
Starter Interface board as shown in the wiring diagram (figure 3).
4. Connect wiring from terminals #1-#5 on the Sequencer Interface I to
corresponding terminals #TB-1 through #TB-5 on the Sequencer Block.
It is recommended that conduit be used to connect the Sequencer to the
Compressor Starter Box/Sequencer Interface I to assure continuous
grounding between components.
5. The 115 V.A.C. wiring and the 5 wires connecting the Sequencer
Interface I to the sequencer should be separated from existing ribbon
cables and 5 V.D.C. wiring, as much as possible.
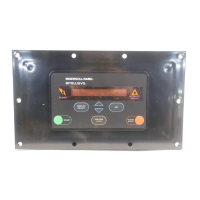
INTELLISYS CONTROLLER E-PROM VERIFICATION/REPLACEMENT
1. Remove the aluminum back cover from the Intellisys Controller. (See
Figure 2).
2. Locate the existing programmed E-PROM (located on printed circuit
board in socket labeled U2). See figure A. If the E-PROM label indicates
software revision levels 1.11, 1.2, 1.3 or 1.4 replace the E-PROM with E-
PROM 39179593 having software revision 1.5 onward. (Steps 3-6). If
the E-PROM label indicates software revision 1.5 onward, no changes
are required, replace the back cover.
3. Remove the existing programmed E-PROM (located on printed circuit
board in socket labeled U2). See figure A.
4. Remove the new programmed E-PROM (P/N39179593) from its packag-
ing, using care not to damage the pins on the E-PROM.
5. Insert the E-PROM into the socket labeled U2 (see figure A). Pin #1 on
the E-PROM should be located in the upper left corner for correct
installation.
6. Replace the back cover.
OPERATION
1. Refer to Operators/Instruction Manual (APDD 321C-90) to activate auto
start/stop and sequencer functions in the Intellisys Controller.
2. Refer to Sequence Controller Instructions (APDD 405A-91) for
Sequencer Operation.
FIGURE A
-68--67-
 Loading...