MIG-185CMT
16
PLASMA CUTTING
START
Hold the torch 2 mm above the workpiece at the start of the cut and pull the torch trigger. If the arc does
not ignite within 2 seconds, you must press the torch switch again.
NOTE: Failure to stand clear of the workpiece before firing could result in spray damage to the
nozzle.
CUTTING THROUGH THE CENTER OF THE WORKPIECE
Hold the torch 2 mm above the workpiece at a 90 degree angle. Squeeze the trigger on the torch and
wait for the arc to penetrate the material. Once the arc has penetrated the material, you should hold the
torch at a 90 degree angle to the material and move it in the desired direction at an appropriate cutting
speed.
NOTE: Penetrating the workpiece in the center will wear the nozzle much faster than cutting from the
edge.
CUTTING FROM THE EDGE OF THE WORKPIECE
Hold the torch at a 90 degree angle 1 mm above and away from the workpiece and initiate the arc. Once
the arc is initiated, tilt the torch against the material at a 90 degree angle and move in the desired
direction at an appropriate cutting speed.
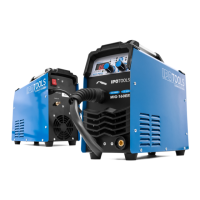
CUTTING SPEED
Move the torch at the appropriate speed to get the plasma stream into the workpiece. Since the first cut
is a test, this is a good time to get a feel for the cutting speed. Note that if the cutting speed is too low,
the kerf may be too wide due to excessive heat, but if it is too high, the arc cannot enter the part.
NOTE: We recommend that you cut the part quickly and with high current.
After the cut
The gas is still flowing after the cut, the arc is no longer visible. This is normal, as the unit must be turned
on for at least 3 minutes for the fan to properly cool the electronics. Once the plasma cutter has cooled,
unplug the power cord from the power source to prevent damage to the unit in the event of a short
circuit, and store it in a clean, dry area.