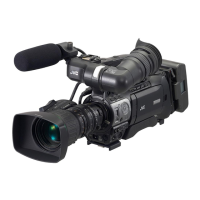
Front
.
345 087
b
a
jk
e
lmn
gfh
op
i
q
c
d
12 9
6
* Microphone is optional.
A Tally lamp
“TALLY LAMP” (A p. 108)
B Built-in microphone
C Microphone holder
“Attaching the External Microphone” (A p. 15)
D
Shoe
E “REC” (Record) button
“Taking Videos in Auto Mode” (A p. 20)
F Zoom lever
“Zooming” (A p. 26)
G Viewfinder
“Viewing with the viewfinder” (A p. 14)
H Eyepiece
I Eyepiece focus lever
J Built-in speaker
K Lens/Lens cover
L “DOOR LOCK” lever
M SD card slot A, B
“Inserting an SD Card” (A p. 6)
N LCD monitor
“Using the Touch Screen” (A p. 8)
“Viewing on LCD monitor” (A p. 14)
O Tripod mounting holes
“Tripod Mounting” (A p. 15)
P “AF/MF” Focus switch
“Selecting Focus Mode” (A p. 18)
Q i.AUTO (Intelligent Auto) button
“Selecting Intelligent Auto/Manual Recording Mode” (A p. 18)
R MODE (Video/Still image) button
“Selecting Video/Still Image Recording Mode” (A p. 19)
S “CAM”/“MEDIA” button
0
During recording: Switches to the media (playback) mode.
During playback: Switches to the camera (recording) mode.
T Lens cover switch
“Opening the Lens Cover” (A p. 14)
U Focus ring
“Adjusting Focus Manually” (A p. 27)
V “ADJ.” dial
W “SET” button
X “WHT BAL” White balance selection button
“Setting White Balance” (A p. 31)
Y “SHUTTER” Shutter speed button
“Adjusting Shutter Speed” (A p. 30)
Z “IRIS” Iris button
“Adjusting Aperture” (A p. 30)
a “AE±” Exposure button
“Adjusting Brightness Manually” (A p. 29)
Names of Parts
111
 Loading...