EasyManua.ls Logo

JVC HR-D540EE - Automatic Timer Recording

JVC HR-D540EE
90 pages
Print Icon
To Next Page IconTo Next Page
To Previous Page IconTo Previous Page
Loading...
AUTOMATIC
TIMER
RECORDING
First
of
all,
load
a
cassette
(with
safety
tab
in
place);
power
will
be
switched
on
automatically.
Two
ways
to
perform
timer
programming
A
Local
programming:
Programme
the
timer
using
the
recorder’s
controls
while
referring
to
the
recorder's
FDP.
B.
Direct
remote
programming:
Programme
the
timer
using
the
remote
control's
buttons
while
referring
to
the
recorder's
FDP.
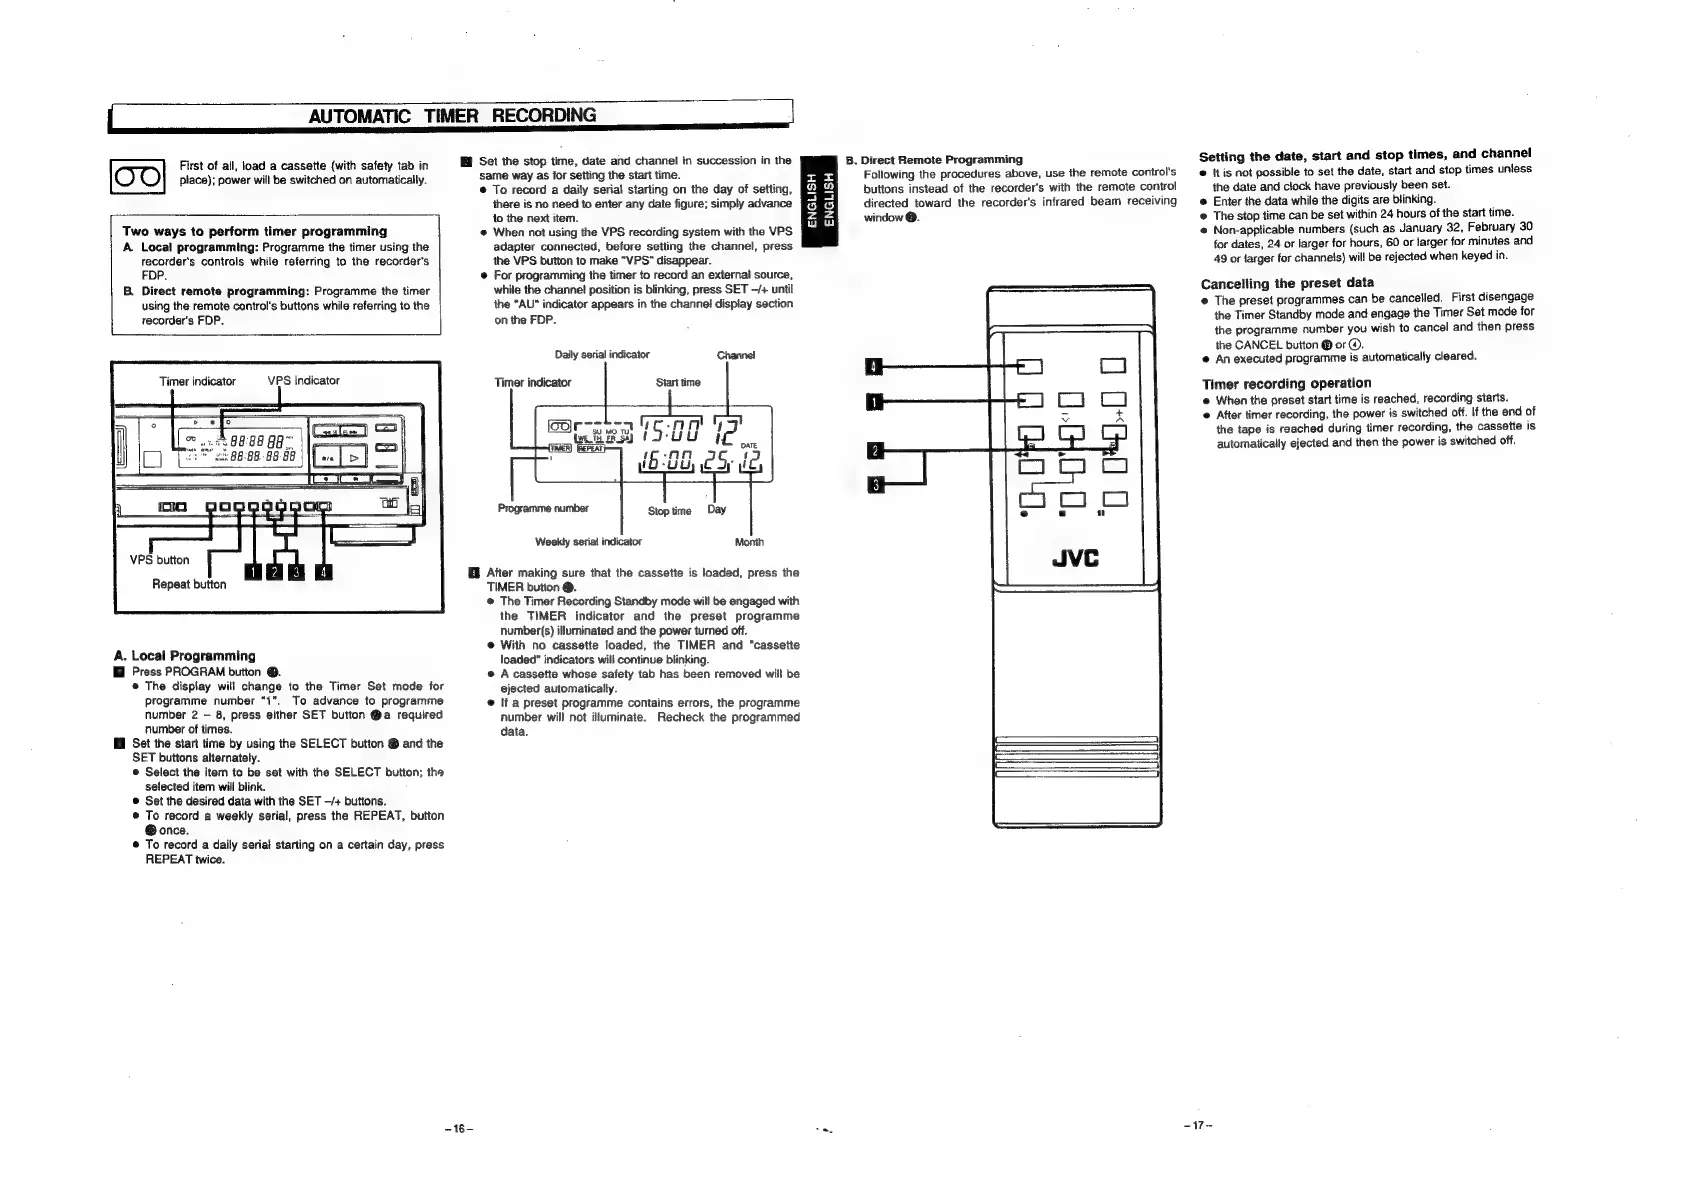
Timer
indicator
VPS
indicator
VPS
button
Repeat
button
A.
Local
Programming
fl
Press
PROGRAM
button
@.
@
The
display
will
change
to
the
Timer
Set
mode
for
programme
number
“1".
To
advance
to
programme
number
2
8,
press
either
SET
button
@a
required
number
of
times.
@
Set
the
start
time
by
using
the
SELECT
button
®
and
the
SET
buttons
alternately.
©
Select
the
item
to
be
set
with
the
SELECT
button;
the
selected
item
will
blink.
©
Set
the
desired
data
with
the
SET
—/+
buttons.
@
To
record
a
weekly
serial,
press
the
REPEAT,
button
@
once.
@
To
record
a
daily
serial
starting
on
a
certain
day,
press
REPEAT
twice.
@
Set
the
stop
time,
date
and
channel
in
succession
in
the
same
way
as
for
setting
the
start
time.
@
To
record
a
daily
serial
starting
on
the
day
of
setting,
there
is
no
need
to
enter
any
date
figure;
simply
advance
to
the
next
item.
@
When
not
using
the
VPS
recording
system
with
the
VPS
adapter
connected,
before
setting
the
channel,
press
the
VPS
button
to
make
“VPS”
disappear.
©
For
programming
the
timer
to
record
an
external
source,
while
the
channel
position
is
blinking,
press
SET
~/+
until
the
"AU"
indicator
appears
in
the
channel
display
section
on
the
FDP.
Daily
serial
indicator
Channel
Timer
indicator
a
time
pete
|
as
Programme
numbe:
a
time
Weekly
serial
indicator
Month
@
After
making
sure
that
the
cassette
is
loaded,
press
the
TIMER
button
@.
@
The
Timer
Recording
Standby
mode
will
be
engaged
with
the
TIMER
indicator
and
the
preset
programme
number(s)
illuminated
and
the
power
turned
off.
@
With
no
cassette
loaded,
the
TIMER
and
“cassette
loaded"
indicators
will
continue
blinking.
©
A
cassette
whose
safety
tab
has
been
removed
will
be
ejected
automatically.
®
if
a
preset
programme
contains
errors,
the
programme
number
will
not
illuminate.
Recheck
the
programmed
data.
~16-
ENGLISH
ENGLISH
B.
Direct
Remote
Programming
Following
the
procedures
above,
use
the
remote
control's
buttons
instead
of
the
recorder’s
with
the
remote
control
directed
toward
the
recorder's
infrared
beam
receiving
window
@.
Setting
the
date,
start
and
stop
times,
and
channel
©
It
is
not
possible
to
set
the
date,
start
and
stop
times
unless
the
date
and
clock
have
previously
been
set.
Enter
the
data
while
the
digits
are
blinking.
@
The
stop
time
can
be
set
within
24
hours
of
the
start
time.
@
Non-applicable
numbers
(such
as
January
32,
February
30
for
dates,
24
or
larger
for
hours,
60
or
larger
for
minutes
and
49
or
larger
for
channeis)
will
be
rejected
when
keyed
in.
Cancelling
the
preset
data
®
The
preset
programmes
can
be
cancelled.
First
disengage
the
Timer
Standby
mode
and
engage
the
Timer
Set
mode
for
the
programme
number
you
wish
to
cancel
and
then
press
the
CANCEL
button
@
or
@.
;
©
An
executed
programme
is
automatically
cleared.
Timer
recording
operation
@
When
the
preset
start
time
is
reached,
recording
starts.
After
timer
recording,
the
power
is
switched
off.
If
the
end
of
the
tape
is
reached
during
timer
recording,
the
cassette
is
automatically
ejected
and
then
the
power
is
switched
off.
247=