8
22.
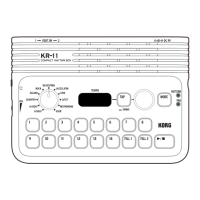
LOOP button
Press this buon when using Loop mode ("Loop mode" p.21).
23.
STEP button
For each step of the paern, press this buon to set the step parameters such as
the step on/o status and the probability at which a sound is produced when
the step is on.
24.
ACCENT button
Press this buon to set the accent parameters for each step in the paern.
25.
MOTION button
Press this buon to record various parameter values for each step of the paern.
Rear Panel
1 2 3 4 5 6 7 8 9
10 11
1.
(POWER) button
This switch turns this unit on and o.
To turn o the power, hold down this buon until the display disappears.
2.
DC 9V jack
Connect this jack to the included AC adapter.
3.
USB TO DEVICE jack
Directly connect to the MIDI controller using the USB cable to receive MIDI data.
This jack is only used to receive USB MIDI messages. To connect to your
computer, use the USB TO HOST jack.
For a USB MIDI controller that consumes a large amount of power, use the
power adapter that comes with the controller.
This jack cannot be used for a USB MIDI controller that has a USB hub function.
4.
USB TO HOST jack
Connect your computer to exchange MIDI data.
5.
MIDI OUT connector
You can connect an external MIDI device to play while using the sequencer or
drum pad of this unit.