32
Torque Specications
Chassis Torque Chart
Chassis Remaining M5 Nuts M5 5 Nm (3.7 ft-lb)
Chassis Remaining M5 Screws M5 5 Nm (3.7 ft-lb)
Chassis Remaining M6 Nuts M6 10 Nm (7.4 ft-lb)
Chassis Remaining M6 Screws M6 10 Nm (7.4 ft-lb)
Chassis Remaining M8 Screws M8 25 Nm (18.4 ft-lb)
Chassis Remaining M10 Nuts M1O 45 Nm (33.2 ft-lb)
Chassis Remaining M10 Screws M1O 45 Nm (33.2 ft-lb)
Rear Brake Fluid Reservoir Screw M5 5 Nm (3.7 ft-lb)*
Rear Brake Cylinder Screw
!
M6 10 Nm (7.4 ft-lb)*
Rear Brake Lever Screw M6 15 Nm (11.1 I bf ft)*
Rear Brake Lever Stub Screw
!
M6 10 Nm (7.4 ft-lb)*
Rear Brake Caliper Screw
!
M8 20 Nm (14.8 ft-lb)**
Rear Brake Disc Screw
!
M8 25 Nm (18.4 ft-lb)*
Fuel Pump Screw M6 6 Nm (4.4 ft-lb)
Handlebar Stub Clamp Screw
!
M6 10 Nm (7.4 ft-lb)
Handlebar Fork Tube Stub Clamp Screw
!
M6 15 Nm (11.1 t-lb)
Handlebar Stub Screw Clamping Piece on Handlebar Tube Screw
!
M8 20 Nm (14.8 ft-lb)
Shift Lever Stub Screw
!
M6 10 Nm (7.4 ft-lb)*
Shift Rod Screw
!
M6 12 Nm (8.9 ft-lb)*
Shift Rod Linkage Screw
!
M6 7 Nm (5.2 ft-lb)*
Shift Rod Screw
!
M8 20 Nm (14.8 ft-lb)*
Shift Shaft Support on Engine Screw
!
M8 20 Nm (14.8 ft-lb)*
Steering Damper Bracket Screw
!
M6 15 Nm (11.1 I bf ft)*
Lifting Gear Bracket Screws – front M6 10 Nm (7.8 ft-lb)*
Lifting Gear Support Screw– rear M8 25 Nm (18.4 ft-lb)*
Footrest Bracket Screw
!
M8 25 Nm (18.4 ft-lb)*
Fork Stub Screw
!
M8 15 Nm (11.1 ft-lb)
Front Brake Disc Screw
!
M8 25 Nm (18.4 ft-lb)*
Front Brake Caliper Screw
!
M1Ox1.25 45 Nm (33.2 ft-lb)**
Fuel Tank Fastening Screw
!
M8 25 Nm (18.4 ft-lb)*
Main Silencer Clamp Screw M8 18 Nm (13.3 ft-lb)
Steering Damper Bracket on Console Screw
!
M8 20 Nm (14.8 ft-lb)*
Steering Damper on Triple Clamp Screw
!
M8 20 Nm (14.8 ft-lb)*
Top Steering Stem Screw
!
M8 20 Nm (14.8 ft-lb)
Top Triple Clamp Screw
!
M8 15 Nm (11.1 ft-lb)
Bottom Triple Clamp Screw
!
M8 15 Nm (11.1 ft-lb)
Banjo Bolt, Brake Line
!
M1O 25 Nm (18.4 ft-lb)
Rear Sprocket Bolt
!
M1O 50 Nm (36.9 ft-lb)*
Deection Console on Engine Screw M1O 25 Nm (18.4 ft-lb)
Engine Brace on Engine Screw
!
M1O 30 Nm (22.1 ft-lb)*
Engine Brace on Frame Screw
!
M1O 30 Nm (22.1 ft-lb)*
Linkage Lever on Angle Lever Screw M1O 45 Nm (33.2 ft-lb)*
Bottom Shock Absorber Screw
!
M1Ox1.25 45 Nm (33.2 ft-lb)*
Top Shock Absorber Screw
!
M1Ox1.25 45 Nm (33.2 ft-lb)*
Tension Strut Bearing Screw
!
M12 45 Nm (33.2 ft-lb)*
Angle Lever to Link Fork Nut M14 100 Nm (73.8 ft-lb)
Tension Strut on Angle Lever Nut M14x1.5 100 Nm (73.8 ft-lb)
Swingarm Pivot Nut
!
M16x1 100 Nm (73.8 ft-lb)**
Steering Head, Top Nut M25x1.5 15 Nm (11.1 ft-lb)
Rear Wheel Spindle Nut
!
M25x1.5 100 Nm (73.8 ft-lb)**
Front Wheel Spindle Screw
!
M29x1.5 60 Nm (44.3 ft-lb)**
!
Safety critical screws, need to be checked every Pre-Ride Inspection and after every Oil Change
* Loctite
®
243™
** Long-life white grease
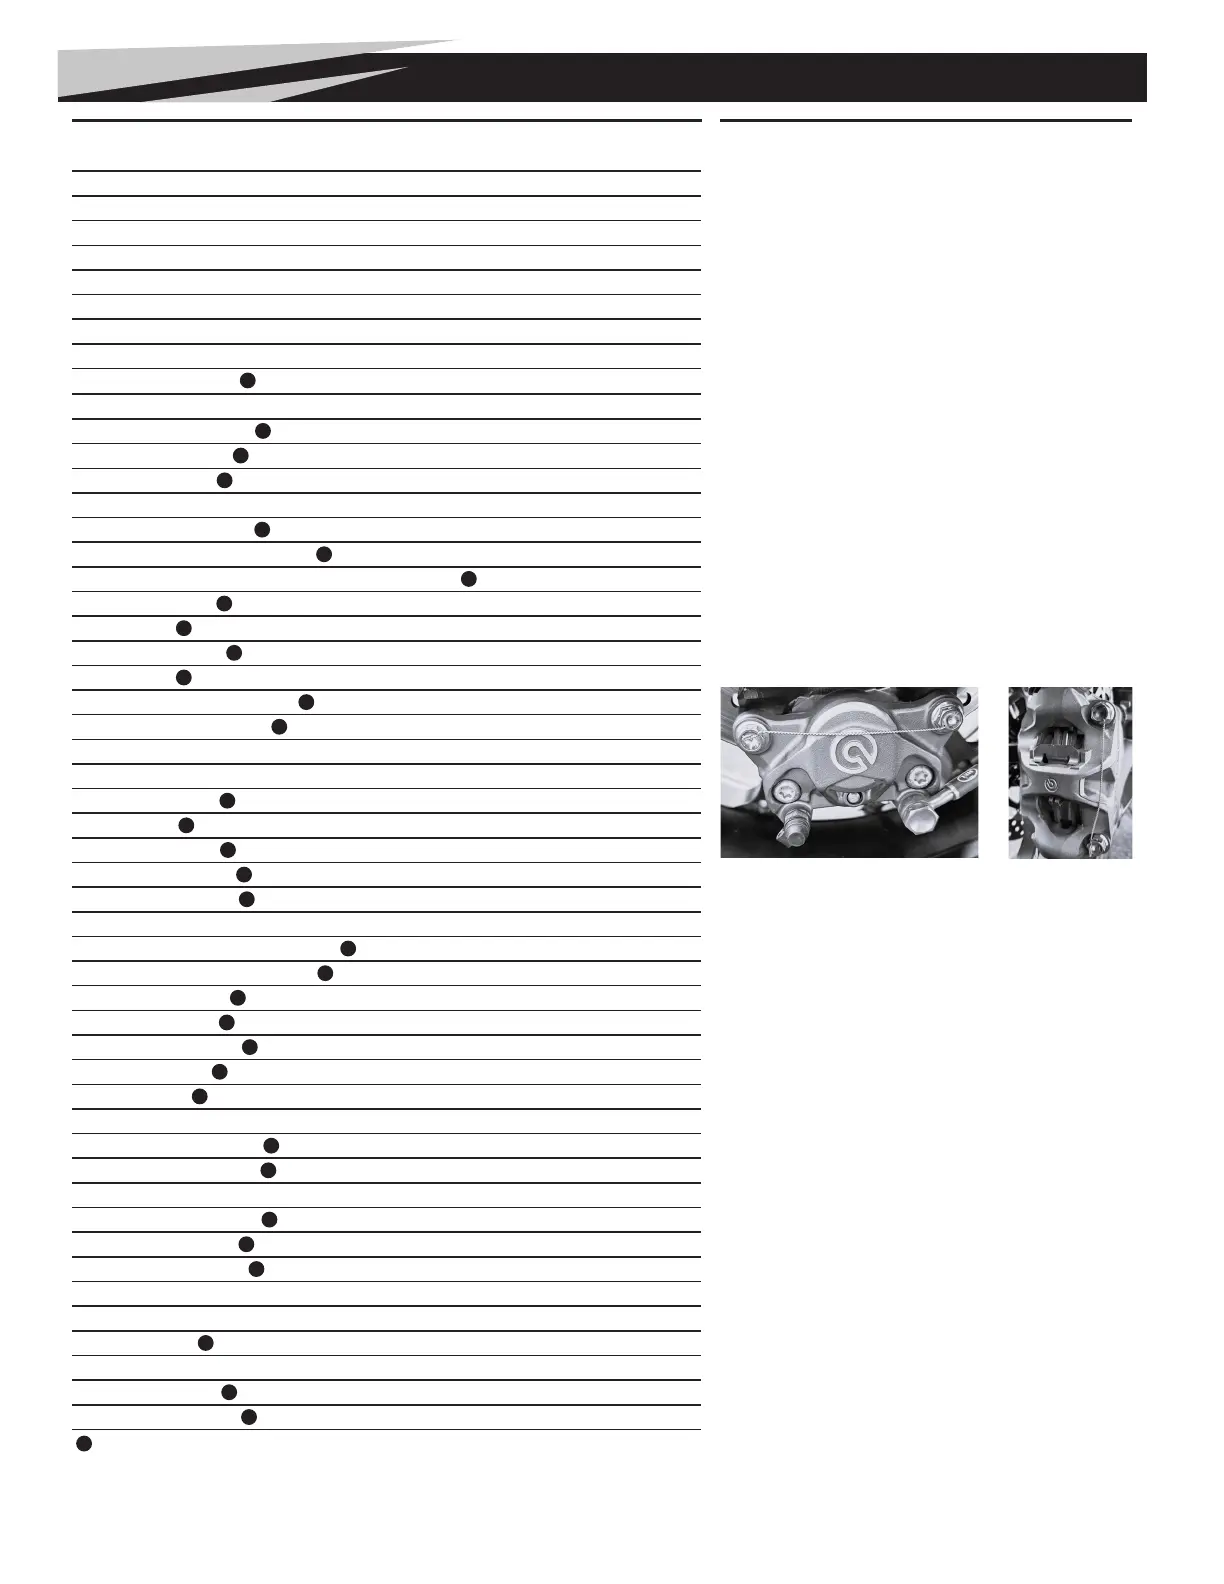
These images show how proper safety wire is installed - in a
manner that, if one bolt were to come loose, it would tighten the
other, and vice versa.
Safety wire is installed as an additional measure of
protection to keep critical fasteners in place from hard
use or vibration.
For your reference, here are the steps in order:
1. Drill fasteners or install ones with drilled heads.
2. Loop the wire through the fastener in a direction that pulling
on the wire would tighten the fastener.
3. Using safety wire plies, twist the safety wire until its lightly
tensioned.
4. Stop a little short of the next bolt or anchor point, and make
the last twist by hand to get it to the perfect length.
5. Go into the opposite side of the other fastener, loop the wire
through the fastener in a direction that pulling on the wire
would tighten the fastener.
6. Leave a 15-20 mm overhang and twist a short amount to
tuck in.
7. Snip off end of pigtail and tuck in for safety reasons.
8. Collect snipped part and throw away.
Safety Wire

 Loading...