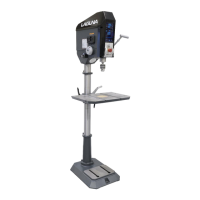
Button Functions/Touch Screen Displays:
Each of the touch screen buttons has an illuminated “teal/blue” colored indicator bar below the
button. When the indicator bar is illuminated, the feature is active, selected, or in the On
position. When the indicator bar is off, the feature is not active.
1. Motor ON/OFF Button - Starts and stops the drill motor when in manual mode by
pressing the button once to start and another time to turn off. When used in conjunction
with the Auto Start feature, the Auto Start button must be pressed to activate Auto Start
and the Motor ON/OFF button must be pressed to turn it on and light up the indicator bar
on the button. The motor will not start until the quill handle is pulled to move the drill bit
downwards.
2. Tone Button - The Tone Button turns the audible tone on and off. The tone sounds when
the touch screen buttons are pressed and provides an audible confirmation tone of button
selections. This function defaults to the On position when turning power on to the drill
press. Pressing the button will turn the tone off and will turn off the selection indicator bar.
3. LED Button - The DP20 drill press is equipped with an LED work light that illuminates the
table work area. The LED Button turns the light on and off. The LED defaults to the Off
position after the power has been turned off to the drill press.
4. Laser Button - Turns the crosshair lasers on and off. The lasers default to the Off position
after the power has been turned off to the drill press.
5. Speed Button - Used when setting speeds in the programming mode. After pushing and
holding the Program Button #9 to select the programming mode, touch the Speed Button
so the indicator bar flashes. Now adjust the desired speed for the selected program by
rotating the selector knob below the touch screen. When the desired RPM displays,
confirm the setting by pressing either the Speed Button or the Selector Knob. The speed
range is from 60 to 3600 RPM.
6. Depth Button - Used when setting the depth in the programming mode. This is most
often used when setting the depth for the bottom of the hole when tapping and using the
Auto Reverse function so the tap will stop and then back out of the hole before bottoming
out. When tapping, it is recommended to set this value less than the drilled hole depth, so
the tap does not bottom out. After pushing and holding the Program Button #9 to select
the programming mode, touch the Depth Button so the indicator bar flashes. Now adjust
the desired depth for the selected program by using the selector knob below the touch
screen. When the desired depth is displayed, confirm the setting by pressing either the
Depth Button or the Selector Knob.
7. Error Indicator/Error Code - Displays error codes. Some examples of errors are:
Selecting RPM higher than the 600 RPM limit when using the Auto Reverse function, Error
9 - when the chuck key is out of the chuck key holder when Auto Start function is selected.
See next section “Error Codes” for details.
 Loading...