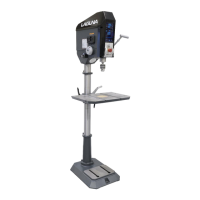
Install desired drill bit, tap, or appropriate tooling into chuck.
Tighten Chuck with Key, replace key into magnetic holder.
Adjust the table (height, swing & angle) and tighten all locks and tension bolts.
Turn ON LED light if needed for this application.
Position workpiece on table.
Turn on Laser Light if using to position stock.
Clamp workpiece onto table. Three T-slots and ten holes are designed, into the table, for
attaching clamps.
Set and lock Depth Stop, if required for the drilling application.
Confirm Main Power Switch is ON (on back of headstock).
Confirm E-Stop is not engaged.
The Control Panel should be lit up.
Choose drilling/tapping program or select & adjust RPM.
Turn ON power button (chuck should start to rotate)
Wait until Actual RPM has matched Selected RPM before engaging bit/tap.
Engage bit/tap with smooth even pressure on handle.
When drilling is completed, return the handle to upper/resting position.
Turn OFF chuck.
Be careful when removing the workpiece that chuck has stopped rotation and confirm
stock is not too hot or sharp to handle!
When complete, turn OFF laser, illumination light(s) and turn main power OFF.