OPERATION LEISTER Unifloor S
Operating condition
• Check the nozzle setting: the nozzle must maintain a distance from the base
material and the welding rod of about 2-3 mm.
•
When welding linoleum, lower the cover on to the welding nozzle (4) (see Detail
A:Page 6).
• Connect the tool to the mains.
Tool positioning
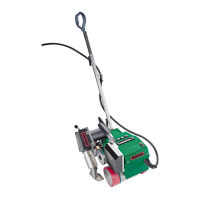
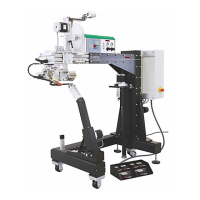
• Swivel hot air blower (3) up to the stop using swivel lever (19).
• Position the automatic welding machine over the joint to be welded.
• Insert the welding rod through the welding rod guide tube (19), pull it under the
welding rod pressure roller (6) and place it in the joint.
• The Guide roller (20) must run in the welding joint.
Welding parameters
• Set potentiometer for welding speed (14) to the required value.
• Set potentiometer for air temperature (16) to the required value.
• Turn on the air blower switch (15), set the two stage switch for airflow (17) at setting
3 and heat up for about 5 minutes.
• Important: low voltage.
If the maximum temperature is not reached, reduce the airflow by means of the
manual air valve (11) and the two stage switch for air flow (17).
• The contact pressure is effected through the weight of the automatic hot air
welding machine itself.
Welding procedure
• Swivel hot air blower (3) up to the stop using swivel lever (18) and at the same time
turn on the drive switch (13) (The welding process starts).
• Supervise the welding process: – Guide roller (20) must run in the joint.
–
The welding bead must be visible. If necessary
adjust the welding parameters using the poten-
tiometer (14).
• Wall switch-off (9)
When contact is made with the wall, the drive and heater are switched off auto-
matically.
• When welding is finished, swing up the hot air blower (3) to the stop by means of
swivel lever (18).
• Switch off the drive switch (13). Cut off the welding rod. Re-position the automatic
welding machine as necessary.
• After completing work, set potentiometer for air temperature (16) to zero so that
hot air blower (3) cools down. Then turn off the air blower switch (15).
• Disconnect the tool from the mains.
7