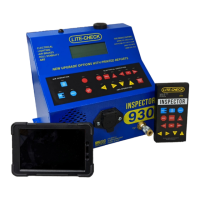
LITE-CHECK INSPECTOR 930
35
Tablet DOT Mode Features
The DOT Mode is used to perform a complete inspection to verify Federal DOT compliance or
for preventative maintenance purposes.
Performing an Inspection
Performing an Inspection
1. On the tablet, start the Lite-Check DOT app by pressing its icon on the home screen
2. Enter your credentials and tap “OK” to login. After a few moments you should see the tester voltage in the
upper left corner of the screen. If not, press the Bluetooth icon in the upper left corner and select your
Trailer Interface from the list.
3. If you are resuming a partially completed inspection or verifying repairs made as a result of a recent
inspection, tap the three vertical dots in the upper right corner to open the menu and select “Open”. Select
the inspection to resume from the list based on the trailer ID and the date. To sort by most recent, tap the
on-screen arrows beside “Date” until only a single down arrow is displayed. Skip to step #9.
4. To start a new inspection, select your shop location from the drop-down list and enter the work order ID (if
any).
5. Tap on the trailer ID to select the trailer to be inspected. You can scroll through the list or enter the first few
characters of the ID to narrow the list to IDs that start with those characters. Alternately, if your trailers have
ID barcodes, press “Scan” and read the barcode with the tablet. Notes on barcode scanning:
5.1 Ensure adequate lighting when scanning
5.2 The barcode should be roughly centered and fill at least half of the narrowest dimension of the screen
5.3 If the image is not crisp and clear, retake the picture
5.4 Ensure the barcode label is clean and legible
5.5 Ensure the camera focuses on the label if there are nearer or farther items in the frame
5.6 Supported types are Code 39, Code 128, UPC A, and UPC E (contact Lite-Check if you have other
requirements and we may be able to accommodate them.
6. If this is a new trailer that has not been added to the cloud yet and you are authorized to add trailers form the
tablet, press the “New Trailer” button and enter the trailer configuration information. Pay special attention
that the brake type, tire type, and ABS check-box are correct.
7. Select the type of inspection you wish to perform from the drop-down list. Note that the available
inspections will vary based on the unit type of the trailer you selected.
8. Press “Save” to begin the inspection.
9. Most inspections begin at the front of the trailer. Visually inspect the 7-way connector and the gladhands
before making those connections to the Trailer Interface. Then complete the remaining inspection items on
the front.