35
EN
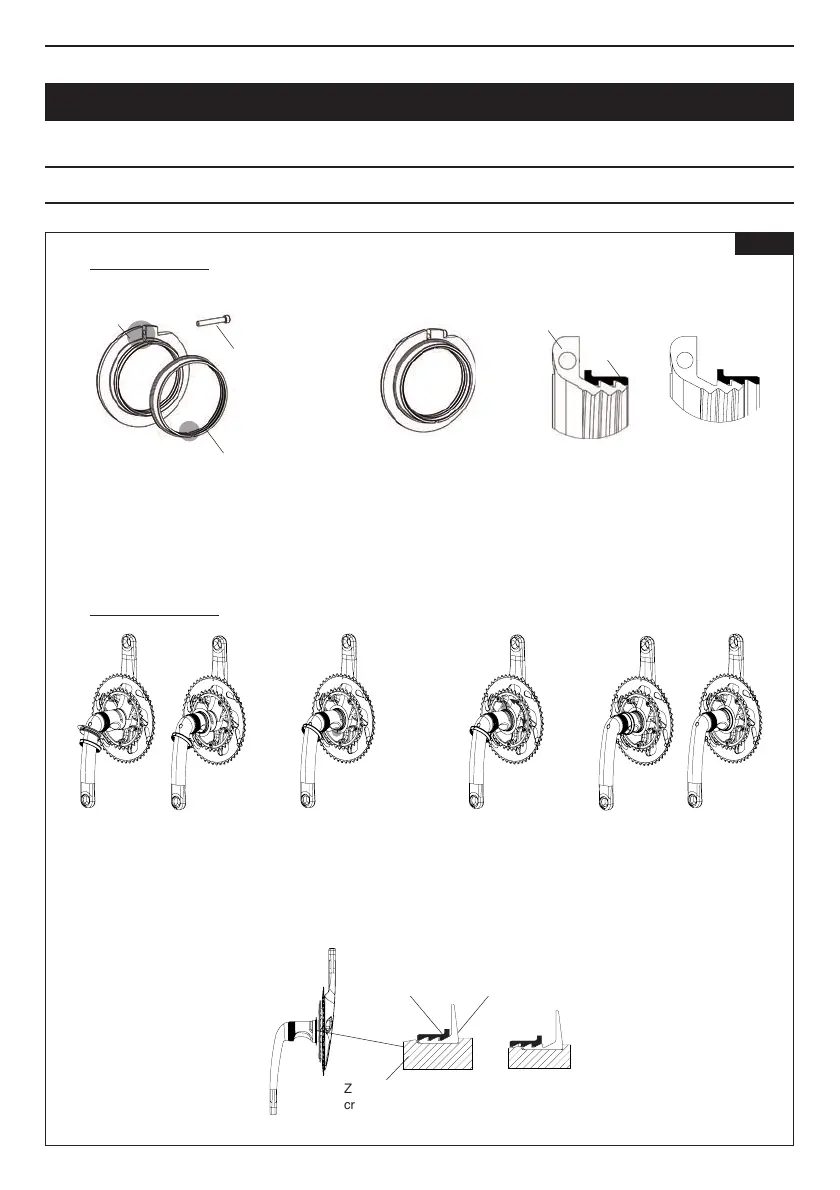
Nut
Expandingring
Expanding
ring
OK
OK NOK
NOK
Nut
Expandingring
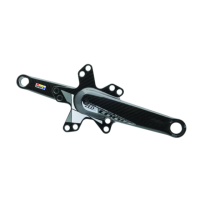
ZED 3
crankset
Rightring
Assemble the expanding ring
with the nut, ensuring that the
ring is correctly tted in its
housing.
Pass the right ring over
therightbearing seat in
the crankset, ensuring
thattheslitintheringis
inthelowerposition.
Lubricate the contact surfaces
between the nut and expanding
ring.Positiontheslitintheexpan-
ding ring opposite the slit in the
nut.
Preparing the left nut
Preparing the crankset
Lubricate:
•Therightring
•Theexpandingring
• The carbon bearing
seat(ontheright)
Do not lubricate the
threads (on the carbon
ortherightring).
Fittherightringandthe
expandingringtotheleft
crank.
Check that the ring is correctly
ttedintherightdirectionwithits
angeagainstthenut.
Turntheringtotheright
untiltheslitisintheup-
perposition.
Assembletheexpanding
ring over the right ring,
ensuring that the latter
is tted in the correct
direction.
Attention:
theslitinthe
expanding ring must be
opposite the slit in the
rightring.
ScrewM3x20
Torque1Nm
Addsomethread
locktypeLoctite
243
PREPARING THE CRANKSET
[ A ]
[ A ] [ B ] [ C ] [ D ] [ E ] [ F ]
[ B ] [ C ]
Fig 9
A
A
B
COUPE A-A
ECHELLE 1 : 1
DÉTAIL B
ECHELLE 5 : 1
E
E
F
COUPE E-E
ECHELLE 1 : 1
DÉTAIL F
ECHELLE 5 : 1
C
C
D
COUPE C-C
ECHELLE 1 : 2
DÉTAIL D
ECHELLE 5 : 1
G
G
H
COUPE G-G
ECHELLE 1 : 2
DÉTAIL H
ECHELLE 5 : 1
C
C
D
COUPE C-C
ECHELLE 1 : 2
DÉTAIL D
ECHELLE 5 : 1
G
G
H
COUPE G-G
ECHELLE 1 : 2
DÉTAIL H
ECHELLE 5 : 1
C
C
D
COUPE C-C
ECHELLE 1 : 2
DÉTAIL D
ECHELLE 5 : 1
G
G
H
COUPE G-G
ECHELLE 1 : 2
DÉTAIL H
ECHELLE 5 : 1