MVR Lite-UG01-EN-200324-OB
<12>
MVR Lite User Guide - English
Connecting the MVR Lite
The MVR Lite connects to one or two video sources (for example, an endoscopic camera, surgical camera, ultrasound, etc.).
1. If you are adding the MVR Lite to imaging equipment that you are already using, begin by
locating the video output of the primary video source.
2. Connect the appropriate cable between the video output on the video source and the
appropriate video input
on the back panel of the MVR Lite.
3. Plug in the power cord.
4. You can also connect standard footswitches or camera triggers to the back panel. A
footswitch or trigger can be used to capture photos. Connect the footswitch or trigger
to the “Remote” connector. By tapping the footswitch or trigger, it will perform the same
function as pushing the Capture Photo button on the front panel.
Please note: To operate two remote cables from your image source (Capture Photo + Record Video)
an adapter is necessary for the MVR Lite remote connector.
Footswitches are available as an option at medicapture.com.
Note that for a camera trigger to be compatible with the MVR Lite, it must be of the simple
“closed-contact” type, not a “programmable” type of trigger.
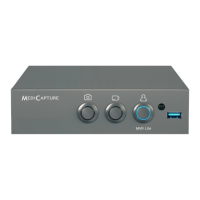
Inserting a USB Flash Drive
The easiest way to get started is to record to the supplied USB ash drive.
1
Insert the ash drive in the front USB port.
MediCapture brand ash drives are recommended.
1
MediCapture brand ash drives come in a variety of models.
USB Drive Connector
Connect a USB drive here Images
and videos are captured to the drive.