25
!
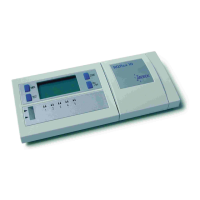
Customizing parameters
Dispensing parameters (from preset or scanned data
matrix) can be modied anytime that the instrument is
not dispensing.
To modify the volume, temperature or concentration,
the user can select the parameter to be modied by
pressing either [ml], [°C] or [X:1].
The corresponding LED will be blinking in green to
indicate editing mode.
On the display, the highlighted digit of the current
parameter value can be adjusted using the [+] or [–]
buttons.
Use the [DECIMAL] button to move to another digit
(from right to left).
Conrm the parameter value by pressing the
respective [ml], [°C] or [X:1] button once more. The
corresponding LED will go back to solid green upon
exiting the editing mode.
The system is ready to dispense media or water.
To indicate that the modied parameters
no longer correspond to a preset or scanned
program, the “Preset” or “Scan” LED is
turned OFF.
Storing a customized program
Any customized program or scanned data matrix can
be stored as a new preset. The maximum number of
presets that can be stored is 4.
Enter the storage mode by pressing the [PROG] button
for at least 3 seconds. The “Prog” LED will ash orange,
and the preset slot can be selected using [+] and [–]
buttons to scroll from P1 to P4.
Press [PROG] once more to store the current
parameters into the selected preset.
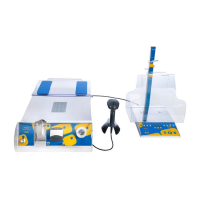
Dispensing media
Position a container or the test bag in the holder on the
dispensing unit. The test bag can be maintained by 2
sticky tack dots (not provided) positioned at the top of
each internal face of the holder.
Before dispensing media:
– Ensure sucient water supply.
– Remove the orange cap on the dispensing
outlet if needed.
– Verify the absence of air bubbles in the
dispensing tubing. If bubbles remain,
dispense a volume of pure water to ush the
tubing.
– Check that the lter is properly primed.
– Agitate the stock media bag to homogenize
after long storage.
!