3: Operating Procedures
Portaflow 220 User Manual 15
(Issue 1.0)
Note: Do not press ENTER until the transducers are fitted and connected to the instrument.
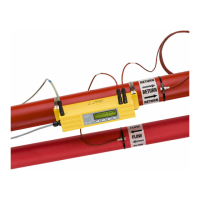
Attaching and connecting the transducers
16. Fit the sensors to the pipe using the appropriate guide rails as described in Paragraph 2.2
. Take great
care to set the separation distance as accurately as possible.
17. Connect the red and blue coaxial cables between the sensors and the test instrument, ensuring that the
red connector on the instrument is connected to the ‘upstream’ sensor.
Taking a flow reading
10. Select the fluid type from the list provided
and press ENTER.
If the liquid is not listed select Other and
enter a propagation rate in metres/second.
FLUID TYPE DD-MM-YY HH:MM:SS
Select fluid type
Water
Glycol/water 50%
Glycol/water 30%
Lubricating oil
Diesel
Freon
Other (m/s)
11. If you need to alter the fluid temperature
from that shown select either °C or °F with
the cursor and press the ENTER key.
12. Enter the new temperature value and press
the ENTER key.
13. The new temperature should now be
indicated in both °C and °F.
14. Select Continue.. and press ENTER.
FLUID TEMPERATURE
DD-MM-YY HH:MM:SS
Enter Fluid Temperature
°C: 5.00
°F: 41.00
Continue..
15. The SENSOR SEPARATION screen now
displays a summary of the entered
parameters and informs you of the mode of
operation and the distance to set up
between the sensors. It also shows the type
of sensors in use – i.e. A-ST in the case of
PF220A and B-ST for PF220B.
In this example it shows the sensors
operating in the ‘Reflex’ mode spaced at
32.2mm apart.
Take a note of these details.
SENSOR SEPARATION DD-MM-YY HH:MM:SS
Site : Quickstart
Pipe : 58.00 mm
Wall : 4.00
Sensors : A-ST Reflex
Temperature : 10.00°C 50.00°F
Set sensor separation to 32.2 mm
Press
to continue,UV to select sens.
18. Once the transducers have been fitted and
connected press the Enter key.
19. This will take you from the SENSOR
SEPARATION screen to the FLOW READING
screen via a signal-checking screen (shown
here).
Please wait..
Checking signals
****************************************
* *
****************************************