ii-
QUICK-START LINKING GUIDE
NOTICE:
Before completing installation, verify that each cabinet has
a separate and
unique
ID. Otherwise the link won’t function. For further information, see
Linked Play
Adjustments Menu
in Chapter Three of the operation manual.
NOTICE:
To link
three or four cabinets, you must use an Ethernet hub.
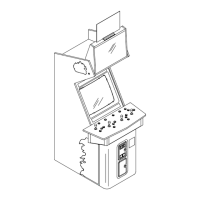
SET UP THE LINKS
[ ] 1. Switch off power to all cabinets. Remove cabinet access doors and linking cables. Check cabinet
linking cables. One end of each linking cable must attach to the Arcade Computer’s network
interface jack.
[ ] 2.
To link two cabinets:
If you’re only linking two cabinets, use one coupler. You don’t need a hub.
(You’ll find a coupler in a Manila envelope, inside the cashbox.)
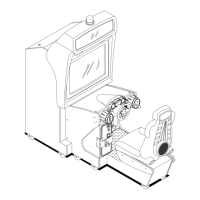
[ ] 3.
To link three or more cabinets:
You need to add a hub to your network. Place the hub near the
rear of the cabinets. Connect all linking cables. When you use a hub,
don’t
use any couplers.
[ ] 4. Turn on cabinet power.
ADJUST GAME OPTIONS
CAUTION:
Don’t connect or disconnect cables to the game electronics or hub with the
power on. Otherwise, you may damage the electronics and void your warranty.
[ ] 1. Find the diagnostic switches behind each cabinet’s coin door. Press and hold each cabinet’s
TEST MODE button to enter the Menu System.
[ ] 2. From each cabinet’s Operator Menu, select the Adjustments Menu.
[ ] 3. From each cabinet’s Adjustments Menu, select the Linked Play Adjustments Menu.
[ ] 4.
LINKED PLAY.
At each cabinet, set the LINKED PLAY option to YES.
[ ] 5.
UNIT ID.
Each cabinet must have a unique unit ID. Set the option UNIT ID to a separate number
for each cabinet.
[ ] 6.
EXIT
the menu system. If you changed any unit IDs, turn off all machines.
[ ] 7.
RESTART ALL CABINETS.
After the machines reinitialize, they’ll operate in Linked Mode.
[ ] 8.
TEST THE SYSTEM.
Test the network by playing a Linked Mode game on all linked machines.