OM-260430 Page 31
D. Configuring A WiFi Connection Using A Static IP Address Per An Embedded Server Page
F
To set up a WiFi connection with a static IP address, the unit must first be connected to a wired Ethernet connection. Before proceeding
with installation, confirm that your wired Ethernet line has open access to the Internet by plugging your PC into the network jack using a
CAT5 patch cord and browsing to collector.millerwelds.com. If successful, continue the process below. If not, contact your company’s IT
support staff.
OM-286673 Page 27
E. Configuring A Wired Ethernet Connection Using A Static IP Address Per An Embedded Server Page
. Before proceeding with installation, confirm that your wired Ethernet line has open access to the Internet by plugging your laptop into the network
jack using a CAT5 patch cord and browsing to a known external website. If successful, continue the process below. If not, contact your company’s
IT support staff.
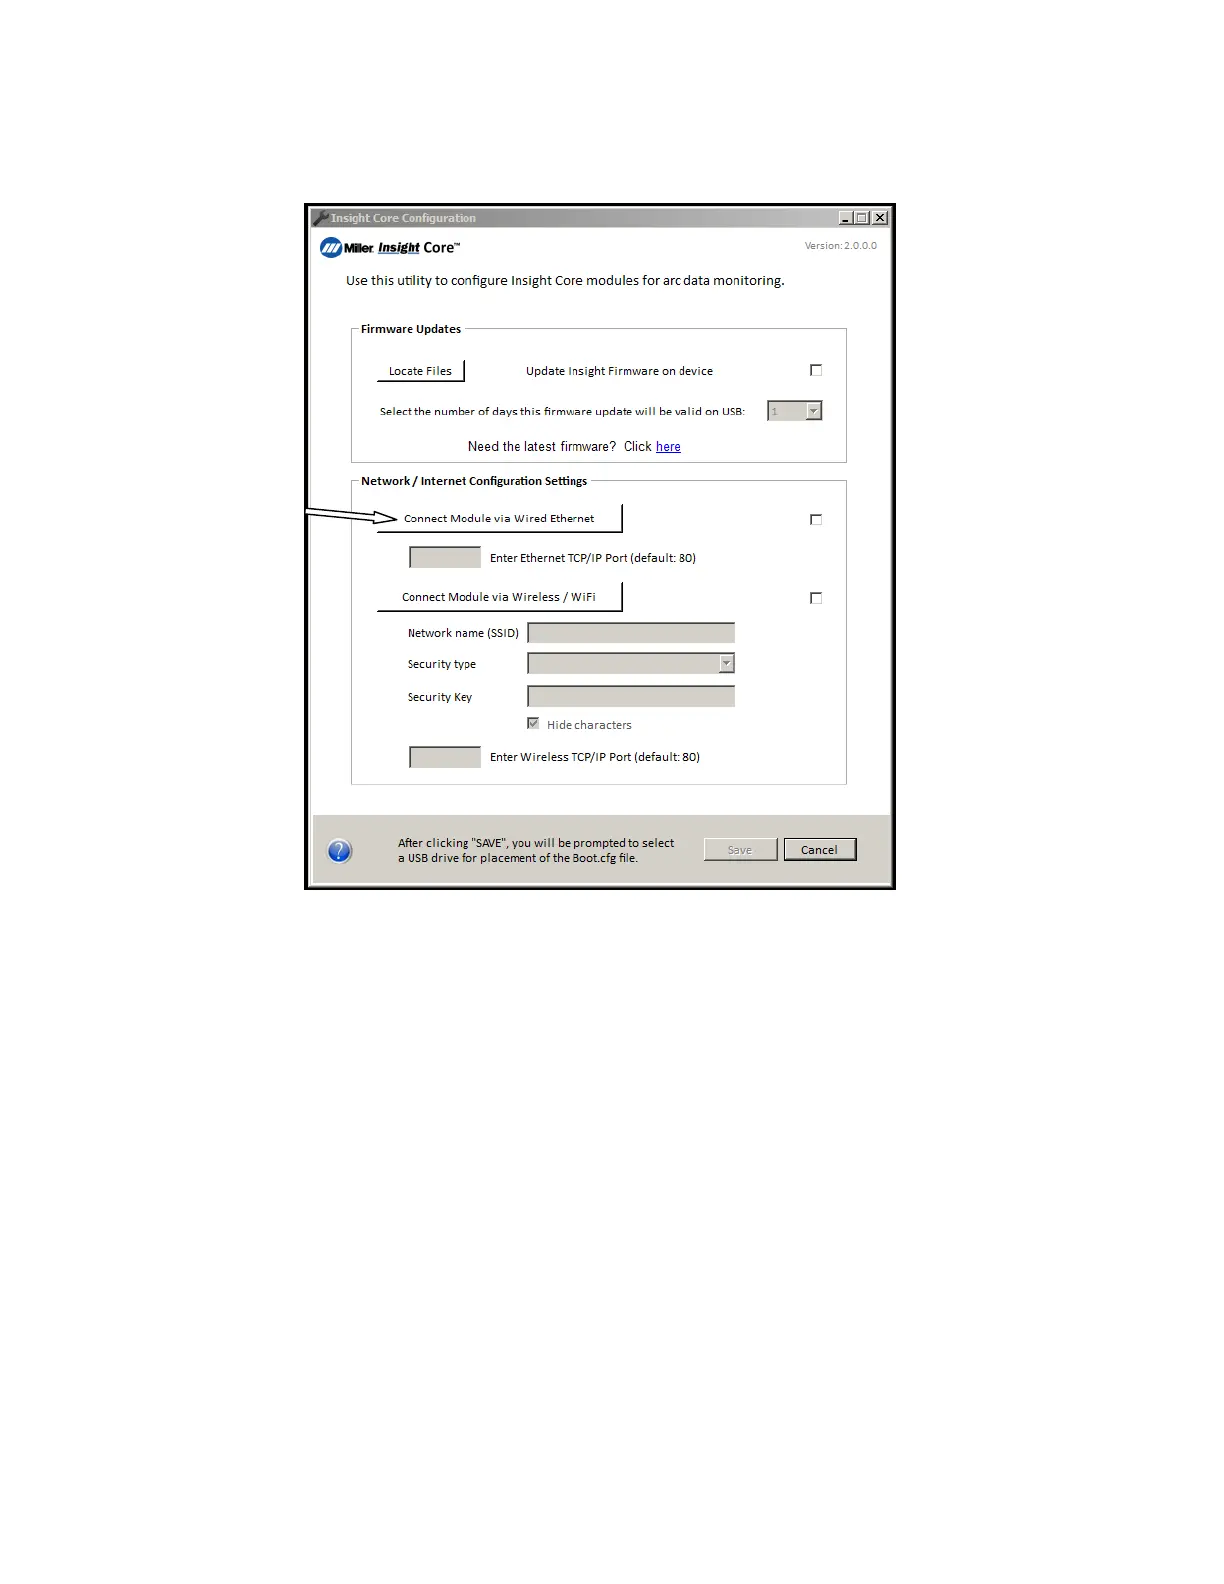
1. Click on Connect Module via Wired Ethernet.
Figure 4-23. Selecting Wired Ethernet Configuration Settings
2. Connect your PC directly to the Insight device network port (RJ45 jack) with an Ethernet cable (common CAT5 or CAT6).
3. Turn on welding power source.
4. Change your PC network adapter settings in order to interface with the Insight server page.
a. For Windows computers, go to Control Panel / Hardware & Sound / Network & Internet / Network & Sharing Center / Change Adapter
Settings. These settings will vary by computer.
b. Right click on your Local Area Connection, choose Properties.
c. Click on Internet Protocol Version 4 (TCP/IPv4), and click the Properties button.
d. Make note of your current network settings before proceeding.
e. Select the “Use The Following IP Address” radio button.
f. Set a static IP address to 169.254.0.1 or alternative (the last digit can be anything except 2).
g. Set the Subnet Mask to 255.255.255.0
h. Click OK when finished and close all network settings windows.
. The wireless feature on the PC may need to be turned off in order to connect to the Insight Module via Ethernet cable.
. All of these network adapter changes need to be reversed when you are finished with installations in order to reconnect to your corporate network.
5. Close all open network setting dialog boxes and browsers. Open another browser window on your desktop. Wait approximately 30 seconds and
browse to the server page at 169.254.0.2 by typing this IP address directly into the browser’s URL text box (in place of a website name).
. If the Static Assigned IP address cannot be accessed, turn the power source off, insert the USB stick and power the unit on. This will write a text
file to the USB stick labeled IP_MAC_LIC_ADDR.txt. Open this file using Notepad to verify the Static Assigned IP address that you are attempting
to browse to is the same IP address of the Insight device as listed in the IP_MAC_LIC_ADDR.txt file.
Figure 4-22. Selecting Network Configuration To Edit
1. Click Connect Module Via Wired Ethernet.
2. Connect your PC directly to the Insight device network port (RJ45 jack) with an Ethernet cable (common CAT5 or CAT6).
3. Turn on welding power source.
4. Change your PC network adapter settings to interface with the Insight server page.
a. For Windows computers, go to Control Panel / Hardware & Sound / Network & Internet / Network & Sharing Center / Change Adapter Set-
tings. These settings will vary by computer.
b. Right click your Local Area Connection and choose Properties.
c. Click Internet Protocol Version 4 (TCP/IPv4), and click Properties.
d. Note your current network settings before proceeding.
e. Select Use The Following IP Address.
f. Set a static IP address to 169.254.0.1 or alternative (the last digit can be anything except 2).
g. Set the Subnet Mask to 255.255.255.0
h. Click OK when finished and close all network settings windows.
F
All these network adapter changes need to be reversed when you are finished with installations to reconnect to your corporate network.
5. Close all open network setting dialog boxes and browsers. Open another browser window on your desktop and wait approximately 30 sec-
onds. Then, if firmware version being used is 1.19.10 or later, type the IP address 169.254.0.2 directly into the browser’s URL text box (in
place of a website name). If firmware version is prior to 1.19.10, use the IP address 169.254.0.2/wifi.shtm.
F
If the Static Assigned IP address cannot be accessed, turn the power source off, insert the USB stick, and power the unit on. This will write
a text file to the USB stick labeled IP_MAC_LIC_ADDR.txt. Open this file using Notepad and browse to verify the Static Assigned IP ad-
dress that you are attempting to browse to is the same IP address of the Insight device as listed in the IP_MAC_LIC_ADDR.txt file.
6. On the server page, select wireless WiFi and enter the desired parameters based on your company’s network environment as defined on
the Insight Network Connectivity Requirements Checklist responses (see Figure 4-23).
F
This server page IP address (169.254.0.2) is the factory default for the Insight module. If you plan to set the Insight device connectivity to
 Loading...