ROTARY MOWER
Fig. 13 Fig. 14
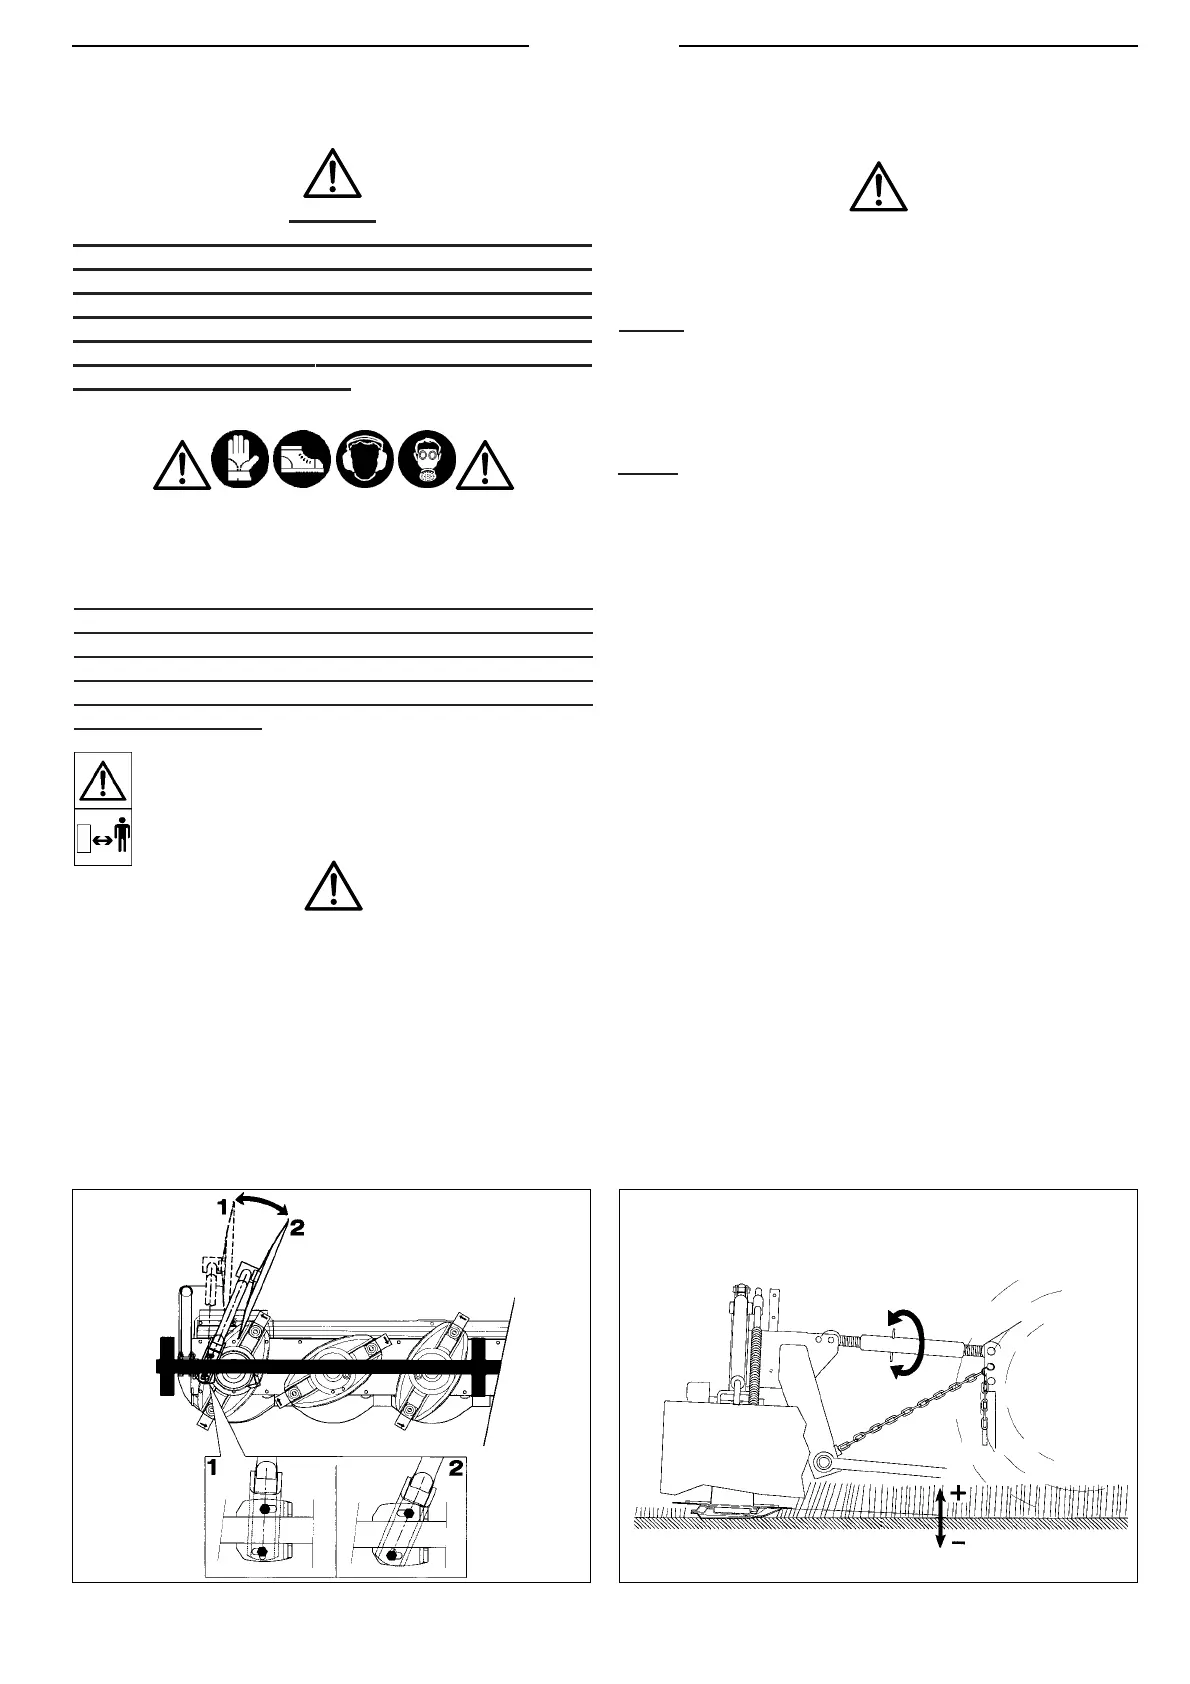
The cutting height can be regulated by means of the
tractors third-point idler (fig.14).
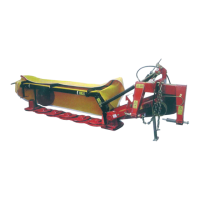
Adjust the outer shroud depending on the windrow (fig.13).
Proceed in the following way to mow with the bar tilted
downwards (max. 40°) (fig.12):
- for 4 and 5 discs, slacken off rod P of spring 2 until the
mowing bar slants to the required extent.
- for 6 and 7 discs, move pin H on rod P from position 1 to
position 2 and then adjust the tension of spring 2.
- Adjust the length of the cylinder by moving its fastener G
along the extension, passing from position A to position B.
If you must work with the bar slanted (banks, ditches) for
long periods of time, it is advisable to set it to the horizontal
position after every half hours work and to keep it there for
a few minutes.
By and large, the quality of the work and the power required
depend on:
- the type of product;
- the type of knives used;
- the cutting height;
- the ground speed of the tractor.
SECTION 4
Operation
DANGER
THE OPERATOR MUST BE SEATED IN THE DRIVING
SEAT OF THE TRACTOR WHEN THE MACHINE IS
WORKING SINCE ONLY FROM THAT POSITION IS HE
ABLE TO ACT CORRECTLY. BEFORE HE LEAVES THE
DRIVING SEAT, THE OPERATOR MUST STOP THE
MACHINE, APPLY THE PARKING BRAKE AND TURN
OFF THE TRACTOR ENGINE.
Always use the appropriate Personal Protective
Equipment (safety footwear, gloves, ear protection and
dust mask).
Before using the machine, make sure that all the safety
devices are in their correct positions and in a good condition.
The protections must be immediately replaced if they are
faulty or damaged. In particular, the protective cover must
be checked regularly. It must be immediately replaced if it is
damaged in any way.
WARNING
Make sure that there are no bystanders or
animals within 50 meters of the machine before
starting it up.
CAUTION
Before use, check the level of the oil in the transmission
unit and top it up if necessary (see chapter 5.4).
Before beginning work, the machine must be adjusted in
order to obtain an optimum position on the job (SECTION 3
Installation and operation).
Make sure that the knives are in a good condition.
4.1 WORK POSITION
Proceed in the following way to switch to the work position
(fig. 6) (from the transport position fig.10):
WARNING
Make sure that there are no bystanders within the range
of action of the bar.
Fig.10:
- Detach pin N of safety chain S from the disc bar;
- From the tractor, release the safety clip A (with the relative
rope), and lower the disc bar (with the hydraulic position) to
the horizontal position.
38
Fig. 13
SECTION 4
Operation
DANGER
THE OPERATOR MUST BE SEATED IN THE DRIVING
SEAT OF THE TRACTOR WHEN THE MACHINE IS
WORKING SINCE ONLY FROM THAT POSITION IS HE
ABLE TO ACT CORRECTLY. BEFORE HE LEAVES THE
DRIVING SEAT, THE OPERATOR MUST STOP THE
MACHINE, APPLY THE PARKING BRAKE AND TURN
OFF THE TRACTOR ENGINE.
Always use the appropriate Personal Protective
Equipment (safety footwear, gloves, ear protection and
dust mask).
Before using the machine, make sure that all the safety
devices are in their correct positions and in a good condition.
The protections must be immediately replaced if they are
faulty or damaged. In particular, the protective cover must
be checked regularly. It must be immediately replaced if it is
damaged in any way.
WARNING
Make sure that there are no bystanders or
animals within 50 meters of the machine before
starting it up.
CAUTION
Before use, check the level of the oil in the transmission
unit and top it up if necessary (see chapter 5.4).
Before beginning work, the machine must be adjusted in
order to obtain an optimum position on the job (SECTION 3
Installation and operation).
Make sure that the knives are in a good condition.
Fig. 14
4.1 WORK POSITION
Proceed in the following way to switch to the work position
(fig. 6) (from the transport position fig.10):
WARNING
Make sure that there are no bystanders within the range
of action of the bar.
Fig.10:
- Detach pin N of safety chain S from the disc bar;
- From the tractor, release the safety clip A (with the relative
rope), and lower the disc bar (with the hydraulic position) to
the horizontal position.
Fig. 6:
- Remove pin K.
- Lower the machine using the tractors power lift until an
adequate work position has been reached (450 mm / 17.7
inches).
- Fix the adjuster chain alongside the tractors third point
using clip G positioned at an appropriate distance on the
chain.
- Fold the front part of the protective cover downwards,
turning front holder Z (fig.10) after having disengaged the
safety side lock (25 fig. 1).
- Make sure that the driveline is engaged and the shield
fixed with the chains.
 Loading...