User Guide - v11 21
4 INSTALLATION
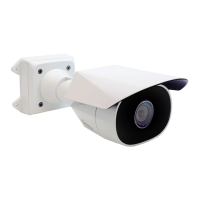
This section details how to install the HD Interceptor Camera.
Installation using the hinged mount
When handling the camera with its cable fitted, support the camera body. Do not hold the
camera by the cable.
1. Remove the three locking bolts and open the hinged mount.
Ensure the safety cable is attached to the camera and hinged mount.
2. Run the cable through an M20 gland into the camera using the side or bottom entry
hole.
The gland must be sealed. If the cable is brought in using the bottom entry hole and
there is a weather proof environment below the mounting surface, then the gland is not
required.
Use CAT5 cable for the Ethernet and a 2-core 14 AWG to 18 AWG cable for the power
(if applicable).
The maximum cable length for the CAT5 cable is 100m.
The maximum cable length for the camera power (if applicable) depends on the gauge.
• 14 AWG - 85m for IR250W, 85m for IR275, 25m for IR550S
• 16 AWG - 54m for IR250W, 54m for IR275, 15m for IR550S
• 18 AWG - 35m for IR250W, 35m for IR275, 10m for IR550S
3. Connect the RJ45 connector to the camera (CON 3/4).
4. Connect the power supply (CON 5) if required.
5. Close the hinge and secure the locking bolts.
6. Tighten the gland to ensure a water-tight seal around the cable.
 Loading...