EasyManua.ls Logo

Nabco GT1175 - User Manual

Default Icon
62 pages
Print Icon
To Next Page IconTo Next Page
Loading...
1 of 62
Model GT1175 Standard and Pocketed Slide Doors Installaon Manual
**with Opus Controller**
P/N C-00370 Rev 11-12-20
NABCO Entrances Inc. S82 W18717 Gemini Drive Muskego, Wisconsin 53150
Phone: (877) 622-2694 Fax: (888) 679-3319 www.nabcoentrances.com
NABCO hours of Operaon: Monday to Friday 8:00 a.m.- 4:30 p.m. (Central Time)
Associated Manuals Part Numbers:  OPUS Wiring and Programming Manual P/N C-00139
Automatic Sliding Door Owners Manual (P/N C-00109) for Decal Installation
NABCO Price Book P/N 16-9244-30 (for Sensors, Switches, and Accessories)
Turn OFF all power to the Automatic Door if a Safety System is not working.
Instruct the Owner to keep all power turned OFF until corrective action can be achieved
by a NABCO trained technician. Failure to follow these practices may result in serious
consequences.
NEVER leave a Door operating without all Safety detection systems operational.
WARNING
Table of Contents
 4
 4
 5
SECTION 3.1: To the Installer .......................................................................5
SECTION 3.2: Objecve ...........................................................................5
 5
SECTION 4.1: Request a User Name/Password to gain access into the “myNABCO” portal . . . . . . . . . . . . . . . . . . . . 5
SECTION 4.2: Associated Video QR Code Link .........................................................5
SECTION 4.3: Types of Units .......................................................................5
SECTION 4.4: Feature Comparison between Controls ...................................................6
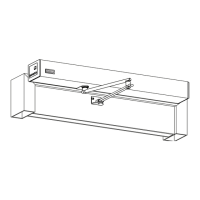
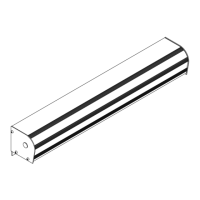
SECTION 4.5: Header Components ..................................................................6
 6
 7
  8
SECTION 7.1: Secure Transom Vercals to Header .....................................................8
SECTION 7.2: Install the Glass Stops .................................................................9
SECTION 7.3: Secure Header and Transom to Pocketed Jamb Tubes ......................................11
SECTION 7.4: Assemble the Door Frame ............................................................11
SECTION 7.5: Install the Tie Rods ..................................................................12
 
SECTION 8.1: Anchor Placements ..................................................................13
SECTION 8.2: Complete the Tie Rod Installaon (For Transom Units only) .................................14

Table of Contents

Other manuals for Nabco GT1175

Questions and Answers

  • J
    John BellAug 18, 2025
    What to do if Nabco GT1175 Door Opening System control does not react to activation signal?
    • D
      David CarterAug 18, 2025
      If the Nabco Door Opening System control does not react to the activation signal, start by confirming that “IN” or “EXT” highlights on the main screen when the signal is applied. If not, inspect the wiring and the activation device. Also, determine if “BA” is highlighted. If using a 4-wire on/off/hold-open switch with a blue wire connected to terminal 8, ensure “Input BA Circuit” is set to “Normally Closed” under “Input Settings”. For a 3-wire switch or no switch, it should be set to “Normally Open”. If the status shows “Stopped” while the door is closed and BA is not highlighted, turn off the power for at least 4 seconds, then turn it back on. The status should then display “Fully Closed”. Finally, ensure you are on the main screen for the activation signal to function.
  • W
    William ChapmanAug 21, 2025
    How to fix Drive-Motor error on Nabco GT1175?
    • S
      Seth BerryAug 21, 2025
      If you encounter a Drive-Motor error with your Nabco Door Opening System, begin by checking all connections between the control and the motor. Then, check the motor fuse to ensure it is in working condition.
  • R
    Rickey ButlerAug 23, 2025
    What causes Electrical lock error in Nabco GT1175?
    • J
      Jacob PerezAug 23, 2025
      If you are experiencing an Electrical lock error with your Nabco Door Opening System, check the lock settings and wiring. Also, make sure the lock delay is sufficient and not set to (After Lock Input). Finally, verify that no programmable inputs are set to “Unlock Input” if there is no lock feedback.
  • J
    Joy HartAug 26, 2025
    Why is it hard to manually open Nabco GT1175 Door Opening System?
    • L
      Lacey MayAug 26, 2025
      If you find it hard to manually open the Nabco Door Opening System, and your software revision is up to and including 18, re-enter “0” for “hold closed force” under “optional settings”. Even if the software indicates it's already set to “0”, manually re-entering it can resolve the issue.
  • B
    bpowellAug 27, 2025
    Why closing functions do not work when opened manually in Nabco GT1175 Door Opening System?
    • S
      sflowersAug 28, 2025
      If your Nabco Door Opening System's closing functions do not work after manually opening the door, and your software revision is up to 17, change the “manual open function” setting to something other than “no action”. The “stop and close” option is often ideal.
  • L
    Leonard BlanchardAug 30, 2025
    What to do if Nabco Door Opening System door stays open after manually opening?
    • C
      Cindy CarrollAug 30, 2025
      If the Nabco Door Opening System door stays open after being manually opened, and your software revision is up to and including 18, ensure that “Manual Open Function” is not set to “No Action” while “Manual Open Sensitivity” is set to “0”. If “No Action” is desired, change “Manual Open Sensitivity” to any value other than “0”.
  • W
    william94Sep 1, 2025
    What does Drive-A/D error mean on Nabco GT1175?
    • W
      Wendy PriceSep 1, 2025
      If your Nabco Door Opening System displays a Drive-A/D error, inspect the motor for an open circuit, short circuit, or short to ground. Note that electrical noise can sometimes cause a false error. If the error doesn’t happen repeatedly, it’s likely not a significant issue.
  • G
    Glenn WhiteSep 3, 2025
    What to do for Encoder Error on Nabco GT1175 Door Opening System?
    • L
      Lauren JohnsonSep 3, 2025
      If your Nabco Door Opening System displays an Encoder Error, check all connections between the control and the motor. It is possible electrical noise may cause a false error. If the error does not occur repeatedly then it’s most likely not an issue.
  • A
    Andre JensenSep 6, 2025
    How to resolve Thermal-on warning on Nabco GT1175 Door Opening System?
    • T
      Tammy HaydenSep 6, 2025
      If your Nabco Door Opening System displays a Thermal-on warning, check all connections between the control and the motor. Also, cool down the motor and adjust the recycle sensitivity and Open/Close speed.
  • H
    holly49Sep 8, 2025
    How to troubleshoot Motor disconnection error in Nabco GT1175?
    • S
      Scott DavisSep 8, 2025
      If your Nabco Door Opening System shows a Motor disconnection error, check all connections between the control and the motor.

Summary

Chapter 1: Warning Labels

Chapter 2: General Safety Recommendations

Chapter 3: Scope

Section 3.1: To the Installer

Familiarizes the installer with proper installation and operation procedures.

Section 3.2: Objective

Details the GT1175 system's design, controlled by the Opus Control.

Chapter 4: Getting Started

Section 4.1: Request a User Name;Password to gain access into the myNABCO portal

Instructions for accessing the myNABCO portal for user credentials.

Section 4.2: Associated Video QR Code Link

Provides a QR code link for locating service parts on the NABCO website.

Section 4.3: Types of Units

Describes the two main mechanical configurations: Single Slide and Bi-Part.

Chapter 5: Before Assembling Door Frame

Section 5.1: Inspect the Rough Opening

Instructions for inspecting the rough opening size and levelness.

Chapter 6: Assemble Door Frame (No Transom)

Chapter 7: Assemble Door Frame With Transom

Section 7.1: Secure Transom Verticals to Header

Steps to attach transom clips and verticals to the header.

Chapter 8: Secure Door Frame to Building

Section 8.1: Anchor Placements

Guidelines for anchor placement in jambs, transom, and header.

Chapter 9: Wire the Switch Assembly (Rocker Switch or Key Switch)

Chapter 10: Install the Threshold

Section 10.1: Install the Surface Threshold

Instructions for installing the surface threshold.

Section 10.2: Install the Recessed Threshold

Instructions for installing the recessed threshold.

Chapter 11: Install the Interior Full Open Sidelite (Pocketed)

Section 11.1: Install the Bottom Pivot

Steps to install the bottom pivot for the sidelite.

Chapter 12: Install the Exterior Full Open Sidelite (Standard & Pocketed)

Section 12.1: Install the Bottom Pivot

Steps to install the bottom pivot for exterior sidelite.

Section 12.2: Partially Install the Limit Arm

Initial steps to install the limit arm.

Section 12.3: Install the Full Open Sidelite onto the Upper Pivot and Bottom Pivot

Mounting the sidelite onto the header and floor pivots.

Section 12.4: Complete Installation of the Limit Arm

Final steps for limit arm installation.

Section 12.5: Adjust the Ball Detents

How to adjust ball detents for breakout resistance.

Chapter 13: Install the Fixed Sidelite (Standard and Pocketed)

Section 13.1: Secure the Fixed Sidelite to the Door Frame

Steps to secure the fixed sidelite to the door frame using mounting brackets.

Section 13.3: Install the Floor Bracket

Mounting the floor bracket to the strike stile and floor.

Chapter 14: Install the Slide Door

Section 14.1: Secure Slide Door to Belt Clips

Attaching the slide door to the belt clips.

Section 14.2: Install Bottom Guide to Slide Door

Installing the bottom guide to the slide door.

Section 14.3: Adjust Rollers

Adjusting hanger and anti-rise rollers for proper door operation.

Section 14.4: Adjust the Interlocks

Adjusting interlocks for proper door closure.

Chapter 15: Permanently Install the Threshold

Section 15.1: Secure Threshold to Floor

Securing the threshold to the floor.

Chapter 16: 110 VAC General Wiring

Chapter 17: Install Weathering

Section 17.1: Door Panels

Securing brush holders to door panels for weathering.

Section 17.2: Door Frame

Applying caulking to the door frame and threshold.

Chapter 18: Glazing

Section 18.1: Door Panel

Instructions for installing glass panels into door frames.

Section 18.2: Complete the Transom Installation

Steps for completing transom glass installation.

Section 18.3: Complete the 1;4 Glass Stop Flush Glazing

How to complete flush glazing with glass stops.

Section 18.4: Dust Protector Hoods (Clean Room Optional)

Installation of dust protector hoods for clean room applications.

Section 18.5: Aluminum Hood

Installation instructions for aluminum hoods.

Section 18.6: Stainless Steel Hood (Header)

Installation instructions for stainless steel header hoods.

Chapter 19: Adjustments

Section 19.1: Adjust Horizontal Position of Carrier

Steps to adjust the carrier's horizontal position.

Section 19.2: Balance Weight of Door Panel with Nose Caster

How to balance door panel weight using nose casters.

Section 19.3: Adjust the Breakout Magnet

Adjusting the breakout magnet for proper function.

Section 19.4: Adjust Preload

Adjusting the preload for door sag.

Section 19.5: Adjust the Ball Plunger

Adjusting the ball plunger for breakout resistance.

Chapter 20: Slide Door Safety Check

Chapter 21: Pocketed Slide Door Configuration

Section 20.1: Full Open Pocketed Slide Door

Configuration steps for full open pocketed slide doors.

Section 20.2: Fixed Sidelite Pocketed Slide Door

Configuration steps for fixed sidelite pocketed slide doors.

Service Parts: Non-Handed Kit P;N A-00407

Service Parts: LH Kit P;N A-00403; RH Kit P;N A-00618

Service Parts: Non-Handed Kit; Full Open Standard

Service Parts: Header

Service Parts: Fixed Sidelite

Service Parts: Left Hand Fixed Sidelite

Service Parts: Right Hand Fixed Sidelite

Service Parts: Slide Door for Fixed Sidelite

Service Parts: Left Hand Slide Door Fixed Sidelite

Service Parts: Right Hand Slide Door Fixed Sidelite

Service Parts: Full Open Sidelite

Service Parts: Left Hand Sidelite Full Open

Service Parts: Right Hand Sidelite Full Open

Service Parts: Slide Door Full Open

Service Parts: Left Hand Slide Door Full Open

Service Parts: Right Hand Slide Door Full Open

Service Parts: Glass Stops and Transom Hardware

Nabco GT1175 Specifications

General IconGeneral
BrandNabco
ModelGT1175
CategoryDoor Opening System
LanguageEnglish

Related product manuals