69
English
15. OPERATION PROCEDURES
15 - 1
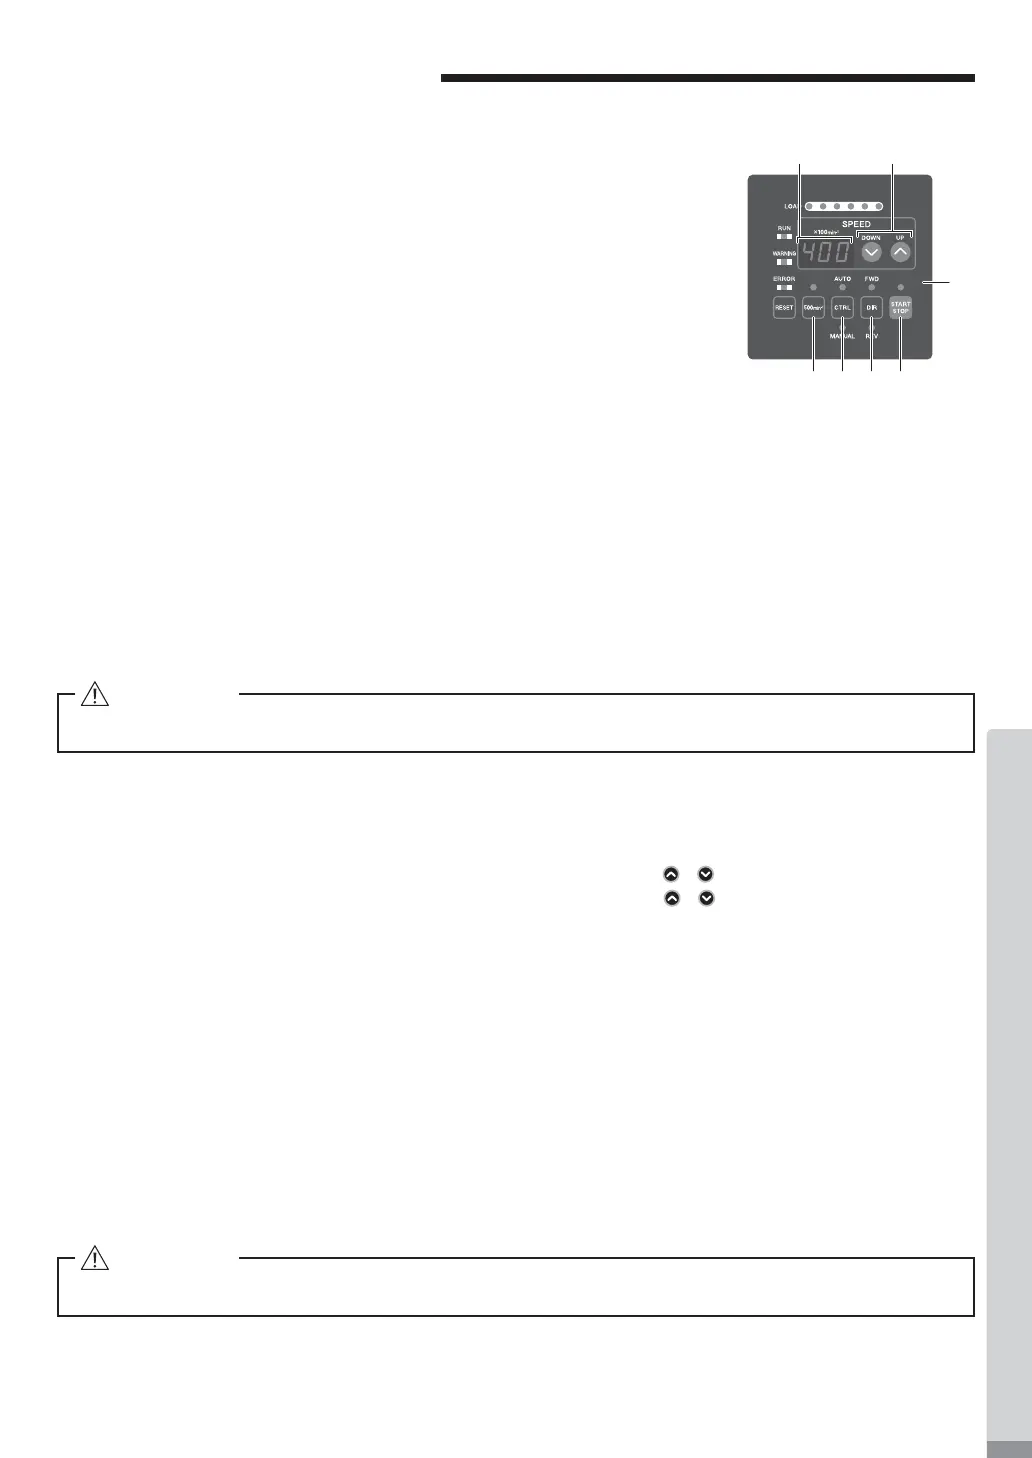
Selecting Control Mode (MANUAL / AUTO). (Select the control button (CTRL)
㉑
of the Fig. 24.)
(1)
Using the CONTROL (CTRL) Button you can select between Manual (Front
panel control) or Auto (External Signal Source) modes. External Signal
Source can be used to control Motor Start / Stop, Rotation Direction, Motor
Speed etc. from an external control source (CNC).
(2) When operating with the CONTROLLER Control Panel, push the Control
Button (CTRL) of Fig. 24 and select MANUAL. The Manual LED will
illuminate.
When operating from an External Signal Source, push the Control Button
(CTRL) of Fig .24 and select AUTO. The AUTO LED will illuminate.
MANUAL Mode : Controlled by Control Panel .
AUTO Mode : Controlled by Input / Output Connector A from an
External Signal Source
⑱
②
⑲㉒ ㉑ ⑳
⑯
Fig. 24
15 - 2
Setting Motor Start / Stop (START / STOP), Motor Rotating Direction (FWD / REV), Motor Speed (SPEED)
15 - 2 - 1 Manual Mode Operation
(1)
Set Motor Rotating Direction (Set the Rotation Direction Button (DIR) ⑳ of the Fig. 24.)
Push the Rotation Direction Button (DIR).
Select FWD. : Right hand rotation.
Select REV. : Left hand rotation.
With the cutting tool facing the operator right hand r
otation (FWD.) will be clockwise rotation.
(2) Set 500 min
-1
(rpm) Centering Rotation (Set the 500 min
-1
Button ㉒ of the Fig. 24.)
When carrying out centering, press the 500 min
-1
Button. The rotation speed is set to 500min
-1
(rpm).
(3) Motor Start / Stop (Motor Start / Stop by pushing the Start / Stop Button (START / STOP) ⑲ of the Fig. 24.)
The motor spindle will start and the LED will illuminate.
Pus
h Start / Stop Button (START / STOP) again and the motor will stop and the LED will go out.
(4)
Setting Motor Speed (Set the Motor Speed Adjustment Button (SPEED
, ) ⑱ of the Fig. 24.)
Set the speed by pushing the Motor Speed Adjustment Button (SPEED
, ).
Speed Range
Motor Spindle : Motor/Motor Spindle of 20,000min
-1
(rpm) speci¿cation : 1,000 - 20,000min
-1
Motor Spindle : Motor/Motor Spindle of 40,000min
-1
(rpm) speci¿cation : 1,000 - 40,000min
-1
The motor speed is displayed in 100 min
-1
(rpm) increments. 200 equals 20,000 min
-1
(rpm).
15 - 2 - 2 Auto Mode Operation
Use the External Input / Output Connector A to input control signals to the CONTROLLER.
(1) Set motor Rotating Direction
Input the " Rotating Direction Setting " to Pin No. 2 : DIR_IN
Right hand rotation is " OFF " (Open) (" FWD ", LED will illuminate).
Left hand rotation is " ON " (Closed) (" REV ", LED will illuminate).
With the cutting tool facing the operator right hand rotation (FWD.) will be clockwise rotation.
(2) Set 500 min
-1
(rpm) Centering Rotation
Input the " Rotates Motor at ' Centering speed ' to Pin No. 16 : 500 min
-1
(rpm)
. 500 min
-1
LED will illuminate.
When using the Centering Mode: " ON " (' Closed ')
CAUTION
Never attempt to cut while rotating in Centering Mode.
CAUTION
Never attempt to cut while rotating in Centering Mode.