12 Nektar Aura Owner‘s Manual www.nektartech.com
Programming the Pad Pressure Component
Use [R5 - Pressure] to select the assignment type for the pads pressure component. The table below lists the options and what parameters
[R6-8] can adjust for each type. Note that knowledge of which messages a receiving MIDI device can respond to is essential to get the right
result. Consult your receiving MIDI device’s user guide to obtain that information.
The ‘Min’ value represents the value sent when pressure on the pad is released. The ‘Max’ value is the value sent out when maximum
pressure is applied. The values sent will gradually increase towards the ‘Max’ value as more pressure is applied to the pad and decrease to
‘Min’ as the pressure is gradually reduced.
If the ‘Max’ value is set lower than ‘Min’, values decrease as more pressure is applied and increase as the pressure is reduced. This concept
works Particularly well with pitchbend - set MIN to value 64 (which means no pitchbend) and then set max to either 0 to decrease pitch
with pressure, or 127 to increase pitch with pressure.
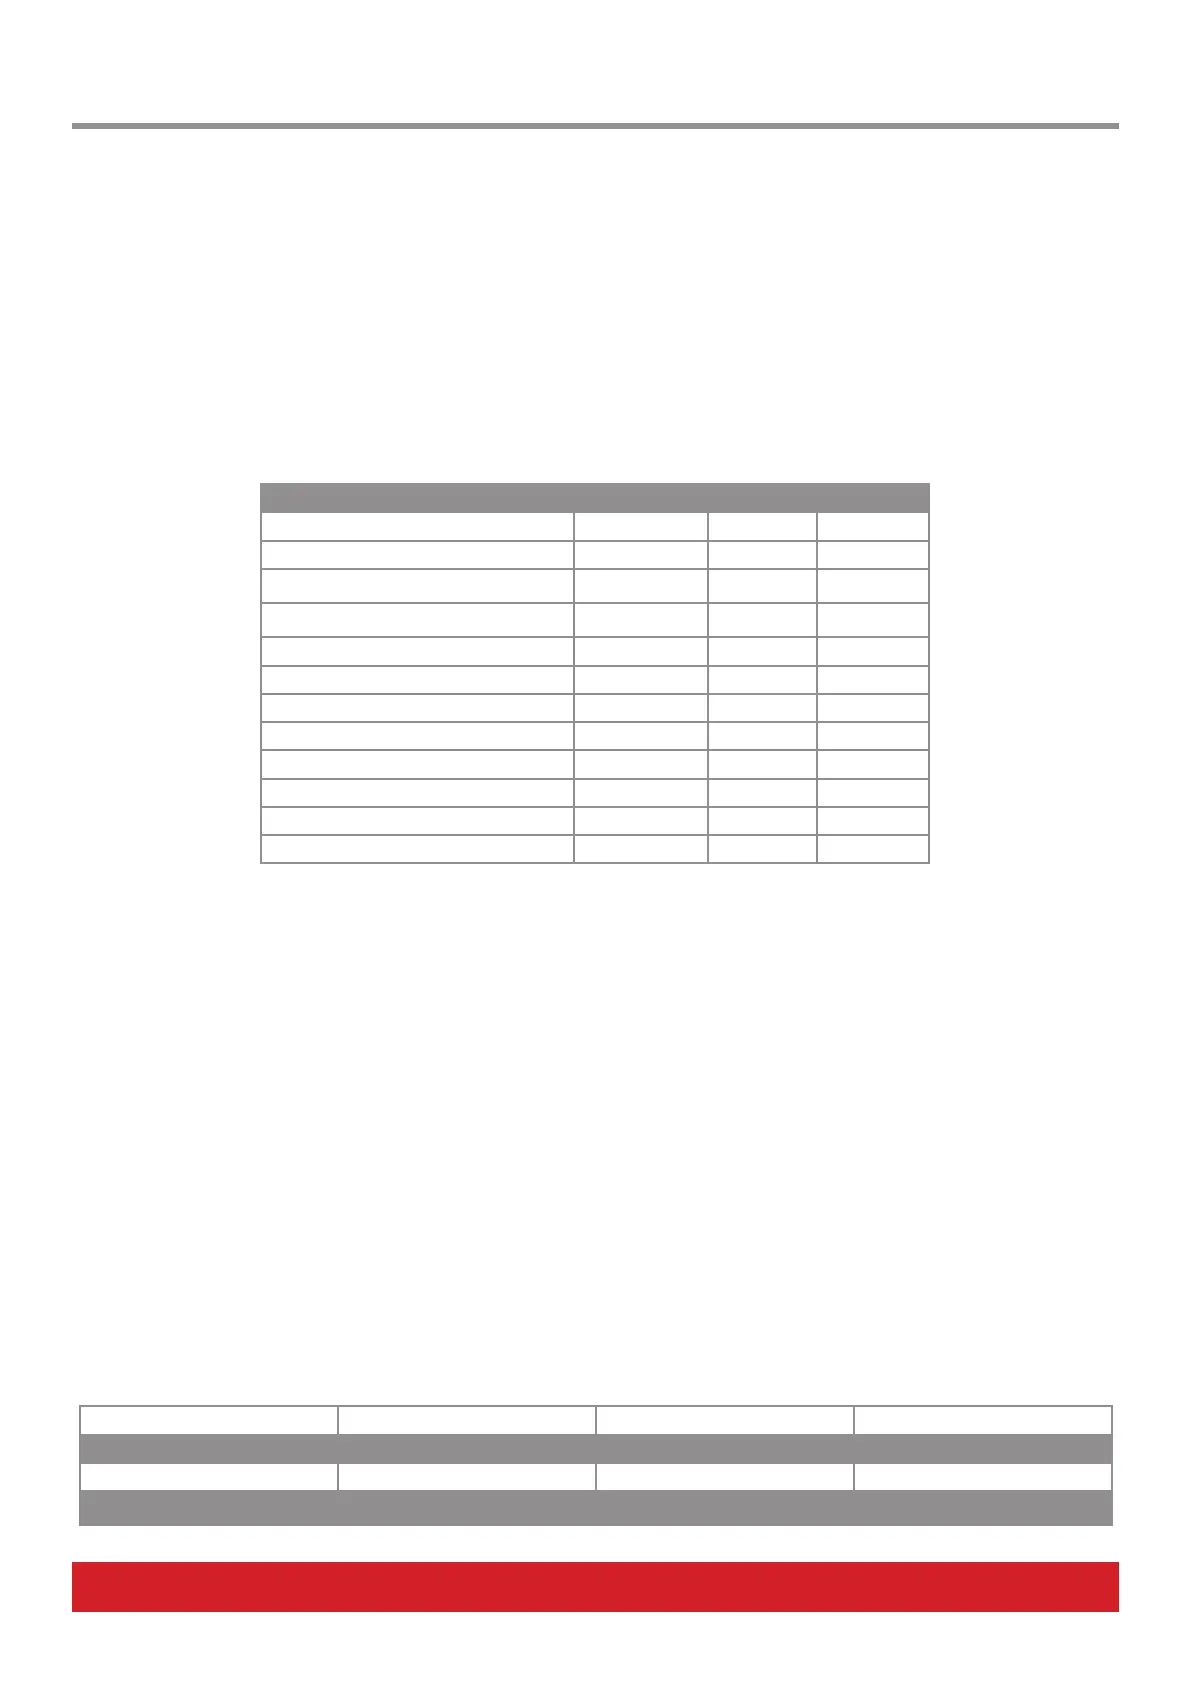
Type Options for Pad Pressure Data 1 Data 2 Data 3
MIDI CC MIDI CC (0-127) Max (0-127) Min (0-127)
Pitch Bend n/a Max (0-127) Min (0-127)
Poly AT (AfterTouch) n/a Max (0-127) Min (0-127)
Channel AT (AfterTouch) n/a Max (0-127) Min (0-127)
NRPNc (Coarse) Value (0-127) MSB (0-127) LSB (0-127)
NRPNf (Fine) Value (0-127) MSB (0-127) LSB (0-127)
ToggleC (NRPN Coarse Toggle) Value (0-127) MSB (0-127) LSB (0-127)
ToggleF (NRPN Fine Toggle) Value (0-127) MSB (0-127) LSB (0-127)
StepC (NRPN Coarse Step) Value (0-127) MSB (0-127) LSB (0-127)
StepF (NRPN Fine Step) Value (0-127) MSB (0-127) LSB (0-127)
Fixed Velocity n/a Max (0-127) Min (0-127)
O n/a n/a n/a
Pad LED Color & Sensitivity [Pad Config]
Press [Pad Config] to set the RGB color and strike sensitivity for the currently selected pad.
• Move [R1 - Color] to select any of the 16 pad colors. The pad LED updates in realtime as you turn the pot.
• Move [R4 - Pad Sensitivity] to adjust the pads strike sensitivity.
* 0 is the default factory setting.
* Negative values lower the pad’s sensitive threshold.
* Positive values raises the pad’s sensitive threshold.
If one pad is not as sensitive to play as other pads, try reducing the Pad Sensitivity value. Equally, if a pad is triggering too easily or even
constantly, try raising the Pad Sensitivity value.
Programming Switches 1-7 and Footswiches 1&2
Press [MIDI Assign] again to assign any of the switches 1-7 and/or Footswitch 1/2.
When a switch is selected, the MIDI Assign display looks like the table below:
Range: C-2 : G8 Global, 1:16 Decimal/Hex
Message Type Channel n/a Data Entry
See table1 See table1 See table1
n/a Data 1 Data 2 Data 3
MIDI Assign: Pad Pressure, LED Color and Sensitivity